

FenderMender
-
Posts
163 -
Joined
-
Last visited
Content Type
Profiles
Forums
Events
Gallery
Everything posted by FenderMender
-
Thanks for all the compliments.
-
From a 1960s-era partially built kit, this 1961 Corvair Monza survived with many custom parts still iintact on the sprue as well as loose. Even the instruction sheet made it, although the box didn't. The original velocity stacks didn't either, so they were made out of aluminum tubing. The six exhaust pipes were supposed to go on the car as extravagant lakes pipes, but that application would have looked so out of place and stupid on a rear engine car. The paint job was done long ago by the original donor and I decided to leave it as is; I did paint the interior and the chassis. Thanks for looking...
-
These three 1940 Fords all hail from the early 1960s. The black version is an unpainted glue bomb donation that I received back then, and it was improved some and left essentially as is. The green and yellow versions were built from 3in1 kits as mild customs, although no body work, to speak of, was done to them. Both were hand painted back then and have survived very well. Thanks for looking....
-
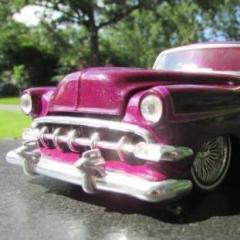
Here's a circa 1961 or so survivor Chevrolet Corvette called "Smasher" that was transposed into something from the past and the future. My Brother Ted and I had the idea of putting 1932 Ford front fenders and an accompanying almost Bugatti-style grille on a modern sports car; and that's before either of us knew anything about Bugatti's. And since fins were in vogue at the time, why not add those bad boys to the body. And while we're at it, might as well go ahead and chop the top for good measure. Cannot remember what car that top is from though. If you know, please inform us. Old age and some minor deterioration to the original 1961 version's cool custom scallops resulted in some flame decals applied as replacement decoration. Also, the old lakes pipes had lost their chrome plating, so they were painted black. Underneath, the original scratch-built trumpet-type exhaust pipes did weather the storms of time quite well. But later the end of one fin got chipped and had to be repaired. All in all, though, a fairly strong 64-year-old survivor. Just wish I could remember what car or truck that chopped top is from. Thanks for looking...
-
This El Camino and Corvette were paired up as show/go cars as "Team Radical", both following the same design motifs. Cannot recall the exact 1:1 model year for the Chevies, they could be 1961, the same year the 1/25 scale plastic models were customized by my Brother Ted and me. We wanted to create some wild appearing vehicles that one might see at car shows during that time period. Since we had no sporty trailer in our stash at the time, the El Camino would be the one towing the drag Corvette to the local drag strip. "Hot Head" El Camino has a Thunderbird grille molded in front; the hood was opened up to expose the engine. Big molded-in scoops behind the rear wheel wells follow through to accept the canted taillights. Window glass was used without a solid top to create a futuristic look to the cabin. And requiste white wall tires, spotlights, lakes pipes and spinner hubcaps complete the 60s look. "Mazooga" the drag Corvette had all fenders cut off and a custom grille installed. Header pipes exit under the modified engine. Out back, nerf bars and drag slicks dominate. Inside, a custom steering wheel, gearshifter, tachometer and roll bars contrast with the extravegant upholstery matching that in the El Camino. Thanks for looking.... ----------------------------------------------------------------------------------------
- 1 reply
-
- 7
-

-
This customized mystery model named "Eye Catcher" was the very first custom build by my talented, late Brother Ted. It's from the late 50s or early 60s. The basis of the model is a complete mystery as it was not from either a kit or a promo model that I am aware of. The reason I say this is because it doesn't have a definitive chassis, oddly enough. (see last picture). All I remember about it is that a 1958 Buick grille was molded to the front (with plastic aluminum), a Corvette rear bumper added to the back with custom bullet taillights applied. The top was chopped, but the top might not have been the original top. The interior was totally integral to the body and not a separate piece or pieces. The painted-on coves were obviously done with a big nod to acknowledge the Corvettes' unique and iconic design. The model might have been some early Premier or Palmer model, but the complete lack of a chassis seems to negate this notion. To me "Eye Catcher" has sort of a vague Thunderbird look to it now. But what it was originally is still a mystery to me. What do you think the original mystery model was and/or who produced it? One thing is certain; it wasn't an AMT or SMP 3in1 kit car! Thanks for looking....
-
This SMP 3in1 kit or promotional 1960 Valiant model was "upgraded" in 1960 for a number of reasons. Even though I liked its looks for the most part, in the back of my mind I desired it to be a coupe. Corduroy was used to resemble a tuck and roll upholstery job to cover the rear seat in an attempt to establish a coupe appearance, sort of. Larger tires added to the rear produced a moderate front rake stance. A blackwashed grille and spinner hubcaps improved its appearance. Interesting enough, the 1:1 car had many critics even though the car itself, looking past its quirky design, was very reliable, economical with its slant 6 engine, and a sales success in the early 60s. Thanks for looking.... [/url
-
Drag racing Funny Cars – in one form or another – were around long before the 1966 National Hot Rod Association World Drag Racing Finals, where the NHRA first hosted the Funny Car class as an official eliminator class of drag racing. My AMT 3in1 kit 1959 Buick Invicta convertible, "The Hulk", was built in early 1960, so technically a 1:1 drag car like the model would not have been classified as a Funny Car by the NHRA then. Be that as it may, it does, in fact, look rather funny with its oversize HEMI engine and leaded-in body panels for aerodynamics. Liquid Aluminum was generously used as a filler for the front, rear and under the long fins. Fairly sure the wheelbase was not altered as some predecessors of funny cars were done this way. And the decals that were applied sporting "16 B/A" suggesting an altered car, (A), and a B category type car, were probably all wrong as I was (and still am) ignorant of drag racing nomenclature at the time. Well, even the NHRA hadn't figured it out yet for the "funny cars" in 1960! (Actually, the yellow decal scallops stood out well on the custom green color, and that's what I primarily liked about the decals, irrespective of the authenticity of the NHRA classification or lack thereof. (Actually, the yellow decal scallops stood out well on the custom green color, and that's what I primarily liked about the decals, irrespective of the authenticity of the NHRA classification or lack thereof. "The Hulk" still makes me smile after all these years about the same as when it was made. LOL Thanks for looking...
- 1 reply
-
- 4
-
-
Everyone is 100% correct that the grille is from a 1960 EDSEL . I should have remembered that, but it's been such a long time ago and the shape looked like a Pontiac, so I just assumed. Duh!
-
This SMP kit version of a 1959 Imperial convertible was converted into an Imperial "Camioneta" pickup truck in the early 1960s. Even though being fond of the large convertible's over all appearance, somehow the large rear tail fins bothered me a little. Toning those down considerably and eliminating the back seat opened up the opportunity to make an "El Camino style pickup truck". A molded in Pontiac grille seemed to work out nicely. With little effort, the truck was lowered as much as possible. The chopped top did come from a couple of 1960 El Camino junked parts acquired in a glue bomb transaction, if I remember correctly. And oh that top, that top with the curved back window, that really sparked the design for the "Camioneta". And the blue color was an experiment, too. Thanks for looking...
- 7 replies
-
- 10
-
-
An old Palmer model and an old Premier model
FenderMender replied to FenderMender's topic in Model Cars
Very, very cool Corvair. It looks awesome! Love those exhaust pipes! One thing that turned me off about the Palmers were the hard plastic tires. -
They would easily pass for 1:1 show cars. Excellent work!!!
-
A Palmer and a Premier model Many years ago, these two models were constructed in such a way that I wish now, in retrospect, that I had never done, especially the Studebaker Lark. The 1960 Studebaker Lark was a significant model in the automotive industry, credited with reviving the Studebaker brand. It was a compact car that offered a unique V8 engine option, setting it apart from competitors. The Lark was praised for its stylish design and innovative engineering, contributing to its popularity and sales success. Notably, it was the first car of its size to offer a V8 engine. The Lark was one of the final efforts for the Studebaker brand to stay afloat; it ended all production of its cars and trucks in the US in 1963. The Ford Falcon I should have kept as a stock version because it was a significant vehicle in automotive history, known for its simple, boxy design that was instantly recognizable and paved the way for future compact cars. It was designed to be an affordable and practical option for families, selling over 435,000 units in its first year, making it a best-seller in the compact car market. If you look at the actual boxes these two came in, you will notice printed on each a 273- 89 and a 6152- 99. The Ford Falcon was a dime more expensive! Nowadays, these two boxes are fetching prices far more than what the built models would probably ever bring. I'm happy to have the boxes at least. LOL Thanks for looking...... Palmer models were notorious for lack of details and their "chassis", which were essentially rectangles, with two main sides being slightly larger than the two end pieces. I modified and strengthened the Falcon chassis with sprue. Sprue was used heavily on the demolition derby Lark for its protection during the races. Due to dismay over the poor quality of details and the rudimentary engineering of the cars, and the fact that the models were falling apart at the time, I took out my frustrations and slapped together a Studebaker Lark demolition derby car just for grins! The Ford Falcon, on the other hand, with not very much to go on, I tried my best to make it appear as a "moderate custom", even opening the up the hood scoop. But the V8 engine is pretty pathetic and really nothing much could be done there at all. And the impractical antennas out back leave folks wondering, what was he thinking? LOL After having experienced so many negatives with these two models and seeing that really very little could be done to actually upgrade them, higher caliber models were sought after and acquired. Thanks again for looking....
-
This 1962 Chrysler Imperial Crown Coupe model was acquired as a glue bomb in the early 1960s and was missing all its wheels, back bumper and other parts. It was quite rough due to the fact that the builder had heavily "welded" long, wide fender skirts to the rear side panels and had used a kit-supplied continental kit setup for the rear bumper. Major pieces of the skirts remained on the car after dislodging sizeable sections, making reshaping of the rear panels necessary. Inside, again, items were "welded" to the front seats, like a telephone and a tape recorder. These were able to be removed without compromising the seats themselves. But in the passenger-side back seat, a stuffed Teddy bear could not be removed without destroying it and the seat corner itself. Unfortunately, the Imperial was also missing its HEMI engine and its iconic taillights. And I should add that the chassis might not even be from the original kit as the builder had severed it into three sections for some unbeknownst reasons! My parts bin is scant, especially in the wheel, tire and engine departments. My only choices of engines were between a Buick Nailhead and a Ford flathead. The flathead is destined for a 20s Ford Model T soon. The tires and wheels were all that was remaining of the antique 60s kit parts from the past. I had to go with the continental kit reluctantly, as I have never been a fan of continental kits. A custom-made back bumper seemed out of the question for a number of different reasons. Thanks for looking..... P.S.Take a look at the beautiful 1:1 version A very nice 1:1 https://classicpromenade.com/for-sale/1962-chrysler-imperial-crown-coupe/
-
Two 1958 Buick Roadmasters with completely different personalities with a common bond, but no Bondo. Back in the day, that is, the early 1960s, the body filler of choice, at least for us on a very limited budget, was Liquid Aluminum. It was cheap, in a tube, and it worked fairly easily. And, as of now, turned out to be extremely longlasting and durable. These two 1958 Buicks, both original 3in1 SMP kits, were the recipients of some generous amounts of the filler material. The builder's intention for the metallic green version was to do things that would definitely look like a George Barris creation. So the drastic chopped top, custom grille, spotlights, plenty of scallops and pin striping, spinner hubcaps, and custom Edsel taillights. The black convertible represented what might have been a pimp mobile at the time with an emphasis on extreme, especially in the fins department. The fins and the Frenched taillights as well as the molded hood scoop required a lot of the metal filler. Above the stock grille and headlights, protruding antennas were placed in the areas scooped out. The use of terry cloth "fabric", in the interior and side coves, was about the most common household material we knew of that would resemble the "shag" look, which was popular during this time. A strange pair that have weathered Mother Nature and the passage of a considerable amount of time. Thanks for looking....
-
My brother Ted created this '32 Ford Coupe in 1961. He wanted an aggressive look with a chopped top, leaded in wide rear fenders, narrow tires up front and big slicks in the back. The front end features a molded-in contemporary grille with quad headlights and a custom horizontal bar piece with "teeth". The color is as close to candy apple red as could be found at the time. The engine under the custom hood is a Corvette with straight pipes running the full length of the car. I remember this build taking place and some of the details that went into its design, but I cannot remember now what kit that front grille is from. And neither can AI determine it after many, many questions were asked about it. So, for those of you who are knowledgeable about specific 50s and 60s cars and their grilles, please let us know what particular car that grille is from. Inquiring minds want to know. Thanks and thanks for looking....
-
Brother Ted's Radical Customized Ford Pickup Truck
FenderMender replied to FenderMender's topic in Model Cars
To the best of my memory, the entire back piece included both the taillight housings (less the lenses) and the cross panel as one unit. Those parallel vanes are molded into the piece as such. They are not individually placed. The part came from an SMP 1961 Ford Thunderbird Convertible 3in1 kit, I am pretty sure, as some of those small kit parts are still in my spare parts bin. I was tempted to chrome the edges of each vane but decided against it realizing that the "look" of it corresponds well with the orange corduroy upholstery. -
Brother Ted's Radical Customized Ford Pickup Truck
FenderMender replied to FenderMender's topic in Model Cars
-
In the early 1960s my late and older brother Ted and I built quite a few custom cars, hot rods and truck models. Ted was the creative genius behind the design and execution of these models. He gleaned many ideas and concepts from the emerging hot rod and custom car magazines that were being published at this time. I have always wanted to complete a radical Ford pickup truck that he had started building back then to pay a special tribute to his skills, creativity and imagination as this truck emphatically epitomizes his work. Originally, the top was vented and chopped, the bed was changed and shortened, the hood was altered, and completely new front and rear ends were molded (with plastic aluminum) onto the body. The rear portion of the truck had wild fins molded to the sculpted sides. The dashboard was carved from wood and covered with corduroy fabric to mimic tuck and roll upholstery. The seats were also done this way as well as a tonneau cover. Original paint was to be a metallic orange after all body work was finished with the top attached and the hood fitted properly. The unfinished work lay dormant for years in a box of spare parts and accessories. Here is what the truck parts looked like in the 60s: To complete the model from its original inception required a chassis to be scratch built, an engine from a kit labelled "Ford", a new steering wheel, and new tires and rims as these parts had never been determined or even available back then. A close color match to the original orange paint was used although it wasn't metallic. Ted's radical truck creation is now complete and it is a testament to his remarkable vision of what a custom show truck in the 60s would have looked like. Here's to you, Ted! Thanks for looking... Here's an early mockup testing out wheels, the non-attached top, and the unpainted hood: Ted's Radical Custom Ford Pickup Truck Completed
-
Very nice! I like everything about it, especially the stance and color.
-
History of the Half Rat Half Rod The three parts shown below constitute what remains of the initial implementation of various customizing ideas for a street rod my late brother and I had toward the end of our modeling experiences as teenagers in 1959. He was off to college and I pursued high school sports, so our hobby went into a very long holding pattern for years. These three parts languished for at least 60+ years in a stash consisting of just a couple of barely-started hot rod bodies and scant parts. Finally I set my mind to building up the model street rod parts as a memento for old time sake. Hope you enjoy the before and after pics. Thanks for looking.... BEFORE the 60+ year old stash of hot rod bodies and parts with all three original parts: the modified body, the modified grille and the Corvette dashboard with modified grille unattached: with Corvette dashboard: [u rl=https://postimages.org/][/url] The completed Half Rat Half Rod (HRHR) represents what the original model was supposed to look like, sort of, except for the fact that at that time there were no "rat rods" to speak of and it would have been more refined and finished finer. Back then, pretty much all model building attention for us was focused on customized cars and cool-looking hot rods, as they were what was trending in popular culture. We were more into custom automotive concepts and ideas then, and suffered in the precise and exact execution of those. Ideally the HRHR was supposed to have been a highly customized hot rod based on a '32 Ford coupe, extremely low slung with massive rear slicks, blown engine, customized interior, side exiting header pipes, and especially featuring a rear body section and a frontpiece from some appropriate modern car or cars of the times. My memory doesn't recall what particular car or cars those two elements are from, possibly a Studebaker Avanti, or perhaps a stylized Thunderbird front end from a 3in1 kit. But in the end, our bold intentions for the final version of the model being built got caught up in the shuffle and never happened as time moved on and life circumstances changed. Fast forward to 2025. To complete the HRHR model, I had to build this as a "rat" rod due to my lack of sufficient and available parts and materials. Notice the rough, old and damaged front tires, the crudeness of the build and all the other inadequacies. I had no massive slicks to use. No interior floorboard or pedals. No firewall. No chassis. No suspension system. No rear or front axle. No window glass. Most everything was scratch built. Materials used included bamboo, plastic film, wooden toothpicks, metal wire, card stock, spackling compound, synthetic felt, aluminum, and clear tape. Even though it took much head-scratching to figure out how to construct, what materials to use, how to sequence building operations, and how to be patient in allowing time for things to cure and develop, there is now a genuine satisfaction knowing that the HRHR is finally complete. And it rolls. This is a special tribute to my late brother Ted. AFTER
-
The gold thing it is, although it will be quite a challenge. Both ideas and parts for it are quite scarce.
-
Thanks to all! Appreciate the interest. Here is what is left in the box of parts that contained old rat rod Potato Head truck, so these are "relatives" of his, so to speak. All the mods and parts are from the early 60s. Not much to start with but the parts are still cool after all these years. Problems are with no complete interiors, only one seat, one chassis, and no suspension systems. Probably can come up with some wheels and tires, and maybe a decent engine. Beyond that it looks like a lot of scratch building. Which one do you think I should begin with?
-
Thanks for all the positive feedback. I really didn't know what to expect as to the final look of this truck as the whole process was a trial by error affair. Now that it's "done", I just might try my hand at weathering it? Yes or no?
-
Someone appropriately described the cab as looking like a potato. So this collection of few 1960s parts became the Potato Head Model A pickup truck, also known now as "Yukon Gold". The project took quite a long time to complete as the builder is a rat rodder by "trade", that is, inexperienced. It is said of rat rodders that they really don't know what they are doing, but somehow they get a vehicle drivable and to roll. Such was the case with Potato Head. It might not be drivable, but it does roll. Many parts were scratch-built and they indeed look like it. The paint job is rough as are many other features on the truck. Noice the warped plywood bed. The radiator. The different "welds". All I know is that for as rough as it looks, it took an inordinate amount of time to "build" this model. If fit and finish were required, it would have never happened. It was lowered as much as possible. Scratch-built parts are: radiator and hoses, two spare tires, entire truck bed and tailgate, roof cover, some suspension elements, partial firewall, interior floor, dashboard, all three foot pedals, gear shifter, window glass, door handles, rear view mirror, rear taillights, and aluminum license plates covering "1940" on both bumpers. Thanks for looking... Potato Head: Early stages: "Finished":
