

FenderMender
-
Posts
163 -
Joined
-
Last visited
Content Type
Profiles
Forums
Events
Gallery
Everything posted by FenderMender
-
Having trouble using the forum
FenderMender replied to FenderMender's topic in How To Use This Board
Thanks for the explanations. I have been able to post again. -
The panel lines were all filled in when this cab was modified back in the 1960s. I recently decided to build a pickup truck out of it and will scribe panel lines at least on the doors. That is why I ask the questions about which version to use, photo A or photo B. In photo A the panel line for the bottom of the door would be at or above the black tape. In photo B, could the panel line be just above the bottom of the cab and be realistic?
-
Having trouble using the forum
FenderMender replied to FenderMender's topic in How To Use This Board
I will try and post a very simple sentence and see what happens. Thank you. It worked. I then amended the wording of my original post and was able to essentially convey my original thoughts. I had a similar problem on a British forum which kept rejecting my post for my having included the word "knob" as I had said something about a custom-made gear shift knob in the post. I kept trying and trying until a moderator said that "knob" is a no-no word on the forum in Britian- referring to a male's reproductive organ! I had no idea. In Arkansas there is a town Bald Knob. -
Piecing together a bunch of old parts from the past to make a Model A pickup truck. Since I know very little about Model As in particular, I would like to be able to make this model appear at least somewhat authentic. Hopefully someone here can say whether photo A or B is technically correct. Photo B shows the model overlapping the frame; photo A has black tape representing the frame. In both photos, the cab is in the same position overlapping the frame and resting on it. Photo A Photo B The questions are: (1) are both applications technically correct (2) which version makes the cab look the lowest (3) which version would you select if it was your build??? Additionally, any comments concerning any aspects of this build would be greatly appreciated. Thanks in advance.
-
I'm signed in and compose a post, but when I click to post it I get instead a notice that the page cannot be found. What is the problem?
-
Thanks Harry. Your build incorporates exactly what I had and have in mind; I just wasn't knowledgeable about how to achieve it, that is "low, full fendered, and still "drivable"."
-
Harry, I have a faint recollection of my brother removing details from the cab and painting it gold to see what it looked like, forgoing a primer. Don't have any recollection of what kit it would have been from. But the speculations of it being a Lindberg are probably the most accurate. In regard to channeling, would the fourth photo depict a 1:1 correct and authentic version of a channeled 30ish truck? I want to keep the fenders but am debating whether to fill the spare tire deep fender depressions. Having two spares on the fenders would definitely interfere much with running 4, 6 or 8 individual straight pipes out of the engine sides. Unless, I would do this:

-
Thanks Stu and Mark. You are probably right about it being a Lindberg cab, although I don't think I have any other parts from a Lindberg kit. Way back when this came into my possession as a teenager, my brother and I were getting bits and pieces from neighbor's kids who had glue bombed kits, got tired of a particular model they had made or screwed up, or just plain quit the hobby for good. So the pieces were random from different kits.
-
Thank you, Alan. I wasn't aware of the AMT or MPC kits. The cab is a stumper for me as well. However, it fits well over the chassis but covers the sides of the chassis all the way to the top of the running boards. From reference pictures, it should sit a distance above the sides of the chassis. That is, the bottom of the "door" on the model would be resting on the top of the running board. In photo, there is the black chassis below the bottom of the truck's door.
-
Too many years ago -help wanted In my very depleted vintage parts stash from 65 years ago are some random parts to a Model A Ford it seems. My brother and I built a number of the Revell 3in1 '32 Ford kits. However, some of the parts below do not seem to be from Revell kits at all. I cannot remember what brand kit or kits certain parts are from. If you know it would be a great help if you would identify the kit or kits. I potentially have some additional small parts that might fit or work okay, but it would be a real relief and blessing to see those kits' instruction sheets, parts, etc. in doing my research. At this point, I just don't know what kit or kits they are from. Thanks very much for your assistance. My intention is to make this into a lowered semi street rod pickup truck or a rat rod, depending upon what parts can be scavenged together. THANKS Really need help here to get the suspension correct Revell I believe tho not sure Revell I believe tho not sure
-
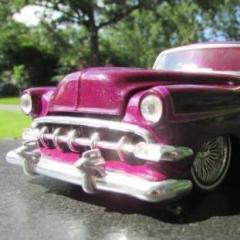
The third, and probably the final car, in the Matte White Convertible Series undertaking by Crash Dummies Garage is a 1965 Lincoln Continental Convertible. The basics of the car were acquired from Looney Tuners Garage in the early 1960s. At that time the body had been poorly painted an uneven, thick gloss black with a gold interior. The engine and engine bay and chassis had been detailed fairly well, but the color scheme was, to say the least, unusual. To give respect to the original owner of the car, the Dummies decided to leave the interior, engine and bay and the chassis as is except for some minor touch-ups. Black body paint was removed and matte white paint applied. All car parts were intact except for the front grille and rear bumper. Fortunately, the Dummies had gotten with the car a 1961 Lincoln Continental grille and back bumper. They modified both so that they matched up accordingly with the two openings on the body. The gap between the front grille and the front fender was filled with a custom-made turn signal. Because of the interior, the Dummies named her the Golden Ghost. Thanks for looking...
-
Crash Dummies Garage has done it again. This time a 1961 Mercury Monterey convertible named "Wonder Woman" continuing their Matte White Convertible Series. This is their second convertible following the successful completion of the "Great White", a customized 1961 Imperial Convertible. The Mercury glue bomb was acquired again from the Looney Tuners Garage's 1960s leftover bits and pieces. It is a real wonder that this car was ever completed by the Dummies as it had giant deep depressions in the quarter panels due to fender skirts having been heavily welded thereto. Large chunks of the skirts were completely bonded in such a way that removing them by sanding would have resulted in the elimination of the panel itself! The Dummies came up with a highly specialized knife blade and were able to contour the panels after having gotten within a millisecond of giving up on the entire project altogether. Adding to the quarter panel problems were: no hood, no engine, no windshield glass, odd windshield frame, no dashboard, no steering wheel. The positives were: spinner hubcaps, good grille, good convertible boot, and good rear end with original taillights. A dashboard was formed from either a 1961 or 1965 Lincoln Continental. A hood was made from fiberboard and the engine block from an early Ford. Thanks for looking... "Wonder Woman" with the "Great White"
-
Thanks for the compliments. Glad everyone likes this model. Wasn't quite sure how it would be received.
-
Looney Tuners Garage was started way back in the late 50s by two teenage brothers. They cranked out some rather far-out cars and trucks, having gained inspiration from the customizers of the time- George Barris, Gene Winfield, Ed Roth, etc., etc.. One car the brothers began working on back then, but never finished, was a 1961 Imperial convertible that they had acquired as a total glue bomb. It had a severely damaged and unrepairable grille (no outside headlights), extreme plastic cement smudges all over the body, a damaged windshield, an interior with assessories (tape recorder, car phone, seat belts) heavily glued everywhere, and finally, a chassis that someone took a hot electric knife to. Fast forward in time to the Crash Junkies Garage which recently picked up this car after some sixty years in storage. The Crash Junkies completed the build after meeting a twenty-one day deadline. Luckily for them was that crucial original parts came with their aged acquistion: hubcaps, complete interior, windshield, chassis and back bumper. The Junkies kept intact the unusual modified front end grille area, realizing that it was actually a precusor to the modern electrical car frontal look of the 2020s. Thanks for looking...
-
From an Ultra-Detail 1:24 scale Metal Model Testor's kit, this Dodge Charger Police Cruiser model was a fun build. Of the one hundred parts count, what I personally like is the window glass in all the windows as well as the interior details, like the computer monitor. The exterior body is quite realistic with those bold front bumpers! up images
-
- 1
-

-
A 1:24 scale Welly model of a 1965 Chevrolet Impala that was lowered and detailed some. Had to have some metal exhaust tips. Another Welly version in blue doesn't quite have the "pop" that this yellow color has. Welly did a good jobwith the engine compartment and in the interior, too.
- 1 reply
-
- 3
-
-
This 25-year-old Yat Ming 1/18 scale 1932 Street Rod model was one of the very first models in my 1/18 scale collection circa 1999-2000. It has aged beautifully compared to much higher priced and even younger models. It is quite surprising. There is no paint rash, no diecast cancer nor any deterioration. As far as looks go with this model, it has always been a toss-up for me. I am very fond of '32 Ford hot rods and street rods. Yet this model for some reason(s) sometimes looks the part and other times misses it. Not sure what it is about it. The features are numerous on it: suicide doors, hinged hood, rumble seat, detailed chassis with dual exhaust, lights on the engine cowl, chrome "AH-OOO-GAH AHOOGA " horn, dual taillights, black foot pad for rumble seat entry, and spoke wheels. What do you think? Thanks for looking... upload and resize image site bb code image
- 1 reply
-
- 2
-
-
Thank you, sir. The neighborhood will almost always be a background for my photos as I prefer natural sunlight and the openness of the city street to set up the prop stand.
-
This is one of two AMT 1/25 scale 1959 Cadillac Ambulance kits that was scored a number of months ago at Ollies. Wanted to tint the windows after the interior had been detailed and it seemed a waste to do that. On the next and different version, perhaps, tinted windows will happen. The weathered look on the Caddie is realistic enough per the box art, but I didn't feel confident to try it, even tho it certainly appeals to me. So, what resulted is a rather up-scale surf wagon which had been cared for and pampered since the 60s by some dedicated motorhead surfers.
-
This is an older 1/18 scale Kyosho Lancia Stratos HF rally car (171155) that was acquired a number of years ago. The #14 car doesn't appear to be as well known as the #1 car; however, I'm no authority on rally cars. The graphics and all are appealing and the features on this model are impressive, like pop-up headlights. The Ferrari Dino V6 engine is detailed nicely and the wire mesh on the openings is real mesh, not fake, as well as the chains on the mud flaps!
-
This is a 2015 Castline 1/24 scale diecast (Chevrolet Turbo-Fire V8 60 YEARS) of a 1957 Chevy Bel-Air that was saved a few years ago at a thrift store. It was missing its grille, back bumper, door handles, back lights, headlights, all wheels and tires, windshield wipers, tailfin trim, side mirrors and hood trim pieces. Adding some scratch built parts here and there along with some custom wheels and a grille from the plastic models' parts bin makes it appear as complete and a somewhat radical custom car. The basic lines are all there for a '57 Chevy and it HAD to be made "road worthy".
-
- 1
-
-
Thanks to all. Yes, the song is cool indeed. You can tell the author really was crazy about a Mercury.
-
I cannot take any credit for the background as the buildings and shrubs ARE the real things! The models are perched on a platform in the street that is high enough so that I can stand upright and take the pictures. All I have to worry about is a careless driver not looking where they are going and fail to see the platform curbside.
-
Mercury Police Car #54 is from a MPC "Super Snap" 1/25 scale kit. Was a little leery about this kit being too simple and maybe not in scale, but after getting started on it and using up the custom parts included in the kit, I kinda like it, especially the tall antenna! It's a Mercury, man.* *("Mercury Blues" is a song written by K. C. Douglas and Robert Geddins, and first recorded by K.C. Douglas in 1948. The song, originally titled "Mercury Boogie," pays homage to the American automobile marque, which ended production in 2010. The song has been covered among others by the Steve Miller Band in 1967 at The Monterey International Pop Festival and David Lindley and Ry Cooder.)
-
Background story to the Cadillac Escalade: I bought this 1:24 scale Jada Just Trucks 2002 Cadillac Escalade EXT model for a dollar at a Goodwill store. The model was essentially a shell with a dashboard without a steering wheel, no interior or seats, no engine or engine bay, no tailgate and no chassis! It sat on a shelf for a year all the while I had hoped some spare Escalade parts might surface somewhere. This never happened, so I decided to challenge myself to construct a chassis, interior, engine bay with an engine and a functioning tailgate. My order for getting the Escalade back on the road consisted of, first, making a chassis and putting wheels on it. The initial cardboard template turned into the final chassis with some plastic credit card stock added along the way at key stress points. Many measurements, trial and error fittings and alterations were done to make certain that the wheels aligned properly with the wheel wells, that the wheels rolled, that a cool stance was achieved, and that the chassis lined up accurately with the screw holes on the body shell. Second, interior work began by making a steering wheel. Then one bucket seat from my very limited parts bin was mounted to a scratch-built plinth. With no rear seat (planned or to be used) as an obstruction, it was easy to carpet the entire floor. My idea for this Cadillac truck was it was to be a single working man's "dream truck" that goes both ways: a roomy work truck and a WIP competition show truck with air suspension. LOL. Third, the engine bay was built onto the chassis and a 2005 Pontiac GTO Ram Air pan engine was installed. The engine, side mirrors and interior foot pedals are from a 1:24 scale Welly 2005 Pontiac GTO custom. Wrapping up the project included forming a tailgate from a small piece of sheet aluminum, covering black cardboard with brushed metallic tape for a reversible tonneau cover, adding a lower rear clip below the tailgate and applying a fifty-plus-years-old license plate decal, "Night Prowlers". This is the final version of the 1:24 scale Jada Just Trucks 2002 Cadillac Escalade EXT with a scratch-built custom chassis, custom interior and custom 2005 Pontiac GTO Ram Air engine.
