

Art Anderson
-
Posts
5,052 -
Joined
-
Last visited
Posts posted by Art Anderson
-
-
While looking at expensive-as-usual late '60s Falcons on eBay, I discovered this live auction coming up:
Plenty of good stuff here; and the opening bids are only $5.00. The collection is in Fowler, Indiana - anyone know who the collector is/was?
The photos alone are worth checking out, although the descriptions use that annoying word "minty" so many times you want to leave a wad of Wrigley's Doublemint on the writer's keyboard. Happy bidding!
Hmmm, and Fowler IN is only about 30 miles or so northwest of me!
Art
-
Ohh, interesting! I don't have both here to compare them, but interesting to know! Thanks Art! Keep us posted on your build!
I was prepared to take this project on with the Italeri Jeep kit, until I found the Hasegawa--the deal breaker there was that the Italeri Jeep has its tires molded as part of the wheels, while Hasegawa has black PVC tires.
Art
-
Chris, this is my own personal opinion, but I'm of the big belief that solid colors need no clear coat to come out nice. There's enough hardener in the paint that if you spend the time to rub out and polish the paint, clear coat is wholly unnecessary.
Some will disagree, but that's how I've been doing paint jobs for many years now. Metallic paint yes........solid colors, no clear coat.
As far as the drying time...........that's a tough one as it'll depend on the climate you're experiencing right now. I tend to wait about a week before doing any rubbing out and polishing. Some may say that's a bit long, but my rule of thumb is if you can no longer smell the paint, then it should be sufficiently dry.
Hope all this helps!
Or, do what I do--use a food dehydrator, which will dry Tamiya lacquers click-hard in about 2 hrs--then, polish it out.
Art
-
Oh wow - another Art Anderson build! I always LOVE your work - one of my favourite builders!
Funnily enough, I just picked up the Italeri Willys Jeep keep which looks near identical to your pics - I wonder if theyre the same kit badged differently?
I'll be watching!
I have both, and the two kits appear to have been independently developed--Italeri's kit dates from the early 1990's (in at least a couple of verisons, including the "Fire Jeep"), while Hasegawa's kit first appeared about 8-10 yrs ago, IIRC.
Art
-
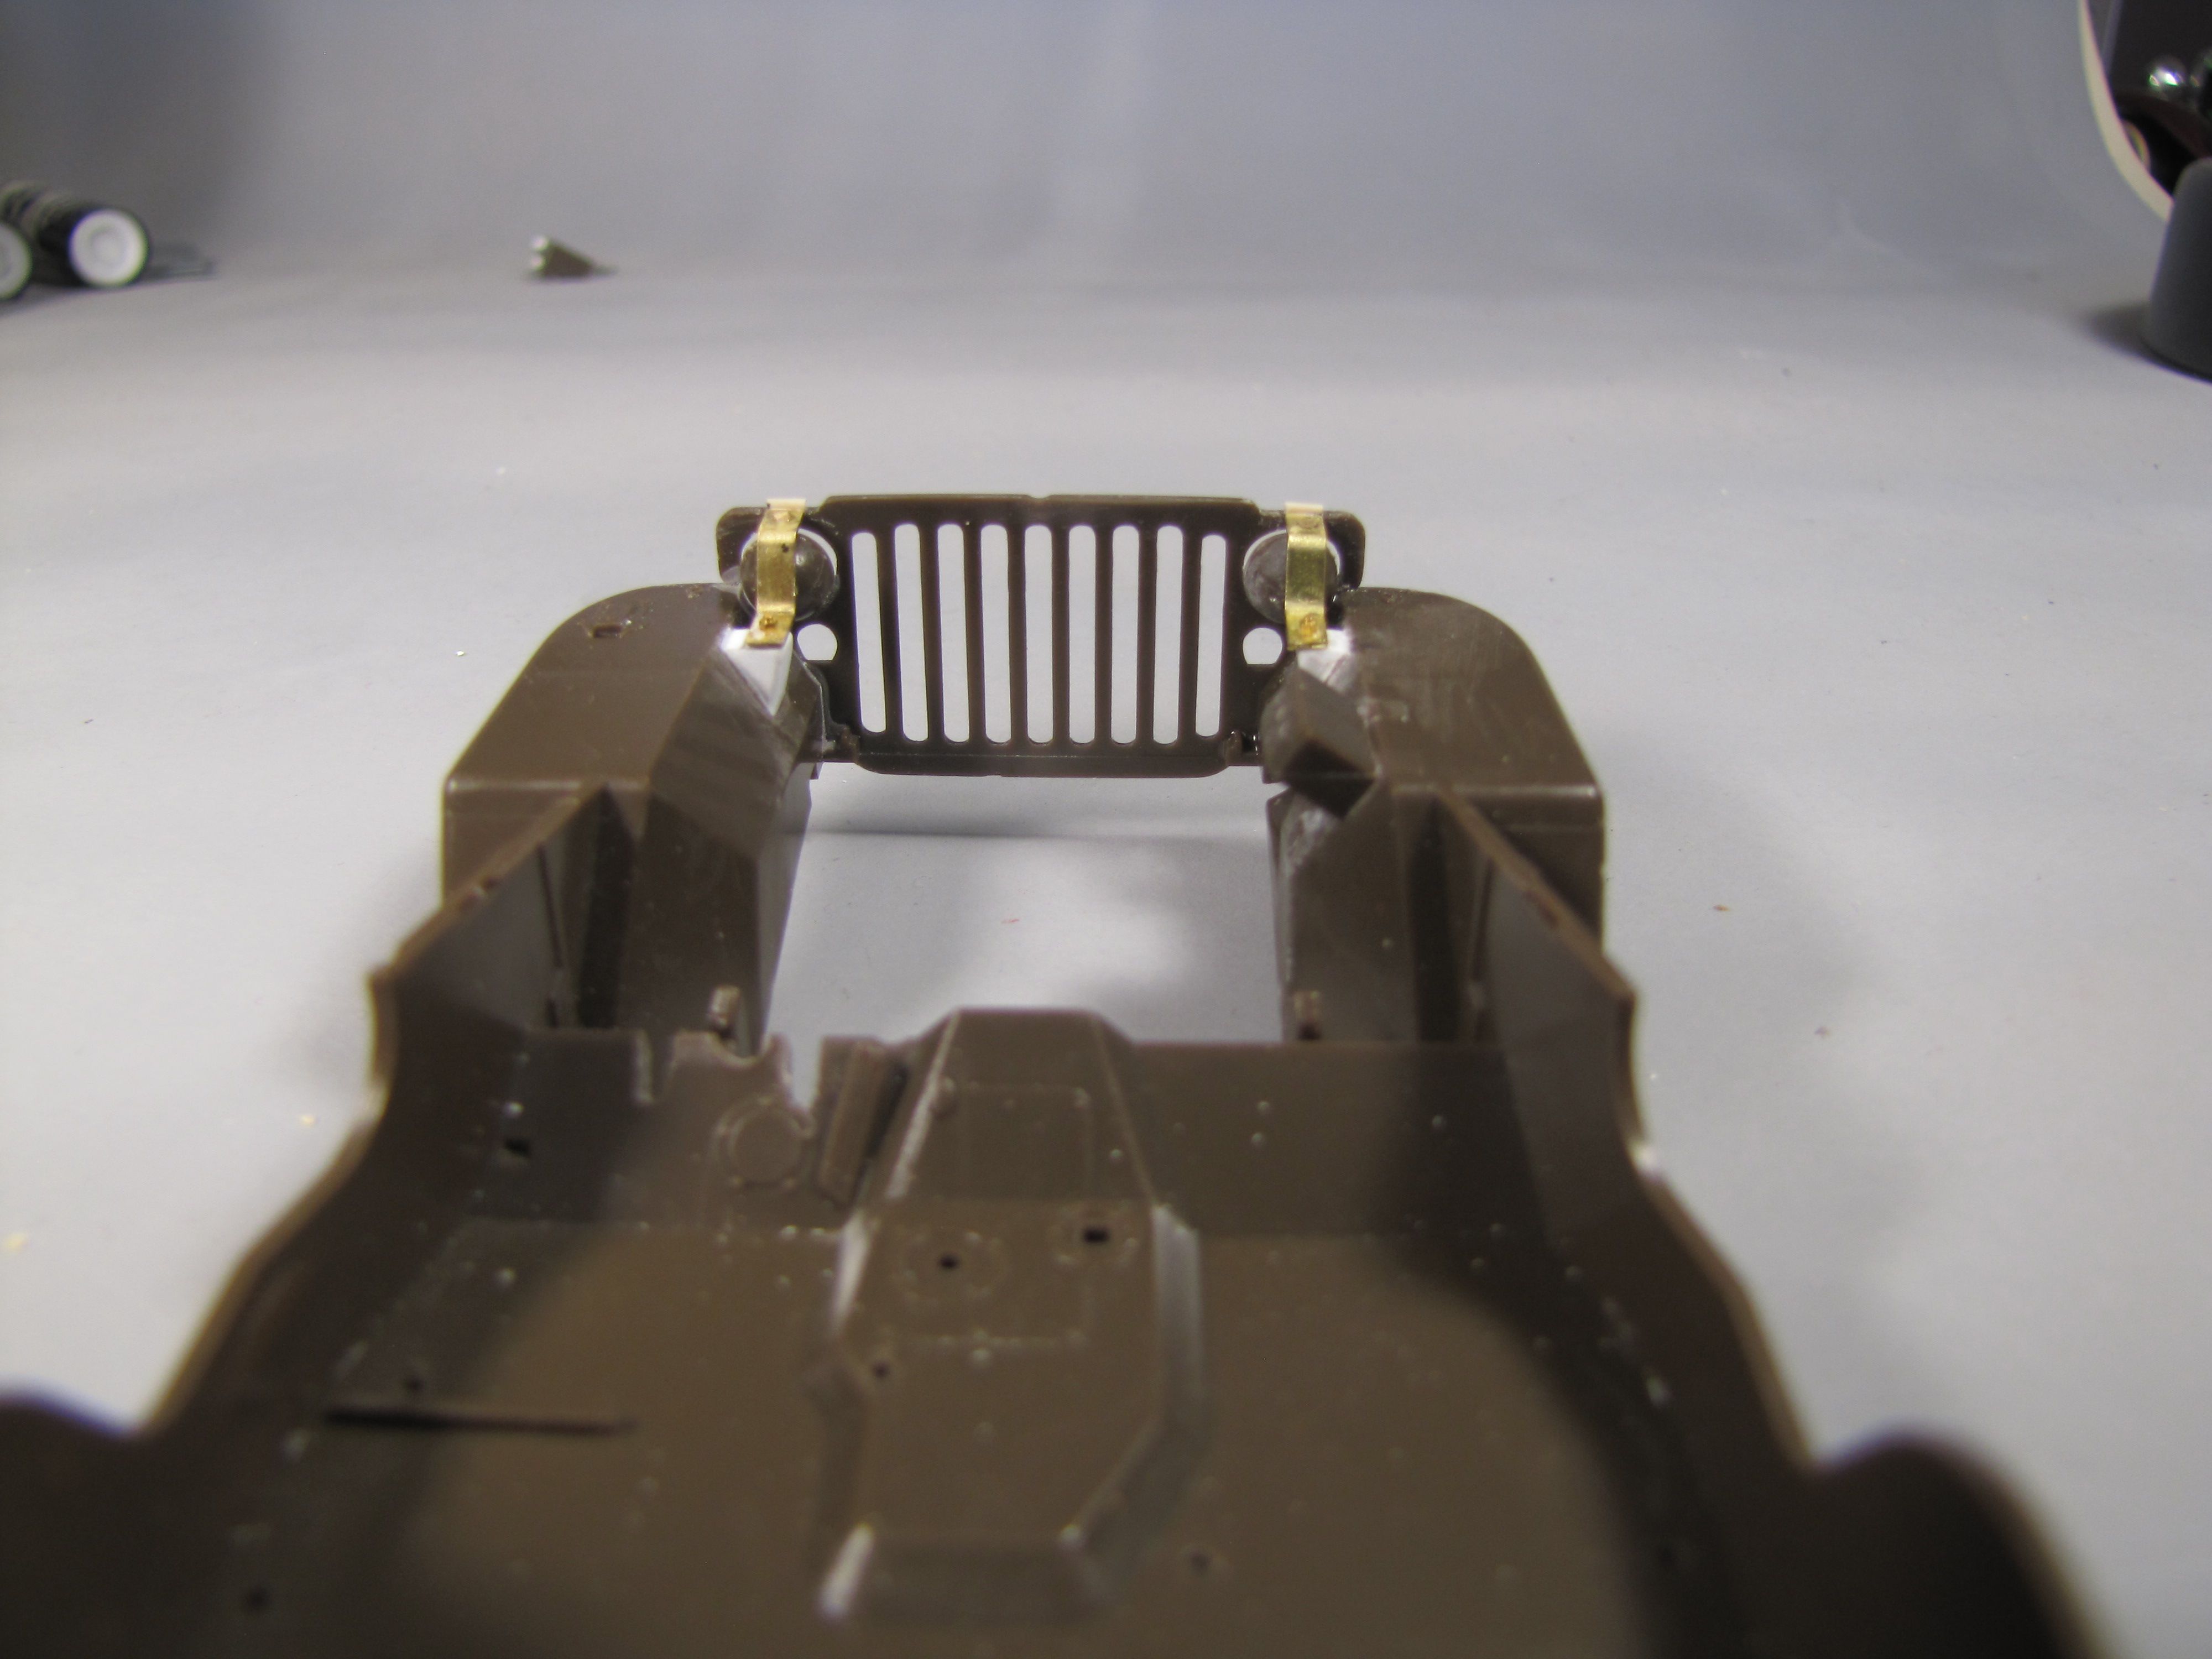
But wait! There's more! WW-II Jeeps had headlights that were uniquely mounted--BEHIND the grill panel. This was so the headlight brackets used, could be unbolted from the inner fender panel, and then the headlight swung up and over the front of the grille panel, and the headlights themselves swiveled so as to provide "floodlighting" for maintenance work in the field. My brackets are done in 1/64x1/8 inch brass strip, simplified, as they were just too small to allow me to recreate the "channel section" appearance of the "upright leg" on them. Still though, I think I captured the look, and the principal of the concept.

-
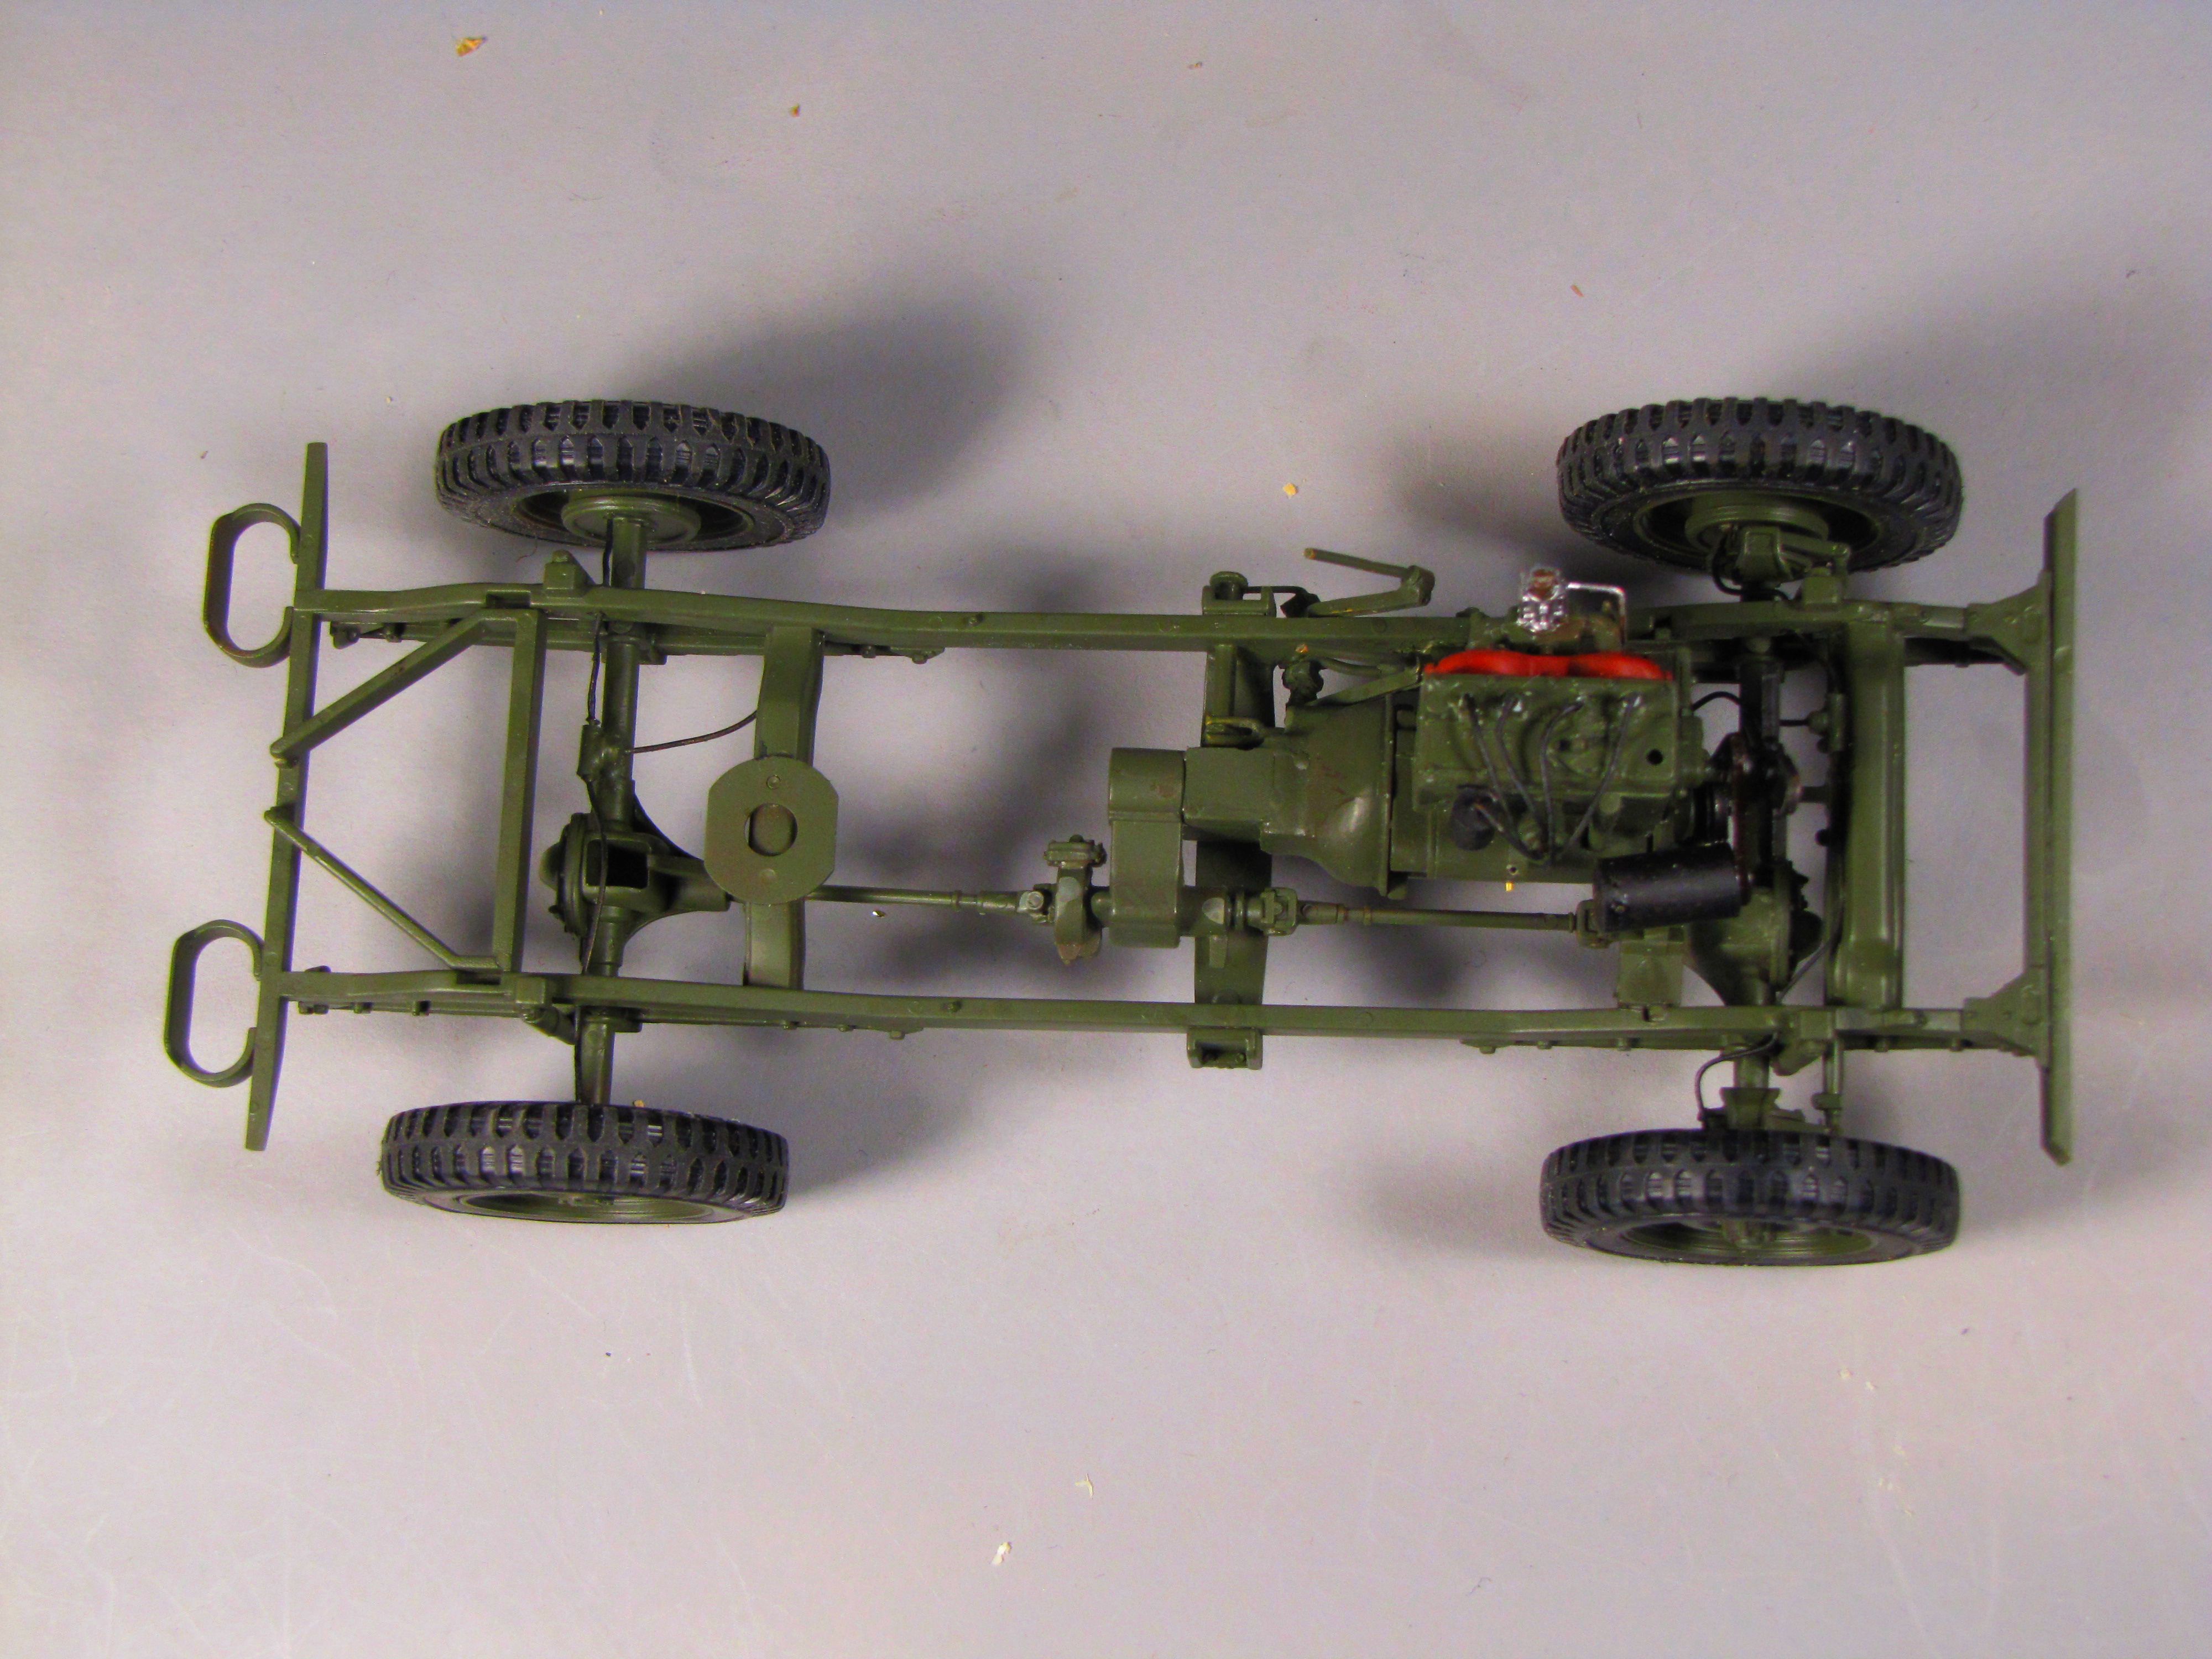
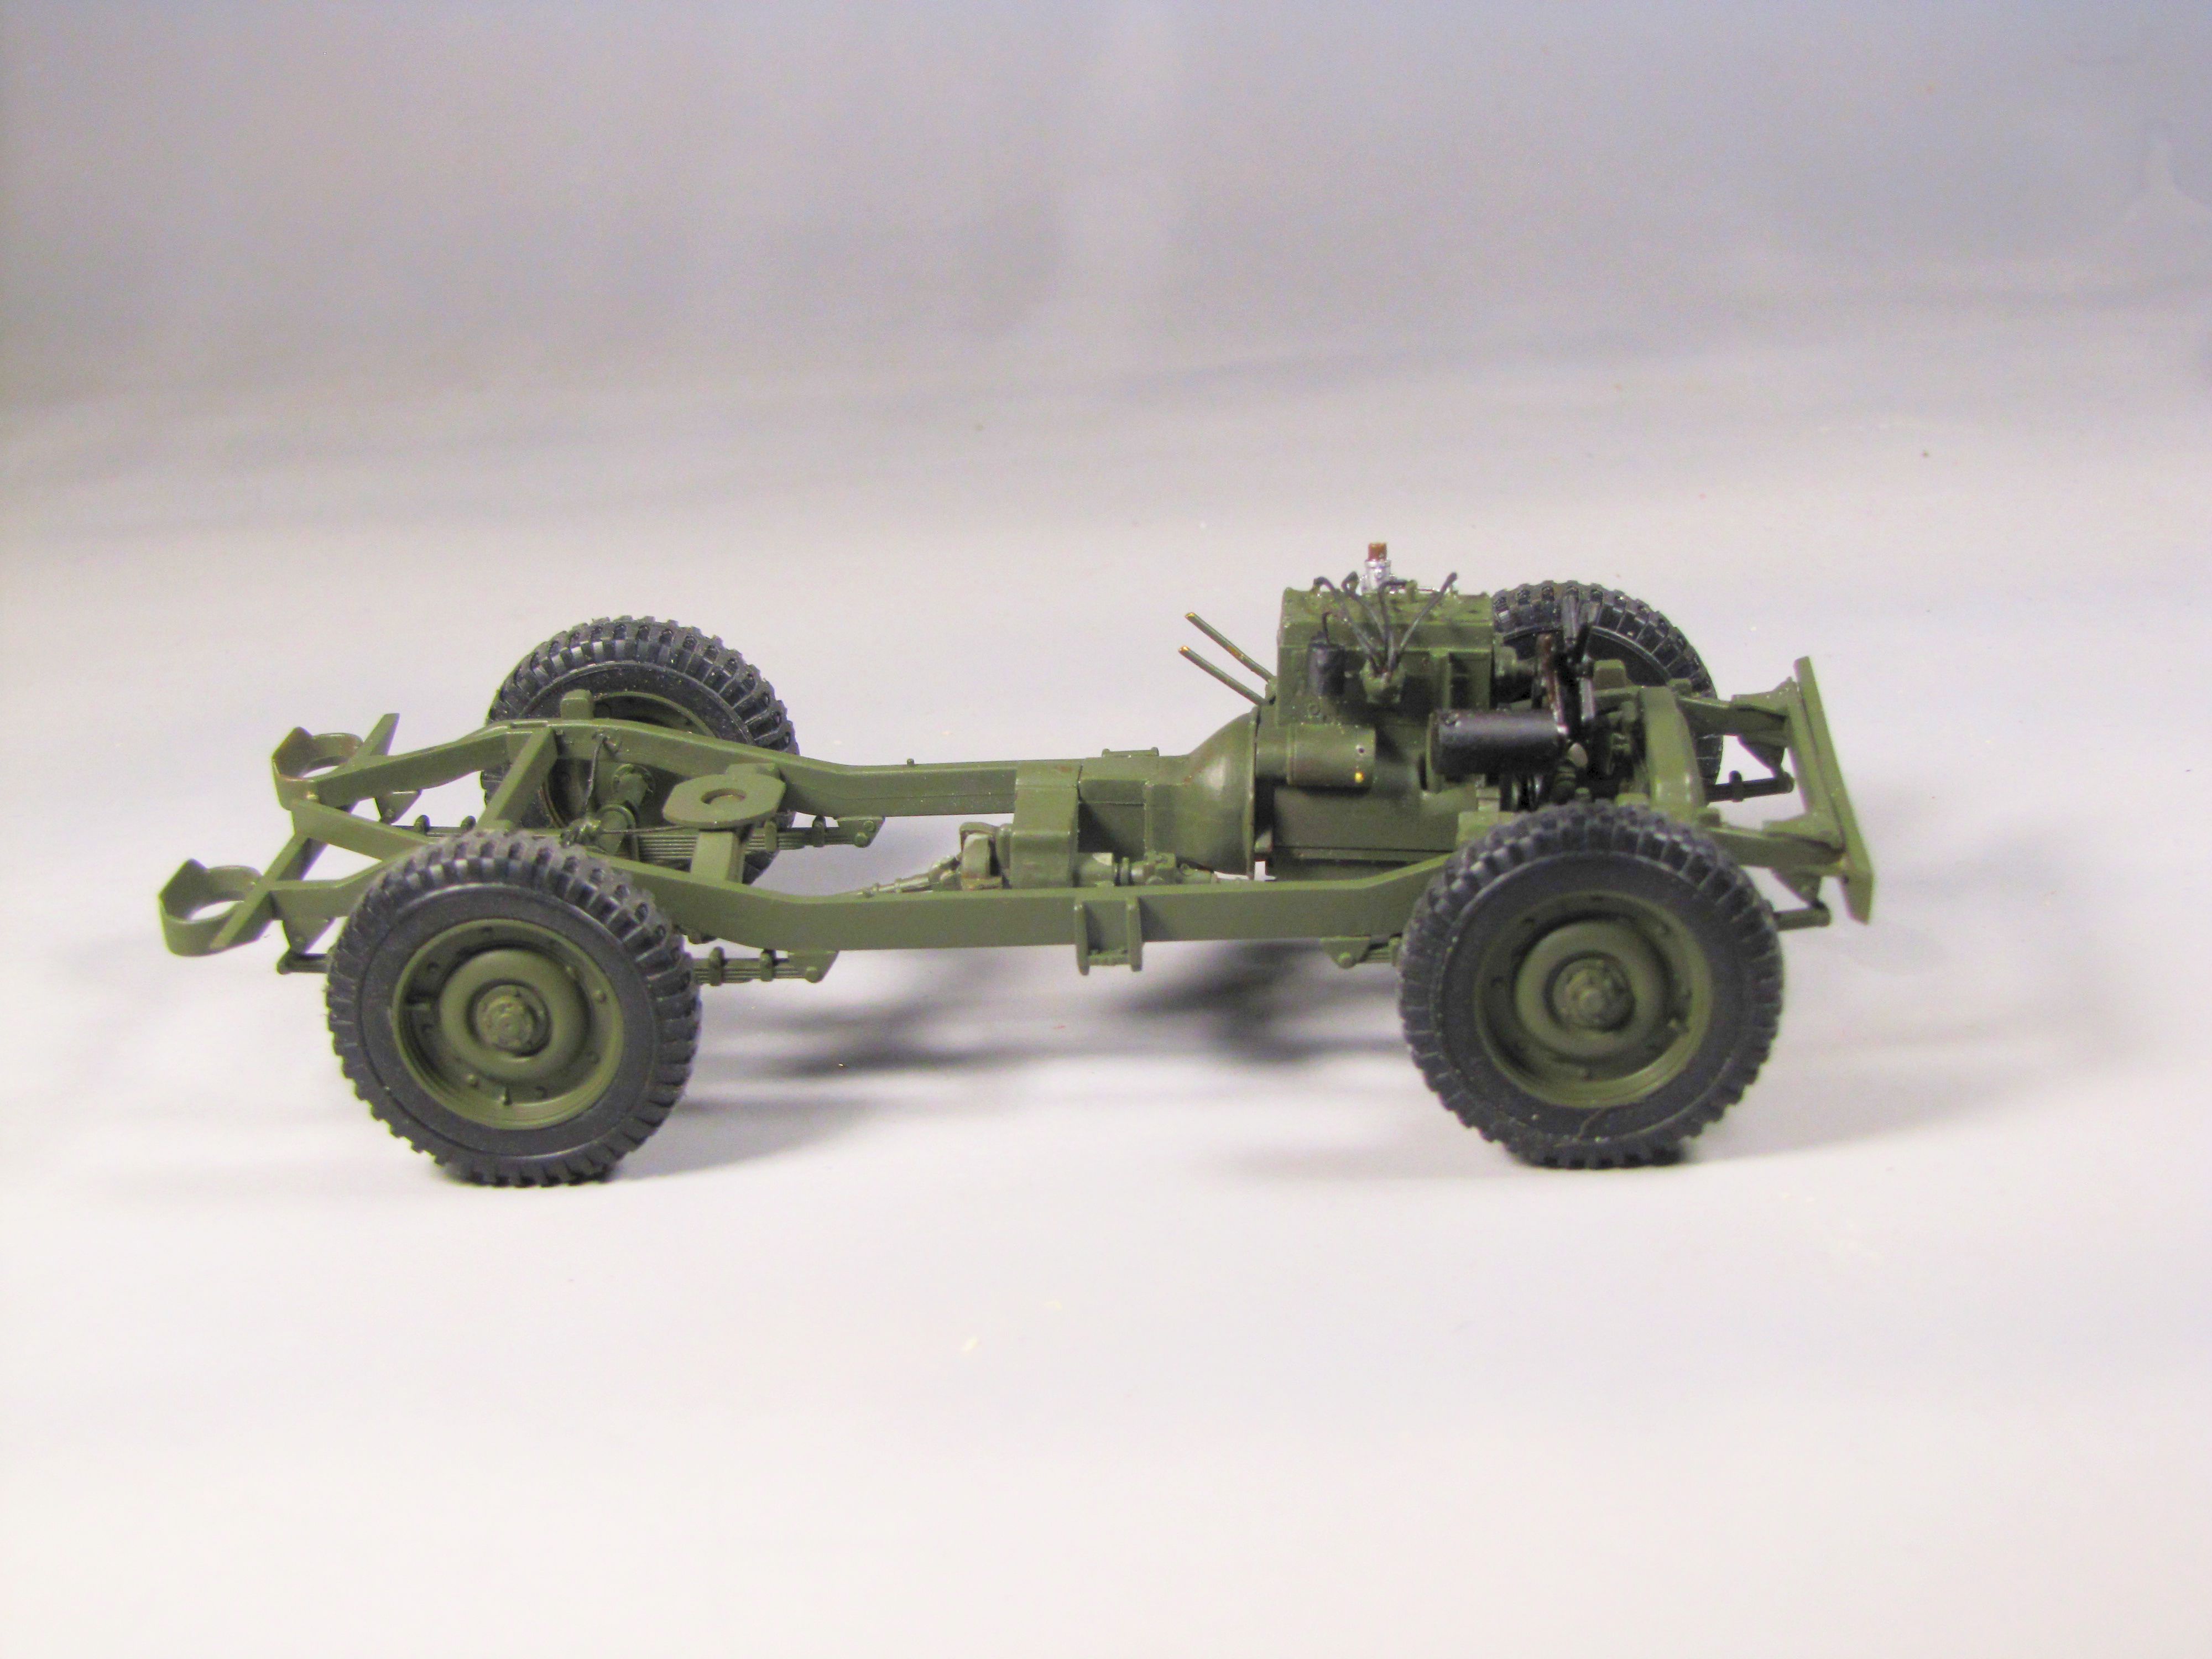
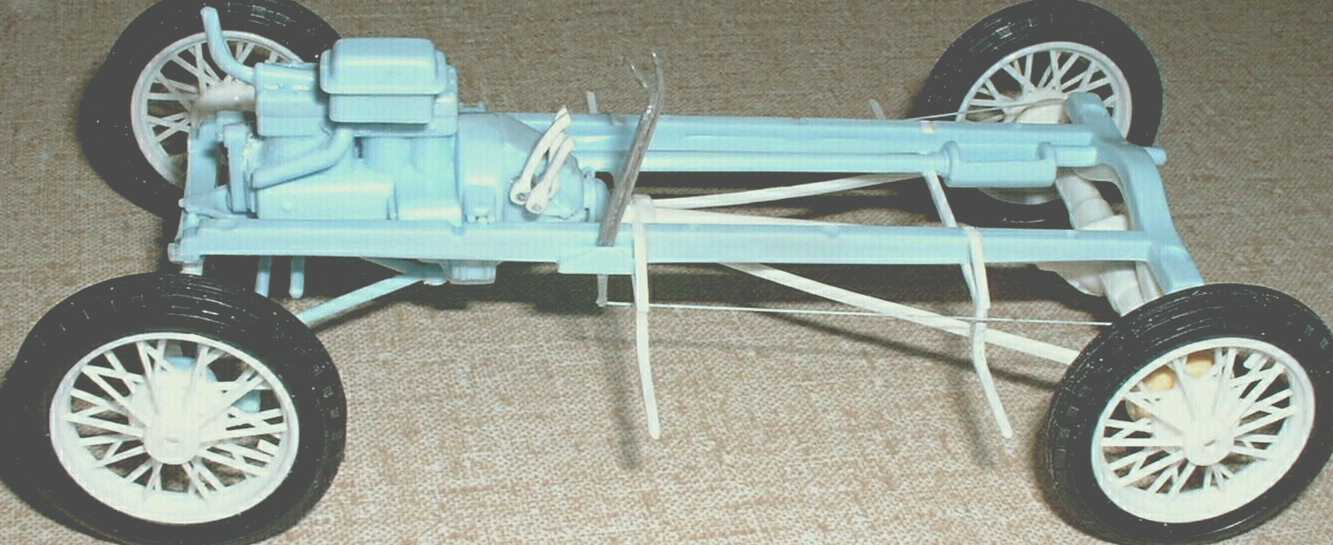
Chassis got wheels and tires installed on the 4th, and has it's completed clutch pedal and throwout rod assembly done.
-
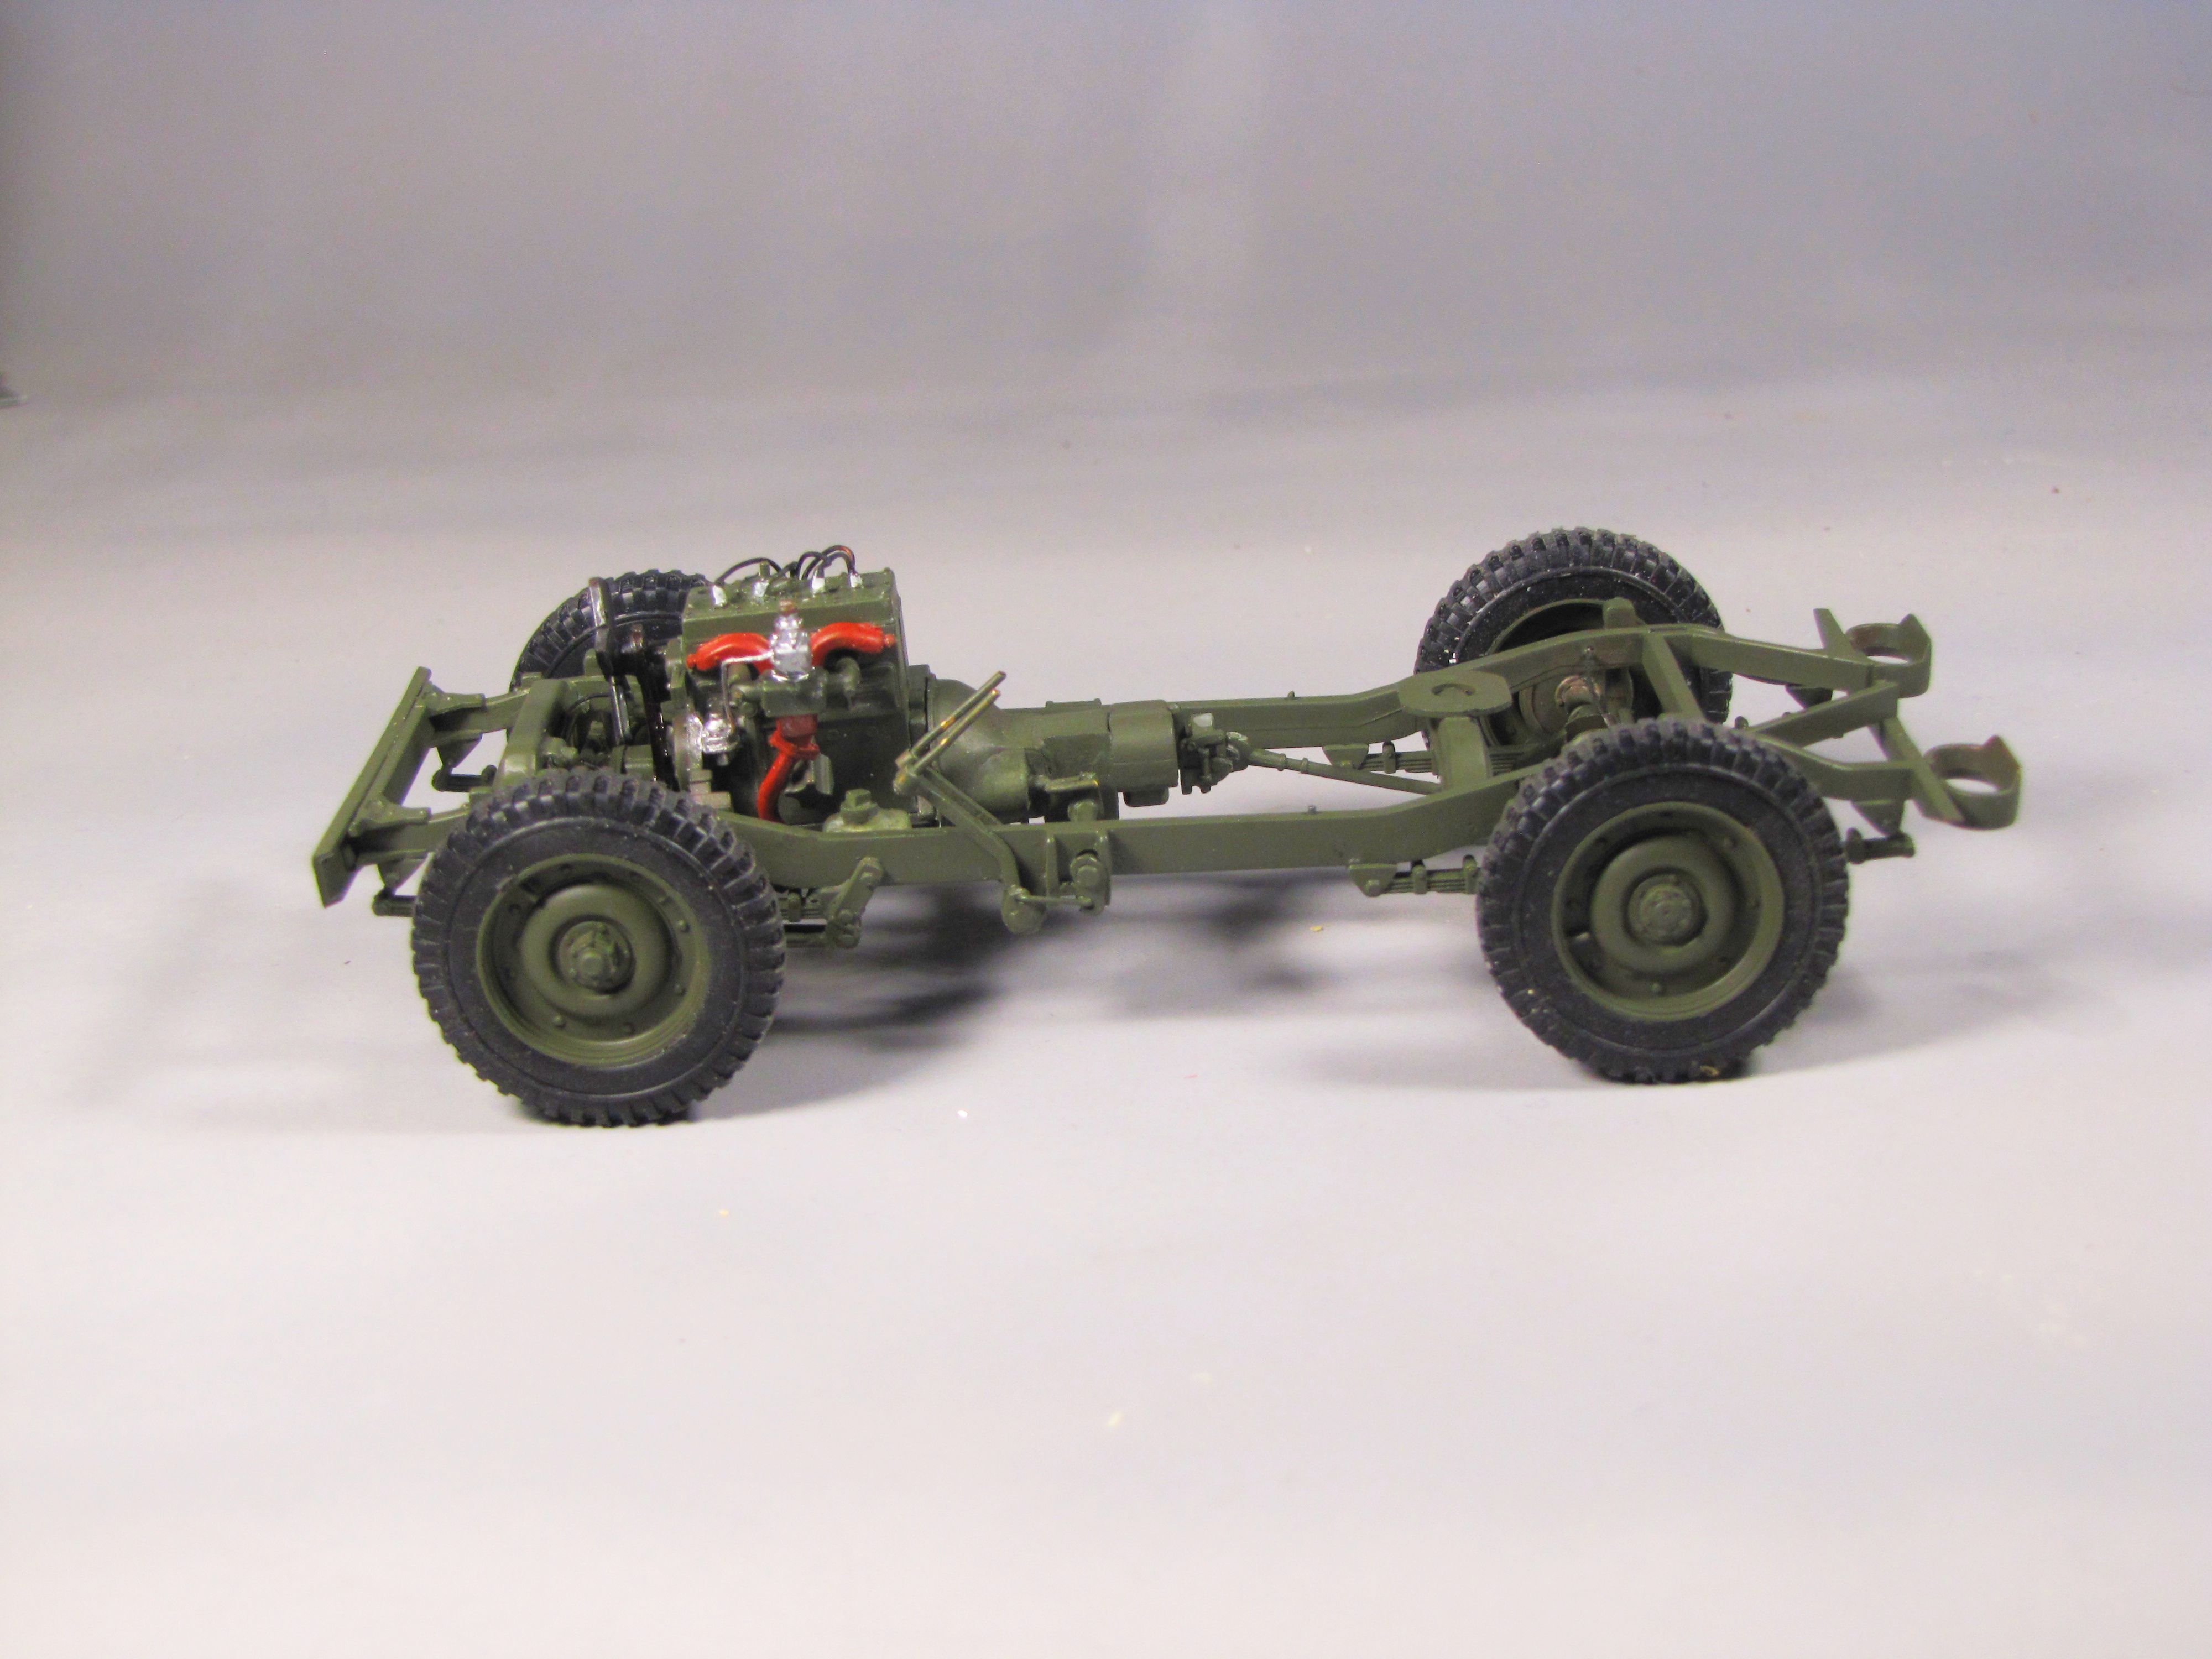
Next up, and more than a bit complicated and frustrating, was the clutch throwout linkage setup--all done in small brass rod, but "anatomically" correct.
-
It's been a good while since I posted up any pics of this one, and I don't see the "search feature", so I'll start a new thread on the subject, with current pics. Most are aware that Jeeps were begun by American Bantam in 1940, but with the sudden, emergency expansion of our US military starting in 1941, Bantam was too small, and in far to shaky financial condition to carry forward--so the US War Department (Army) transferred all drawings, and all production to Willys-Overland in Toledo, Ohio in early 1941. While Willys was bigger, and more financially solid than Bantam when WW-II began in earnest for the US, bigger factories were required for the expected mass-production of what was then officially called a "Truck, 1/4 ton, Four-Wheel Drive", so Ford Motor Company was called upon to hep break the "logjam". Ford started production of Jeeps in early 1942, and quickly added their own detail which sped up assembly--that being the substitution of the Bantam-designed, and Willys-continued, multiple piece tubular front frame crossmember. More than likely, For's production boss, Loren Sorensen and metal stamping guru, Joseph "Sheet Metal Joe" Galamb, in creating a new one-piece front crossmember--a "hat-section" channel steel unit that greatly simplified production--and the Ford GPW Jeep was born. Externally, and in it's driveline, the GPW was identical to the Willys MB, but in the end, Ford produced approximately 50% of the 500,000-plus Jeeps built from 1942-45. This is my Hasegawa 1944 Ford GPW project, in 1/24 scale. It's as fully-detailed as I can make it--with added clutch and brake pedal details and linkages (something which most all makers of Jeep kits seem to forget to include, at least in 1/24 scale. First up is the raw chassis, with a scratchbuilt Ford front crossmember. Also added in this pic are the clutch and brake pedal assemblies, scratchbuilt in brass. Added next, in addition to the pedals and master cylinder, were all the brake lines with appropriate tee "fitttings" (fabricated from 1/16" brass tubing).
-
And, I'll add a completed '26 T Tudor for your mix! I built this one in 2001, using several restoration reference books: First the completed, but unpainted AMT '26-'27 T Touring chassis, and second, completed using the Revell Buttera '26 T Sedan delivery, converted to stock Tudor sedan configuration: (I think I had it at the Gilmore for our model car hobby seminar in February of last year?
Art
-
SAdly, and I say this sincerely: New model kits of most cars prior to say, 1946, are just not gonna sell in numbers large enough, nor fast enough, to justify the development costs. I, along with numerous other modelers, would LOVE to see more Pre-WW-II cars in model kit form, but we're just not that big a part of the market for model car kits.
Art
-
When I was looking at built examples of the Revell Bass Boat the other day, I was wondering why there weren't more modern pleasure boat kits? I think the most recent was the jetski found with the custom Silverado kit, and it was a nicely detailed piece (the trailer on the other hand left something to be desired!) They don't even need to go with the larger cabin cruisers either, there are plenty of smaller boats that would only need maybe 50 parts (including trailer) max, many less than that. Plus, like the car kits, if they are desperate they can easily re-release the kits with new decals and maybe a few different parts/accessories.
I think the answer is quite simple, frankly: Over the years, there have been several plastic kits of pleasure boats, most recently the reissued Lindberg boat kits that came out in the very early 60's---they NEVER sold at all well.
Art
-
Uh, it pays to read the label, folks! Purple Power, like so many other water-borne "de-greaser's" or paint strippers, has as one of it's active ingredients Sodium Hydroxide, a/k/a lye. Lye is well-known to many of my age-mates--our mothers used it around the house when we were kids, and even today, it's the active ingredient in DRANO and other drain-unclogging chemicals.
Lye is highly caustic--for those who remember HS Chemistry, it's chemical name is "Sodium Hydroxide" which is a "base" (the opposite of acid, but nonetheless lethal to most non-ferrous metals, such as aluminum (which is what model kit chrome plating is--and just about any paint other than epoxy finishes.
Just as lye strips model kit "chrome" plating (which is actually a micro-thin coating of aluminum), as well as common ordinary paints and varnishes (another name for lye is "caustic soda"), it absolutely will dissolve any aluminum vessel--often right before your very eyes.
Art
-
An old trick from the days before flat-finish paint for plastic models came about: Add just a bit of talcum powder to a gloss paint--experimentation would be key here--perfect time to use the "spoon test" (airbrush onto the bottom of the bowl of a plastic picnic spoon!). By varying the amount of talc in the paint, you should be able to vary the level of "lfatness". Another solution would be to use a "semi-gloss" clear coat--and one can vary the "sheen" of that by mixing a bit of gloss clear with the semi-gloss.
Art
-
Which one ?
Actually two: 1953 (which was first offered with a diecast metal body 1977-78, reissued a couple of times since with the body molded in styrene, and a '57, also pretty nice, both in 1/24.
Art
-
Thanks for all the advice. I'm glad you told me about the reaction to Purple Power!!! Its what I have on hand and had every intention to use. Strange question. Can I buy paint stripper at Oreilys or Pep Boys? Or do I need to find an auto paint supply store? Thanks again.
Probably you can get aircraft-grade paint stripper at those stores, if not, Walmart does stock the stuff in their paint department, when last I needed to get some.
Art
-
Hi Everyone. I bought my first diecast yesterday and I want to paint it a different color. Can the paint be stripped with Purple Power degreaser or pine sol? Will Plasti coat primer work? Then repaint as usual? Any advice would be appreciated. Thanks
First of all, DO NOT USE Purple Power or any other mass-marketed cleaner for paint removal off of diecast--all of those contain Lye, (Sodium Hydroxide--which is lethal to Zamak, the alloy used in virtually all diecast models!)
But, do not fear, the paint can be removed, without fear of damage to the metal underneath. Go to any paint store, paint department, even many auto supply stores--look for paint strippers labeled as "aircraft"--those are for non-ferrous metals ("ferrous" meaning iron or steel). "Aircraft" paint stripper (and the stuff is widely available) will remove the paint from a diecast model in mere minutes--but be SURE to use proper personal protective gear--in this case, Nitrile gloves (available at most any Walgreen's or CVS stores) to prevent painful skin damage to your hands, and proper eye protection is also very advisable!
Then, once all that factory paint is sripped, WASH the body and associated diecast parts thoroughly with detergent and water, then dry completely. For best adhesion of the new paint job, use "self-etching" primer, which will ensure a very strong bond for the final paint finish--select and spray the paint and color you want! (I've done this numerous times over the years, works very well!
Art
-
I disagree Art. At the quantities they buy their bottles (they buy them by the thousands), they are relatively inexpensive. So are the chemicals they pour into the bottles. The most "expensive" part of those cements in little glass bottles is the profit made by the company producing them. Same goes for hobby paints.
Peter, still though--it's the glass bottle that is the most expensive piece of the equation. Go check on the price of the smaller glass paint storage bottles that are out there for sale. Even if you take 45% off that retail price, at say, Hobby Lobby (which will result in approximately what those bottles cost FOB the glass bottle factory's loading dock, they are still costly. Even the likes of Paasche buy them by the thousands. By contrast, my pint 16 fl oz.) of MEK, in a metal can, set me back a whole $8 back in 2006.
Art
-
I think a '56-'57 would make sense.
It's visually different enough from the '62 to make it appealing to fans of the earlier cars (like me), and it's on the same underpinnings as the '62. Many of the dimensions are identical to the '62, so intelligent use of existing CAD work could streamline the new body tool design
Then, if the CAD files were intelligently managed, it would be relatively straightforward to do a '58-'59-'60 body using the '62 nose and the '56-'57 tail (IF the company wanted to update the existing bodies, which are really quite good).
Uh, Monogram did produce a '57 Corvette, but in their 1/24 scale days--it's actually a very good kit--I built one, did it in real DuPont Sierra Gold (paint mixed to factory spec about 1959 or so--still have the quart can, still quite liquid!).
http://ep.yimg.com/ay/yhst-41037708895877/monogram-1957-corvette-convertible-stock-6.jpg
Art
-
Sorry all. I was thinking Special Edition in general and not Corvettes exclusively. If it were just Corvettes then the '58 and or '59 reissues would make sense. I think that they would need a new tool for any of the other C1 Corvettes. For C2's my personal favorite is the '67 Big Block, but any of them would work for me.
Actually, Revell-Monogram has a very good C1 Corvette--it's 1/24 scale, derived from the one-shot only metal-bodied kit from 1978, but with the body shell shot in styrene.
Art
-
Revell kit # 85-4283 is likely the one you need, builds stock or racing, great start for custom & many of the AMT custom parts can be adapted. If you want a radio in your build, use the AMT dashboard
Won't work, without a TON of modifications, as Revell did the '57 Ford Custom Tudor sedan, which is significantly shorter, in both wheelbase and overall lengh, at least not without a bunch of modifying.
Art
-
Norm Veber's resin engine is a reproduction of the display engine that was included with the 1961 Falcon kit from AMT that year. it's actually still quite well done.
Art
-
IMO, Fujimi EN series--nothing more need be said.
Art
-
I've been starting to collect old model train magazines, in (possibly unrealistic) anticipation of having the space in the not-too-distant future to get back into that particular hobby. The ones I find most interesting at the moment are from the late 1940s and early 1950s. Besides the incredibly high standards of scratchbuilding, craftsmanship and electrical sophistication of train modelers then (entirely contrary to what the "everything is better now" contingent would have us believe) one other thing really stands out.
During this period, MOST HOBBY ITEMS WERE MAIL-ORDERED...from catalog sellers or direct from the manufacturers from ads in the mags...not unlike the online ordering of today, but just not as immediate.
The slow but steadily increasing proliferation of hobby-shops in the 1950s was hailed by train modelers as a wonderful thing...where you could actually see and touch a kit or locomotive prior to purchasing it, and even possibly talk to an actual live human who knew something more than the words in the advertising blurb. Shops that stayed abreast of changing and developing hobby interests (like plastic armor and aircraft and car kits and RC planes, for example) experienced very nice and stable growth.
It's funny how we've gone full-circle, and that, with triple the population now, it's next to impossible for a physical hobby shop to be a viable business proposition.
Speaking from a point of view of slightly more than 70 years, I've seen the hobby shop business for now 65 yrs, since my first Gowland & Gowland Highway Pioneers, worked for avery large full-service hobby shop for 10 yrs--during college and for a few years afterward, shopped several dozen hobby shops stretching from Indianapolis to the Chicago area for nearly 50 yrs--and even owned my own store from 1984-1992 (when I closed that to go full-time resin casting).
Early on, hobby shops had mostly wood and or Strathmore Board (a fine, hard smooth paper product) kis for model railroading, a smattering of wood & diecast metal model railroad cars, metal locomotive kits, brass rail, basswood ties and tiny railroad spikes--model airplanes were either solid wood (like Strombecker) balsa & tissue (such as Comet) or larger balsa gas powered kits that you built up much like a real airplane, then covered with silk, and used "dope", which is a fast-drying lacquer having great shrinking properties. Those flying models were either gliders (like sailplanes), or rubber-band powered--and if we kids could scratch up say, $3.50-$4.00, perhaps a Cox Thimble Drome Baby Bee .049 (that's .049 cubic inch displacement to you younger guys!). The model railroad side of things was pretty much dominated by the likes of Mantua Metal Products (which became Tyco by 1960 or so, and the product lines of William K. Walthers Sr--considered by most to have been the Father of the model railroad industry, having started that about 1940--all manner of milled basswood, cast metal car ends and fittings, even stamped nickel-plated thin steel passenger car sides, with milled basswood roofs and floors--and diecast metal trucks--even scale non-opening cast metal couplers (you coupled those early Walthers cars by hand!).
By about 1951 or so, plastic model kits began sneaking in--but, believe it or not, many hobby shop owners literally sneered at them--they saw plastic model kits as mere toys--not worthy of shelf space in their stores (which catered mostly to teenagers and adults--anything plastic being little kid stuff!). choosing to leave those upstart plastic toy model kits to the likes of dime stores. It wasn't until the mid-1950's that enterprising shopkeepers saw the value of stocking such plastic model kits as were then coming on the market--many old "traditional" hobby shops ignored plastics to the point of their fading away into oblivion, believe it or not By the late 1950's, in model railroading, Athearn (formerly Globe--Irvin Athearn also introduced the model world to the very first Gowland & Gowland plastic model kits before bowing out of those, leaving Lew and Royal Glaser of Revell to rise up, bring them out as Highway Pioneers kits--and along came Aurora Plastics, and a former flying model aircraft kit designer, Paul K. Lindberg came on the scene with a growing line of plastic model kits. Monogram Models, who began business in 1945-46 with solid wood model kits of WW-II US Navy warships, followed by quck-build balsa & tissue scale model flying model airplanes, got into molding plastic model kits--their first plastic model kit being PC-1, a 1/20 scale Kurtis Midget, which hit about 1954 or so--followed very quickly by their long-selling Kurtis Offy Roadster in 1/24 scale. By 1960, the last of Monogram's wood airplanes with plastic detail parts were fading from the scene--molded styrene ruled in Morton Grove IL. Revell kits ruled hobby shop and variety store shelves by the middle to late 50's, mostly with aircraft & ship model kits, only dabbling in model cars--model car kits being pretty much the "stepchildren" of the hobby industry, until AMT Corporation blew the lid off the can in 1958 with their wildly popular 3 in 1 Customizing kis that we all today have come to love. On the model RR side of things, the Atlas Corporation introduced "Snap Track", brass rail and plastic ties, which mimicked in HO scale the sectional track used by Lionel, Marx and American Flyer in larger sizes. New also, from Atlas" was their "Flex Track", which looked just like Snap Track, but with tie strips that allowed you to bend their 36" sections to fit whatever radius, whatever sort of S-curves you wanted--they even brought out flexible cork roadbed to lay it out on--and switches (turnouts) to match. Revell took a brief turn into HO trains, but while their rolling stock failed miserably in the marketplace, their styrene building kits still survive to this very day. The 1960's also saw the rise of fabulously detailed brass HO steam loco models, from the likes of the Japanese companies, Tenshodo and United--brought in by the importer Pacific Fast Mail--and at what we today would consider to be bargain prices--anywhere from about $50 to perhaps $100 for a Union Pacific 4-8-8-4 Big Boy articulated. One wife was shown in a cartoon in Model Railroader, exclaiming to her husband that at $69.95, his United Nickel Plate Berkshire should have been nickel-plated! On the wooden flying model side--the 1960's saw the demise of rubber band-powered balsa & tissue models, gas powered control-line planes ruled (with engine sizes from .19cid up to .60cid --all 2-strokes, using methanol with castor oil added (kinda like miniature Lawn Boy mower engines!)--but by the end of the decade, R/C systems became more available, from the likes of Kraft and CitizenShip (they were out of surburban Indianapolis). Imported engines, SuperTigrre from Italy, and numerous makes from Japan were slowly taking down the old domestic US model engines, such as McCoy and K&B.
As for the 1970's and beyond, I'll leave that to others, simply because most of us here were either young adults, or "coming of age" by then--but I think I've laid out, if more than a bit wordy--some of the story of the development of the hobby shop,and the merchandise lines that they carried, in my lifetime.
Art
-
It's been around for a long time, works well, as does the little hypo-needle pipette applicator they sell.
I use mostly Plastruct Plastic Weld (orange label) these days, or Weld-On 3.
I'll second what Bill has to say on this subject. That said, I'm still working with a pint of Weld-On #3, that I got at a plastics supply house over 10 yrs ago. Virtually all the ultra-thin, fast drying liquid cements we use are MEK (Methylene Chloride) which itself is not at all expensive--rather it's the packaging that costs--glass bottles are not cheap folks! It's the glass bottles that most packagers of the stuff use that's the most expensive part--go price those glass paint-storage bottles for airbrushing and you'll see. $7 or thereabouts for a 1 oz bottle of Micromesh? I paid about $8 for my pint (16 fluid ounces) of Weld-On back over 10 yrs ago, and even allowing for the inevitable slight evaporation over the years, it's still one of the best bargains I've ever gotten, in my opinion. I simply decant the stuff into my Micro-Mesh bottle with a simple syringe.
Art


AMT 1957 Del Rio 2 tone paint process?
in General Automotive Talk (Trucks and Cars)
Posted
Actually, it's just as easy (and due to the possibility of the pink wanting to "bleed" through white) to do as all of us suggest--do the white first, then mask that off, shoot the pink (white has never bled through any darker colors in my 50+ years of masking for two-tone paint schemes.
Art