

Jake-Off
-
Posts
55 -
Joined
-
Last visited
Content Type
Profiles
Forums
Events
Gallery
Everything posted by Jake-Off
-
im lovin the stripe on that thing, very clean looking build ya got there, and also with the phone line u can use the copper for hot rod gas lines and vacuum lines, and save the coatings since they can be used for plug wire boots that look real close to scale... i just tested that out a second ago telephone line gets a thumbs up from me
-
idk if i should keep the inner wheelwells brown or go to pink idk where my spare floors r for this kit so i cant show a pic of them pink.
-
pretty slick... did u use sharpies on the pipes errr what?
-
60 Ford Starliner.... UPDATED 2-1 Engine & Interior
Jake-Off replied to raisin27's topic in WIP: Model Cars
think i might have to re do my plug wires now, since how they look like radiator hoses on mine, and i have pleny of ethernet wire since im all wireless now, but im feeling pretty lazy today so i dont think thats going to happen. awesome build btw -
thanks for the pics guys they help alot, i just wasnt sure how big or small they were, and it seems that the higher numbers r the smaller bits, i was just courious cuz i was looking at these sets online and i had no idea how big or small they were... some times it would be nice for them to put a scale of some sort or even a penny next to the stuff
-
i was thinking of ebay but i dont really understand the #60-#80 type stuff besides thats how u identify them from each other, but like what would be the right sizes for doing carb details ya kno or what sizes should i look for in a kit
-
thanks i'll take a look today most likely
-
no man thank u for the complements. but im in good at my usual hobby spot, get them deals, which is nice on the wallet, well my girls wallet right now.... i leard not to tell my boss what i really think of him, which is one reason why i have time to work on the scale cars, instead of my real ones. and the shortage of money to build my motor. but im trying to find a job in a body shop instead of a cold wet damp radiator repair shop. lol body shops need to be warm for everything to work right lol warm is nice and i have a way with metal
-
i was looking at the hobby shop i go to for the detail stuff, theres walls of detail stuff, and i never saw drill bits but the pully kits cost more than the model it self which is rediculus, a guy could put quite a bit into the detail stuff, but i need to get out of heating up pins with a lighter so drill bits need to come first, but i guess ud be the guy to talk to about detail stuff, i found this site through one of your models, cant remember which it was but i was stunned by the detail
-
here she is, not perfect and also the first time doing carb linkage and all that good stuff. btw where do i get super tiny drill bits
-
thanks man, but i found a thread in tips and tricks about this same thing, i just over looked it befor but my woman has a mac and we down loaded a font ironically nammed beauty school dropout i just need to print some stuff out, but first need to get white decal paper, i tried with clear but i soon found out that it dindnt show up all that well on brown
-
how do i make interior look ripped
Jake-Off replied to caseya's topic in Tips, Tricks, and Tutorials
i did kind of the same thing, except i used double ply with a constant design in it to give a bit more texture to the "foam" and seat cover then just peel apart the two layers on the corners or rip the one layer, and pretty much glue it on like flocking with the interior color paint obviously ten i hit it with tan and brown to give it more depth and grittyness,. pretty much what diymirage said but heres some photos of my first ever torn up interior, its faily easy and simple since nothing really has to be "perfect" since ur making it look f***d up anyways hope these help to give u some ideas -
well i went and got a sheet of decal paper and printed out my lettering, but it seems like the ink is separating a bit but im letting it dry now and then going to coat it with a thin layer of flat clear, but if i dont like the end results, then i will bring the file to a pinter and see what they can do... but if u guys got a secret on printing kustom decals let me know please. the model wouldnt be all it can be with out this decal on it... and i prolly should have this in tips and tricks huh?
-
im working on a 62 catalina kustom, which i have named beauty skool dropout, if u have seen grease then u might have a good idea of the colors lol but im in a bind, i need to know where who or how to make decals if u could help me out let me know it would be much appreciated i thought of stencils and paint but id much rather just do a decal thanks alot jake
-
thats pretty funny man, but no i dont.... i just have a messy work bench, and with moving stuff from my table to the bench it miht be in a model box with a bunch of spare parts getting all scratched up but wjen i was younger and had cats i did have that problem offten since i built most my models on my bedroom floor, i was 6 or 7 at the time...and never built a snaptite. i just had to use the orange smelling non toxic glue that i sniffed often what can i say, the stuff smells good but adhered for.... well im sure u know. but i watched my dad build models alot when i was a tike, and the same goes for 1:1 cars as well
-
a lil later than expected but heres the body and interior. the interior still needs work and touch ups and details, but it gives u a better idea of what its looking like. the body still needs bare metal foil...and the hood is MIA. no clue where it is so i might be buying another kit for the hood. and the camera was acting up so i didn't get the best pics, but hopefully u can see the level of shine in this thing
-
i havent had much time lately.. things r getting hectic with my woman moving in and stupid family drama... seems as if none of them r happy that i've found a girl i wanna some what settle down with ya kno... i know im only 19, but i've been with plenty women so i know when i have something different so im sticking with it, and plus shes a gear head chick so yeah....i id be stupid to let her go ya kno but i do have a bit more done, got my interior almost done. just need to figure out which of the three interior colors im going to paint the dash pad, so i needed to step away for a bit anyways. and i have it all wet sanded and polished but im not going to go into detail too much, prolly just a distributer and all the hoses and that will be that and once im done with the wagon and the other 4 projects im going to dig into the 64 catalina custom i got, which that one is going to get alot of detail since the frame is separate from the floors but i will take some updated photos right after the dash is done so should be tomorrow night some time with the good camera oh and did i mention i also got a ps3 2 weeks ago
-
i went and got the micro mesh pads, and they were woth every penny, i have about 5 spare bodies that all shine pretty well, but i still need to go out and buy some of that other stuff cotto....try it with water and end at the finest grit u have, the water acts as a lubricant so u dont get deep scratches, and it helps the life of the sandpaper...after ur done wet sanding it should have a decent shine to it, and using cotton cloth u'll end up with some small scratches, so then try the trick that marcos suggested. i personally dont know how well it works, but it looks like it works pretty well
-
i just got my first wet sanding session done, next another few coats of clear and more sanding, a little trick i learned on how to get a nice deep look....and i went and got some glaze to finish up my interior aswell....but i hope u mocked everything thing up cuz every thing line up like ###### on mine i should have know it was gonna be like that when i found the rear sway bar broken and the heater box messed up...right along with the rocker trim thats broke...but i hate how the dash sits in it... but i'll make it work, oh and i got alot of tape in my future, i decided to do the frame yellow and the floors silver urs is looking much better now that its polished up, interior is looking good too, but wheres the pumps and dumps, i see the bats
-
yeah, do it!!!!! the more the merrier hahaha .....wagons r' us anyone lol
-
thanks man, well so far i got my motor almost done, i was gonna do the billet pulley's and all that crazy stuff, but i got a 62 catalina custom coming so that'll will be my first attempt at the crazy engine detail but with the wagon i'll be mocking up the chassis soon so i can find some wheels i like, i do have some chrome spoke gold lip lowrider wheels i was thinkin of putting on it, but i just might put some corvette rally wheels with white letters... but i'll get back to the wagon after my brass zoomies r done on my 29 model a. i have five projects going on right now, since i get board with one then move to the next till i come up with new idea's but your's might look good with a nice tan and brown interior
-
that color is pretty rad man, but it looks as if these wagons r pretty popular right now there 3 of us doing these
-
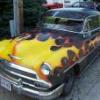
thanks man, didn't know if id like the order of the colors, i still think the lower half would have looked better in black, but o well it looks rad how it is, but it took me about two days to figure out the order of the colors, since theres many different variations with four colors ya kno
-
id like to see what it looks like when its finished, i finally got clear on my 66, but i need to wet sand it then im gonna put two more coats of clear on it.... im trying a trick thats used on 1:1 cars to make the colors look supper deep, but i cant wait to see what this thing will look like
-
dude thats pretty (edit) slick, i have a few slammed models my self, one 51 fleetline that i chopped and sectioned (before i found out the made resin chopped 51 chev's) and the other two r hot rods, all old skool style i like the paint on that, i see u painted it atleast twice but it looks awesome, im pretty fond of the black and bright ass green, but good lookin truck all around