traditional
-
Posts
469 -
Joined
-
Last visited
Content Type
Profiles
Forums
Events
Gallery
Everything posted by traditional
-
-
These two mild custom pickups (1/18 scale) were built a few years ago using typical custom trends of the late 50s and early 60s, including louvered hoods and tailgates, white custom interiors, lowering, chrome steelies with wide whites, custom exhaust (polished aluminum tubing), snap-on tarps over the pickup beds, custom paint etc. The '53 Ford also has a fully plumbed/wired 4-carb (incl linkage) Desoto Hemi, custom tube grill, canted quad headlights and fenders, sunken antenna, rolled rear pan etc. The '49 Ford uses an Olds engine with six strombergs, running board mounted antennae, custom tail-lights and an added rear bumper. The carpets are white felt, the tarps use pin-heads as the snaps, and the Merc style hubcaps are made from fabric snaps found in craft stores.
-
That '36 rod is both beautifully conceived, and beautifully executed.........I love everything about it. Great modelling!
-
-
Usually, my brother and I find ourselves modifying model kits or damaged stock precision diecast models into hot rods. This was just the opposite.....My brother, Larry, has spent the last few weeks modifying a TESTORS metal hot rod kit into an accurate, highly detailed, stock 37 Ford sedan....a one-off precision diecast. Keeping only the main diecast body shell and fenders, he adapted a chassis from a badly damaged and incomplete Danbury '36 Ford cabriolet, making appropriate new springs, shocks, drive shaft, and motor details. Using reference from a real car he fabricated the complete interior including floor, dash board, door panels, window frames, seats, handles, levers, and gauges. Moving on to the main body shell, an accurate firewall was fabricated with all its electrical components...battery, solenoid, wiring, and linkages. He cut open the sealed trunk and made an opening trunk lid (in aluminum) with its inner formed structure, support bracket, and micro hinges. That meant the inner trunk details were necessary...bulkhead, spare tire, luggage shelf, etc. The additional outer body details include fuel filler and cap, fender welting in fine black wire, and running board support brackets (visible underneath). The colour is correct Dalmation Green which we applied in my paint booth using base coat/clear coat. We are both very pleased with the result, not only because the model appears authentic but also because we are unaware of any available 'stock' 1937 Ford models.
-
Hi Jeff, No, I don't have any examples of an HHR model at all (other than a 1/64 Johnny Lightning), but if anyone decides to make a kit, I'd be 'all over it'. Bye-the-way, my wife has an HHR (windowed version) as well....it's a year-round driver, but my panel goes away for the winter. I assume by your avatar that you're an HHR fan yourself.....I think that they're one of GM's best kept secrets....smooth, comfortable, and economical. I knew that I wanted a panel version as soon as I saw it...no practical reason,,,I just love sedan deliveries.
-
Here, also, is one of the factory pics that the Mack Truck Museum in Allentown PA supplied to me. This is the very vehicle I used as my prototype
-
This model Mack B61T tractor and trailer were just completed in early September of this year and it was probably the most effort I've ever put into a single model....approximately 220 hours (according to my wife). I've always wanted a detailed version of a B model Mack sleepercab and I'd had a coarse 1/25 'Etter' resin sleepercab in my to-do cabinet since the mid 1970s. A damaged FirstGear Mack wrecker was bought cheaply on Ebay in the early summer and became the impetus to get the project finally started. I bought a resin fifth wheel, rear axle/suspension, and front bumper and modified them all to suit my needs and reference. That reference, incidentally, was generously supplied by the Mack Truck Museum in Allentown PA, and included the info on the Dorsey refrigerated trailer as well. I fabricated all kinds of brackets and fittings in styrene and aluminum etc. and made hinged, openable storage cabinets and cab vent-door. The super-heavy-duty chassis of the FirstGear model was modified to be lighter and shortened, twin battery boxes fabricated in styrene, and air lines added to the brakes/tank etc. The aluminum tubing exhaust, muffler, clamps and brackets were fabricated also to match my Mack factory photos. I also took a little time to fabricate some wheel-chocks, flashlight, flare package and first aid kit from styrene, aluminum tubing, wire, and small chain etc. to put into the opening storage cabinets. I modified an AMT Great Dane trailer to match the 28' Dorsey trailer from the reference that I had (shortened, lowered and relocated side door), matched the refrigeration unit, and finished the ensemble using automotive filler, primer, and custom mixed basecoat/clearcoat.
-
That's really pretty, and period correct. A very crisp and clean build as well....Great job!
-
These customs were built a few years ago, and were my first foray into trying to work with diecast starting material. They both began as stock mainstream diecast models bought at WalMart for somewhere between $14 and $20. I learned quickly that working with diecast substrate is a bit different from the plastic processes that I was more accustomed to in that any major modifications like chopping, channelling and shortening etc. has to be fastened mechanically if there's going to be any durability. The familiar plastic solvent-weld technique had to be replaced with 'drilling and pinning' before any filling and blending could take place. The advantage of diecast is that you can easily use standard automotive fillers, primers and paints and ,delightfully, the models have much more longevity with these automotive materials. Over time you don't get those minor 'sinks' that seem to appear as plastic solvent-welds shrink over time. Both these models use felt as carpeting and they both have engine swaps to go along with the bodywork....the '50 Ford uses a modified Oldsmobile engine and the Ranchero has a modified Cadillac. They both have lots of engine detail including the usual wiring and plumbing. The undersides are finished with polished aluminum exhaust systems and all brake-lines and fuel-lines etc. I had a lot of fun building these models and because they're kept in display cases, they've maintained their integrity over the years.
-
Something completely different.......1/12 Austin A35 Panel
traditional replied to traditional's topic in Model Cars
Yeah, I just mixed the color to match some reference that I'd found and I'm happy to hear the actual name of that color...Thanks. The kit is a very simple kit...I suppose intended for younger modellers but, fortunately, the proportions are quite good and the plating is smooth and clean (not like the car in the movie). For some reason, I've always had a soft spot for the A35/40 Austins and especially for the little panels, so this simple model filled a void. -
Every now and then, I find myself doing something a bit 'off the wall' and this is probably one of them. Airfix (British) makes a model kit in the 'Wallace and Grommet' series of a cute Austin A35 with all the dents and rust holes of the movie version. I find these tiny Austin panels quite cute and I remember seeing a couple of them running around in Canada when I was growing up, so I decided to 'RESTORE' the Airfix model to represent a 'like new' panel. All the simulated rust and dents were filled and finished and the kit's 'dog-leg' door hinges were replaced with tiny brass modified cabinet hinges. I fashioned the small 'flying A' on the hood from a thin sheet of polished aluminum, and painted the finished body in an authentic period color using automotive basecoat/clearcoat. I'm really delighted with this 'not so small' finished model of a tiny vehicle. Please note; the actual color of the finished model is somewhere in between my pic colors. The various lighting that I used caused some of the pics to come out a bit dark and others a bit light. Hey! life goes on.....
-
Although I build plenty of plastic models, I've grown to really appreciate using inexpensive damaged diecast models as starting material for model projects. They are usually far more detailed and proportionate than many resin cabs and, assuming that the damaged (hence inexpensive) parts are not going to affect your building plans, they can be much less costly than their resin equivalents, and will usually be far more durable and permanent when finished. They also generally take well to normal automotive fillers, primers and paints etc. The downside is that they're often very finnicky and tedious to disassemble for paint stripping/modifying without damaging the various plastic parts that are part of their initial assembly. These days, I'll use any materials that are going to give me the best outcome...I no longer care whether the material is plastic, metal or whatever. This Mack B53 hydraulic concrete mixer uses a paint-stripped and modified FirstGear 1/25 towtruck as the basic chassis cab and a modified resin mixer drum with lots of handmade styrene, wire and aluminum tubing parts to complete the assembly. Most of the unrealistic chrome plating was painted out (grill-shell, windshield frames, mirrors etc.) and any unnecessary holes filled before automotive primer, basecoat and clearcoat was applied. The vertical exhaust stack was fabricated in aluminum tubing and mesh with some handmade brackets etc. and Letraset was used for the various lettering/logos. The standard Mack front bumper and braces (the wrecker had a massive'pusher- type' bumper) are formed in styrene. Incidentally, My computer only allows me to add one picture at a time and then I have to edit the post to add pictures.........so if you only see a couple of pics, give it a few minutes and they'll all be added. Thanks
-
Actually, on the L130, the frame mounted gas tank extended beyond the cab (behind) and the gas cap was accessed between the cab and the stake body. I guess, since the 'Comfo-Vision' cab was marketed to many other manufacturers as you mentioned, they avoided using a thru-cab gas filler wherever possible.
-
That is exceptionally well done ! Beautiful detail..... Congratulations.
-
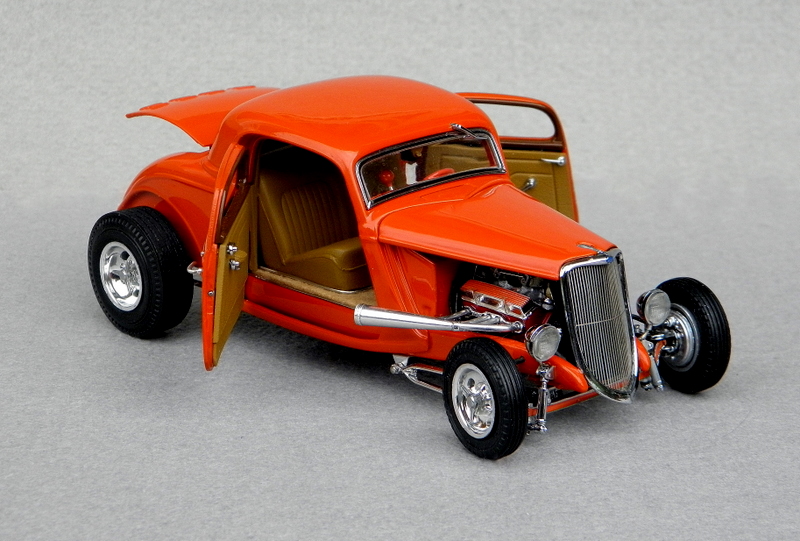
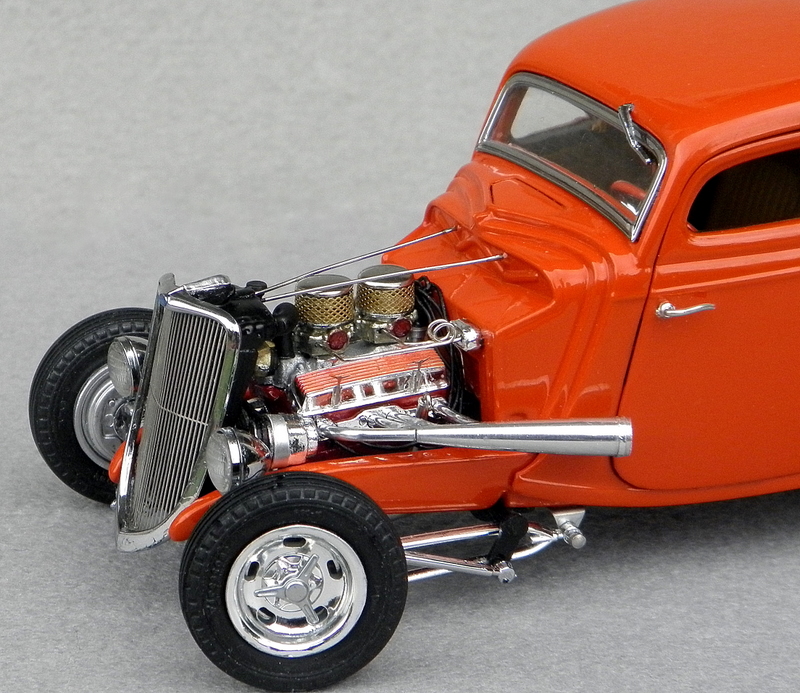
Someone asked if I could show more pics of the '34 Hot Rod so I'm attaching some shots showing additional detail etc. The underside view shows the handmade rear suspension (individual aluminum strip leaves for the "buggy style rear spring etc.) as well as the brake-lines, fuel-line, and 'hairpin' brackets etc. The opening fabricated styrene trunk is finished in felt to represent carpeting, and a gas filler is mounted in the lower trunk (a good reason to do the louvres on the trunk lid). Door handles are formed from plated wire which goes through a tiny length of polished aluminum tubing (to look like the mounting flange). Incidentally, the one-piece hood is also handformed from sheet aluminum. Someone also asked about paint and primer. I use RM Dimont automotive one part primer and basecoat with two-part clearcoat. Although automotive basecoat/clearcoat can be somewhat dangerous without proper ventilation etc., I luckily happen to have a decent set up for using it because my brother and I also restore real cars for ourselves and have accumulated the appropriate equipment over the years. I can only add one pic at a time here, and then have to add others by editing the original post so it may take a few minutes until the pics are all attached
-
This model was a collaboration between my twin brother, Larry, and me quite a while ago. The truck represents one of the first trucks that we both had the opportunity to drive in when we were little tots. My father, who was president of a chainlink fence company and had just purchased the new one-ton International for the company, allowed us to drive with him while he delivered it from the dealership to the fence company yard. The 1/25 starting material was a basic '53 International diecast cab from a Speccast pickup truck (hardware store promotional). The '53 has a different grill, hood, and fender detail from the '52 so Larry fashioned a new 'front face' in brass including all the various bright trim which was sent out for real chrome plating. Larry also handmade a brass, steering front I-beam axle and the styrene/aluminum/and brass one-ton chassis, fuel tank, exhaust, and axle/suspension. The stake bed was fabricated in styrene and, in order to have the exact style of truck wheels necessary, they were fabricated from modified (believe it or not) fishing 'bobbers' inserted into lathe turned rims. Cab heater, engine detail, brakelines, brass hinge-mounted rear view mirror etc. were added (fortunately, we'd accumilated lots of factory reference over the years), and the paint is custom mixed basecoat/clearcoat. This was a labour of love for both of us since the 1/1 vehicle held such formative nosthalgia and, although one ton stake trucks may not be everyone's cup of tea, there may be a few of you who'll enjoy seeing the finished model
-
My 2008 HHR 'panel'
-
How can I attach a few pics on my posts? (not just thumb-nails)
traditional replied to traditional's topic in Model Cars
Thanks, Terry. I've tried that method using photobucket and it'll allow me to attach one pic. When I come back from photobucket with a second pic, the topic has disappeared. I see many topics with quite a few large pics, but I seem to be limited to just two to four thumbnails. I'm obviously missing the correct technique. -
I'm sure one of you guys can probably help me. I can't seem to locate info on attaching more than one pic onto my posts. Ive been able to attach thumb-nail pics, or else a single pic, but I know that there must be a way....I see lots of posts with multiple pics attached. Also, what is a "TOPIC TAG"?? Thanks, Cliff
-
I've just completed this channelled, chopped '34 Ford coupe using a diecast body (originally full fendered) with many handmade parts in styrene, aluminum and brass. The wheels, rear tires, engine (bare block and valve covers), quickchange (center section only), and basic hairpin radius rods are from an old Monogram California super-modified, and the engine detail is mostly handmade....dip-stick, mesh filters,fuel-lines, linkages, wiring, plumbing etc. The exhaust headers and conical motorcycle-style mufflers are turned and fabricated in aluminum, as are the shock brackets and the individual leaf rear transverse spring suspension. The traditional bench seat is handmade in styrene with the pleated inserts taken from a Revell Monogram deuce roadster kit. Louvres were added to the trunk lid, floor and trunk carpeting is in felt, and the paint is custom mixed basecoat/clearcoat

-
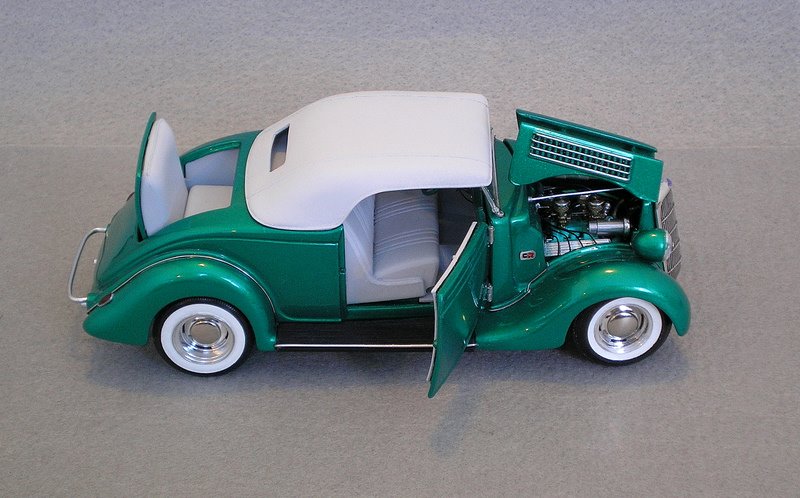
I've recently completed this model of a '35 Ford Hot rod by merging the front clip from a cheap diecast '35 Ford sedan delivery onto a damaged (super inexpensive)Franklin Mint '36 Ford Cabriolet. Although the real '35s and '36s shared most of their main bodies, the fenders, hood and grill are entirely different and because of the discrepancies between the two models that I was grafting, a lot of modifying and adjusting was necessary to make the union an acceptable one. Both models were completely disassembled and stripped of paint before I could drill and pin (with stiff wire and epoxy) the various parts so that the mostly diecast model would be durable, since I didn't have the advantage of solvent welding as on plastic models. The stock flathead motor was replaced with a mid fifties Cadillac V8 using four stromberg 97s and including all wiring, plumbing fuel lines, linkage, and working dipstick etc. The front axle was dropped considerably and a later Ford rear axle and parallel leaf springs replace the stock 'buggy' style spring. Paint is custom mixed basecoat/clearcoat and dual exhausts are formed from polished aluminum tubing. The 'Carson' style top is fabricated from styrene and bondo with fine wire glued onto the outer edge to simulate the upholstery 'beading' usually found on that style of top. Since I'm a real fan of traditional style hot rods, all the accessoies and details are chosen with that in mind. Even though it's not a standard plastic kit, I hope some of you will enjoy seeing the latest of my modified diecasts.