Aaron Corey
-
Posts
44 -
Joined
-
Last visited
Content Type
Profiles
Forums
Events
Gallery
Everything posted by Aaron Corey
-
 Thanks for the kind comments guys. This build is going a lot more smoothly than my last one (a lowboy trailer). Having the right tools for the job certainly makes a difference. After building the lowboy with all of those crossmembers under the deck, I decided to get a miter-rite from micro mark. Waaaay easier to make accurate, consistent cuts compared to those extruded aluminum miter boxes that often come with razor saws, plus it can be set to any angle. The lowboy turned out okay, but gluing the frame together when some of the crossmembers were roughly 1/32 of an inch shorter then the rest was a challenge
 -
I've added a couple of extra drawings along with all of the project photos I've taken so far to my Photobucket album: http://s1101.photobucket.com/albums/g435/aaron5153/Midland%20dump%20trailer/
-
Hey Chris, thanks for the info on fifth wheels. Finding out how this stuff actually works is half the fun of scale modeling. And it can actually help with making more accurate models, since the functions of some things isn't always obvious from looking at photos. Feel free to make use of my drawings, that's why I posted them. This forum is a great place to find info on trucks and trailers, so I'm happy to make a contribution to it (even if it's just a small one). I've also had a little bit of training in drafting (mostly in high school). I've got a few more drawings for this project, so if anyone's interested I can add them to this thread. Here's my latest progress on this build:
-
I've also got the oscillating upper fifth wheel built. I think the purpose of this type of setup is to allow the trailer to tilt when being pulled over uneven ground.
-
I've received my order from Plastruct, so now I can actually get this build started. So far, I've built the sides of the trailer. In this photo, one side is complete and the other is partially built to show how it's constructed:
-
I've decided to start a new project: building a belly dump trailer from scratch. I got a few inquiries on my last project about the materials and methods I used, so I thought it might be helpful this time to describe my build process in greater detail. My first step, of course was to choose a specific subject to use as the basis for my trailer. In this case, I chose a Midland MX2000 belly dump: I was able to find a brochure with dimensions on the manufacturer's website (http://www.midlandtr.../brochures.html), so that really helped with my next step - creating 1/25 scale drawings: Personally, I find it very helpful to create these drawings for two reasons: First, it helps me figure out the dimensions and the cut angles for all of the pieces I need to make; and secondly it helps me figure out what pieces I need to buy (I use mainly Plastruct styrene stock). I use a program called Microsoft Visio to create my drawings. I just placed an order with with Plastruct, since I was missing a few pieces, so now I just need to wait a week or two before I can start the building process. To be continued...
-
Homemade decals
Aaron Corey replied to mysterj1's topic in WIP: Model Trucks: Big Rigs and Heavy Equipment
For text, clear film would be the way to go. The issue with light colors on a dark paint job is that inkjet printer ink is translucent, so the underlying color (brown in your case) would show through. The only way around this that I'm aware of is to use a printing process that allows you to print with more opaque pigments or print a white layer underneath the color layer. Most consumer printers these days don't have this capability, but a print shop may have access to printing techniques that would do the trick. For example, they might be able to screen-print a white text layer first, then lay down your yellow/orange color on top of that (I believe that's the process that model kit manufactures use for their decals). As long as the two layers are perfectly aligned, you won't see the white layer. -
Homemade decals
Aaron Corey replied to mysterj1's topic in WIP: Model Trucks: Big Rigs and Heavy Equipment
I've used the decal film from Bare Metal Foil (http://www.bare-meta...Decal-Film.html) to make custom decals. They offer both clear and white film, depending on whether or not your decal design has white areas. Also, bright colors (like yellow and orange) can benefit from being printed on white film, especially if you model is painted in a dark color. Just make sure you get the correct type of film for your printer (laser or ink jet). For designing you artwork, you can use just about any type of paint or illustration software, as long as it allows you to create and print your design at the right size for your model. Using a paint program (like MS Paint or Photoshop) might be more challenging since you have less precise control over the sizes of objects. Personally, I use a 2D illustration program called Microsoft Visio for this purpose because it's quite user-friendly and it allows you to draw your artwork at exactly the right size (i.e. the screen has a grid and rulers so that you can easily control the size of the graphics you're drawing). Adobe Illustrator would work too, but of course it's more expensive and has a steeper learning curve. Depending on the complexity of your design, you could even use the drawing tools built into Microsoft Word. After you print your decals, you'll need to seal them. Bare Metal Foil also makes a "liquid decal film" product for this purpose (http://www.bare-metal.com/Microscale-Model-Finishing-Products.html). Alternatively, you can use Testors glosscote laquer in the spray can. I prefer the liquid decal film since it doesn't have the toxic fumes of the laquer. You just brush it on and it dries fairly quickly. -
detachable gooseneck lowboy
Aaron Corey replied to hduvall's topic in WIP: Model Trucks: Big Rigs and Heavy Equipment
Rogers has drawings with dimensions for their lowboy trailers: http://www.rogerstrailers.com/ -
International S Series Semi Tractor
Aaron Corey replied to a topic in WIP: Model Trucks: Big Rigs and Heavy Equipment
Very nice build. I've always liked the S-series trucks, so I hope they do reissue them someday. Here's one I built a few months ago: -
I bought a Campbell Hausfeld compressor about 5 years ago, and it works great for airbrushing. Fairly quiet too compared to my previous one. Mine is similar to this one: http://www.chpower.com/productdetail/2-gallon-air-compressor_fp2048
-
IH F2674 and lowboy trailer
Aaron Corey replied to Aaron Corey's topic in WIP: Model Trucks: Big Rigs and Heavy Equipment
Here's how it turned out. My final step will be to add a few custom decals for the cab marker lights and "S2600" badges for the sides of the cab. But that'll have to wait until I have some other decals to print at the same time so I don't waste an entire sheet of film. -
IH F2674 and lowboy trailer
Aaron Corey replied to Aaron Corey's topic in WIP: Model Trucks: Big Rigs and Heavy Equipment
Well, I decided to go without the cab guard (I'll probably use it on a future project). For some reason I just thought it looked odd on this truck. Gordon's right about the window (most of the real one I see on daycabs have the window). Maybe I'll use this one on a truck with a sleeper. Thanks Darrell, I used Testors Star Spangled Blue, one of their single coat lacquers in the rattle can. It's metallic, but the metal flake doesn't really show up in the photos (It's pretty subtle even in person). Thanks, I also had this same kit about 28 years ago (part of the reason why I bought this one when I found the unbuilt kit online). Of course back then I was 11, so it was left in bare brown plastic with no modifications. Still, I remembered it was a nice kit, and still relatively modern. The one thing to watch out for on this kit is the slightly brittle plastic (The original one I had as a kid ended up with a broken front axle). On this one I made sure to really reinforce the frame where I chopped it. Aaron -
IH F2674 and lowboy trailer
Aaron Corey replied to Aaron Corey's topic in WIP: Model Trucks: Big Rigs and Heavy Equipment
Just test fitting some additional scratch-built parts to the truck. I'm not sure if the cab guard looks right with this truck, so I might save it for a future project. I think I might add another tread plate in front of the pogo stick. Aaron
-
IH F2674 and lowboy trailer
Aaron Corey replied to Aaron Corey's topic in WIP: Model Trucks: Big Rigs and Heavy Equipment
Thanks Mark. I realized before I started that I would need some sort of jig if I wanted both of the frame rails to be straight and to match each other. At the time I just had one of those simple aluminum miters that are only good for 45 and 90 degree cuts, so I knew my freehand cuts wouldn't be precise enough to ensure everything would line up perfectly. I bought a small piece of plywood at the local Michael's craft store, but I needed something to glue to it (I was thinking wood strips). But then I noticed that they had these small wood cubes, so that seemed like good way to hold everything in place while giving me enough room to glue everything without having the plastic stick to the jig. Aaron -
IH F2674 and lowboy trailer
Aaron Corey replied to Aaron Corey's topic in WIP: Model Trucks: Big Rigs and Heavy Equipment
Thanks for all the kind words everyone. This trailer was my first major scratch-building project, so I'm glad it turned out as well as it did. I just need to work on my painting skills a bit. You're right about the running lights chuckyr. When I look at the photos, the unpainted lights do stand out, so I'll need to add that detail. I still have a few odds and ends to add to the truck (hydraulic tank, pogo stick, air/electrical/wet lines), so I'll just call it a work in progress until then Modeltruckbuilder: one of the reasons I chose the Rogers is because I was able to find tons of reference pictures online, including the drawings on their website. Also, their style of gooseneck looked simpler to build than some of the others out there. By the way, I saw the three-axle version you did, and I'd say yours turned out way better than mine (plus the gooseneck on yours is actually detachable). Aaron -
IH F2674 and lowboy trailer
Aaron Corey replied to Aaron Corey's topic in WIP: Model Trucks: Big Rigs and Heavy Equipment
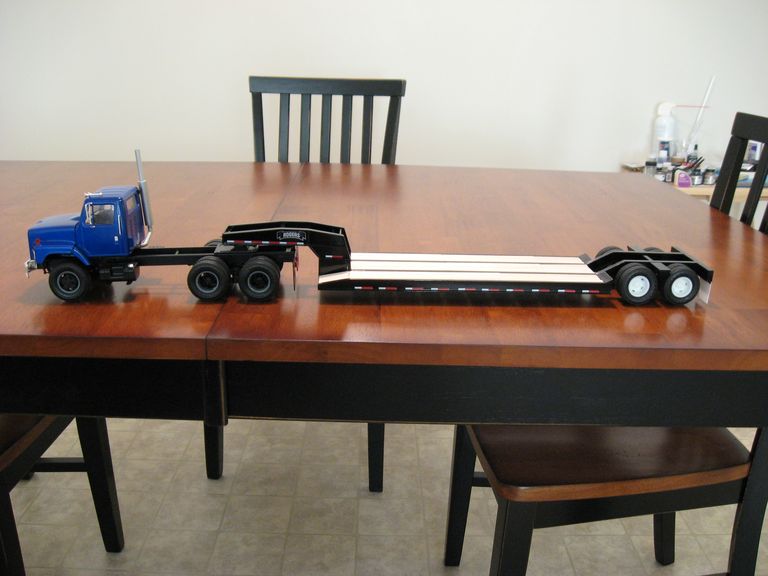
And here's some shots of the truck and trailer together
-
IH F2674 and lowboy trailer
Aaron Corey replied to Aaron Corey's topic in WIP: Model Trucks: Big Rigs and Heavy Equipment
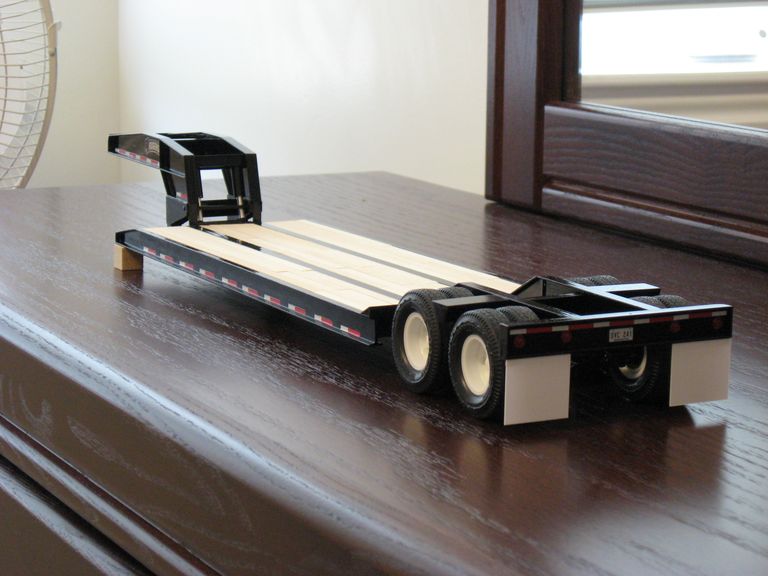
Here are some shots of the trailer by itself. One shot has the wooden jig I made to get the frame rails (relatively) straight.
-
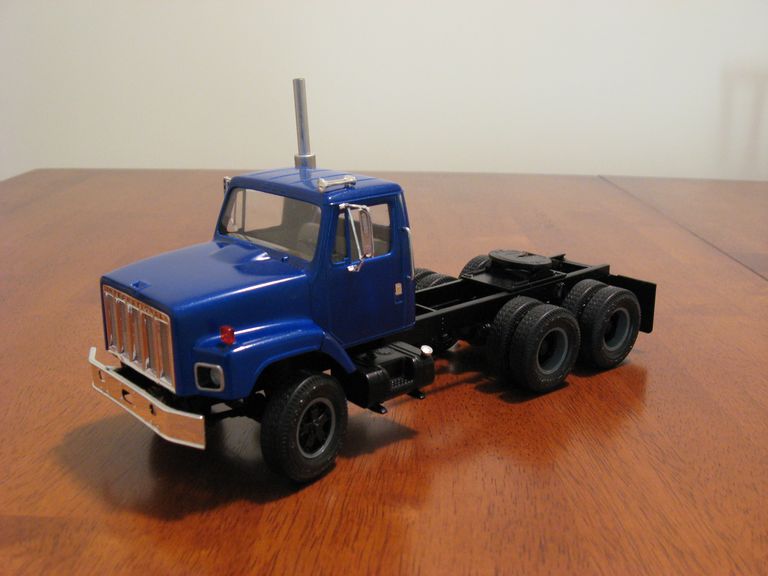
Hi all. This is the first build that I've posted to this forum. It's an International F2674 pulling a scratch-built Rogers 35 ton lowboy. I made the following mods to the truck: Shortened frame by 1.5" Moved air tanks and battery box to the passenger side Heat shield below passenger door made from aluminum Upper part of exhaust stack replaced with aluminum tubing Model Car Garage diamond mesh behind the grill Wheels taken from the Chevy Titan kit (originals were missing) Fifth wheel also came from the Chevy Titan kit (I liked the look of it better) Grab handles made from aluminum wire (one of the originals was missing) I still need to scrounge some windshield wipers - one of the risks of buying vintage kits is missing parts As for the trailer: Modeled after a Rogers lowboy suspension and wheels came from the AMT logging trailer frame was built from scratch using various Plastruct pieces Deck is made from basswood Rogers logos printed on white decal film