
Scottnkat
-
Posts
563 -
Joined
-
Last visited
Content Type
Profiles
Forums
Events
Gallery
Everything posted by Scottnkat
-
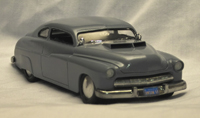
Well, I put the body on the chassis to get an idea of how it would look - here's the engine bay (I think this will work).
-
Thanks for the comments, guys - I really appreciate it.
-
Okay, time to finish up the hood pins. First, I drilled three small holes in the grill. Now we're going to use that thread you saw in the earlier picture. This is silver thread that my wife picked up at Walmart - it's pretty cheap, and it is an actual silver color instead of just a grey. We need to cut a few lengths of thread and tie a knot at the end: Run the thread through the holes in your grill so the knot catches the back of the grill. Glue this in place - I used Gator Glue, but you could use whatever glue you are comfortable with. Now you have the cables for your hood pins: Sorry, I know it's tough seeing the threads when the green mat has white stripes on it as well, but you can see them coming out of the grill where we drilled the holes earlier. Now the only thing left to do is make three more clips (as shown above) and tie those new clips to the threads. Make a knot and cut off the excess. This is best done when you are getting pretty much all done so you can make sure that the length is correct. Kathi just added to put a little dab of glue on this knot as well so it doesn't come undone - yes, she is helpful And as a final update to the previous post, once the glue has set and the needles are all set in place, simply clip them off below the support. Your hood pins are now ready to be used: Now I have the car body drying (after putting on a clear coat). Next we have to mate the body to the chassis and put on decals. We're getting to the end!! Woo hoo
-
Okay - final update for the night (now I am going to rest). Here's how we will make the hood pins functional. I had drilled out three holes on the hood, but what you may not have noticed is that there are also three holes in the support beam under the front of the hood - this is where the needles will go: You wanna make sure that the wire goes through the needles very easily - you don't wanna have to fuss with it once it's all together (imagine the needle swaying in the breeze): We then snip a bit of wire and put it through the needle eye - this will help hold the needle up and will be used for a slight adjustment that I will mention later. We then put the needles through the holes in the hood: Make sure that your needles go through not only the hood, but also the support beam below: Alright, that picture stunk, so here's another one that shows how the needles go through both the hood and the support: Once it's all set, you want the needles to be raised slightly (no need to treat your model like the car you had 20 years ago where you had to push on the hood to get the hood pin through the rod). Rotate the wire to slightly lift the needles up just a touch, then support that with a small bit of tape: Now superglue the needles to the support (not the hood - that would be bad). Let it sit for the glue to set, or use some accelerator. While this is sitting, you can take a few and make the pins as mentioned above. Voila!! You've just made functional hood pins.
-
Okay, time to make some hood pins. Here's the things we will need: Sewing needles, jewelry wire, flat need nose pliers, round needle nose pliers, and a hole punch. Basically, the eye of the needle is just a little too small, so we use the hole punch to make the eye just slightly larger. Careful with this - if you stamp it too hard through the eye, you will simply break the needle - these don't bend much at all. Once you have the eye large enough for the wire to fit through, the needle is done. Now we need to shape the wire. Use the round tipped pliers to make the "S" shapes in the wire, then turn the wire back to run beside the wavey "S" side, then clip it off. It should look something like this: Now use your flat pliers to get this wire back into shape and flat. When you're done, it should look like this (or something similar): Finally, feed the needle through the hood or trunk, use your newly made clip to hold it in place. Here it is on the trunk - since the trunk doesn't open, we didn't have to worry about making these ones functional like the ones for the hood, but the same process will be employed for those as well. These have been superglued into place and once it's dry, I will just clip the needles below the trunk and that part will be done.
-
Oh yeah - I also finished the hood as well (look behind the car). I've only used BMF a couple of times (including this time) so I am nowhere near a pro. The way I do it is to cut a small piece just big enough for what I need, then I rub it down with my fingers so it doesn't move. I then use a toothpick to rub it down into the corners really well. Finally, I use an X-Acto knife with a brand new #11 blade to cut along the edge I just rubbed down, then peel off the excess. I go through those blades pretty often (I used two brand new ones just doing the windows), but as long as I go slowly it doesn't seem to work too badly. Hope that helps, Bartster - maybe some day you can just take some bare-body and give it a shot for yourself.
-
Well, sorry for the delay in posting anything. I am not very good at doing Bare Metal Foil and I had to do the same spots a couple of times. But here it is all foiled up and ready to go:
-
Thanks, Jim. This car was a little before my time, too, but I thought if I'm gonna build a half dozen of Petty's cars that I think were important (which is my plan), then I'd have to start with the first one he won a Championship in. Future builds will include the STP Charger, the Superbird, and even his Plymouth Barracuda drag car (that one I am still working on in my head to figure out just how I wanna do it). Regarding Genevieve, yes she does have talent. This thread is about this car, but maybe I should start a thread with some of her work for other people to see. That's not a bad idea.
-
Thanks, Ian - I appreciate the kind words.
-
Okay - final update on the Belvedere for tonight - the scuff plates for the hood pins are on the hood and trunk now: Also, the rolling chassis is done and (minor victory when it happens) all four wheels are flat on the ground! Woo hoo!! Kinda reminds me of a dirt track racer from Hell as it is... he he he
-
thanks, roadhawg - I appreciate it.
-
I've got the engine compartment done. It's currently got tape holding it all in place while the glue sets up. Here's a couple of pics:
-
Okay - here's how we are using the sequins... ready? First, you need a hole punch that's 1/8 inch. My wife has one for her crafting stuff, but it shouldn't be too hard to find one. Why 1/8 inch you ask? Well, 1/8 inch works out to a three inch round disk at 1/24 scale, so this will be about perfect. Once you have your hole punch, pick out a sequin that has at least 1/8 inch flat area. Then you simply center the sequin on the hole punch and punch that sucker! This is just about a perfect size for the scuff plates on the hood pins - sorry it's not centered - I just placed in on there to show it in place The hard part about it is getting the sequin perfectly centered. When Kathi did it, she got one or two bad ones for each good one she did, so it will take some time - good thing sequins are so cheap! The nice thing about this is that you can use all the colored sequins to make these as well in different colors - while it may not be correct for a period piece, it would look great on a new tuner-type car. Check out the blue one we did just because... :cool:
-
Heck of a good guess there and I suppose in a way that would be correct (depending on how loosely we want to interpret it, eh?) I hadn't even thought of those - well, maybe for a future build - you have a good idea there, man!
-
Remember when I mentioned that I had drilled small holes in the body and had to re-paint? Well, here's a close up shot of those holes: Yep, we are going to try doing functioning hood pins. Here are the "tools" I will be using to do this: My wife provided the silver thread and the needles, and she picked up these sequins at Wal-Mart for $0.97. Now, you may be thinking the same thing I did when she handed me sequins - namely, "hey, jerkwad, sequins have those funny facets on the sides - they won't look right". Well, my wife has a plan to use the larger diameter sequins so we can cut the facets off and make nice round FLAT pieces. I don't know about everyone, but I am sure many of us are like my family - one income, lots of kids, so little to no extra funds to buy PE sets and stuff, so we have to make due with what we have. If this works, then this will be something that (hopefully) alot of people can do for cheap.
-
Here's a pic of the finished chassis. One thing about this to note - it has disc brakes on this car. If I remember correctly, disc brakes weren't used in NASCAR until later - cars of this era had drum brakes still. I could be wrong, but I think that's right. I also completed the interior. The kit came with decals for the gauges, so I didn't have to worry about that. The dash insert was chrome, but on the car it would have been steel instead. I removed the chrome and just painted this in silver - the brush marks kinda add a texture to the "steel" dash insert. The floorboard/back deck area was warped (which I didn't notice until I decided to glue it all together). It was rubber-banded all through the night, so it was good and straight this morning.
-
Oh, one last thing - I had to re-paint the body again after I decided to drill some small holes here and there... Why would I do that, you ask? Ah, you can guess or you can wait for the surprise. He he he
-
Well, I found something that I hate about this Lindberg kit now - just look at this thing they call a carburetor!! That's not a carburetor! That's a sad piece of plastic. Unfortunately, I don't have a large spare parts bin, so I have to make due with what I have. Lucky for me, this sucker is gonna be under the air cleaner and invisible to all! I did make some progress today. Here is the (almost) completed engine sitting in the frame now. I am not very good at wiring up an engine (this is my 2nd time trying it), but I did at least find out the firing order and I believe I got it right. I realize that the fan is not exactly how it would have looked, but this is one of those "personal touches" I mentioned earlier. Behind the radiator, it will be practically invisible anyway, but I know it's there. Ah, my first hemi build...
-
HA HA HA HA HA!!!! You got an out loud laugh not only from me, but from Kathi as well!! Yes, we are grateful for that - thanks for the smile!!!!!!!
-
I've been doing more painting - we're starting to get an assortment of useable parts now - pretty soon, we can start on some more construction - woo hoo!!! PS - notice the newly painted black valve covers - yep, they are just about done
-

1959 Cadillac Custom -- 1 yr build now finished 12/25/12
Scottnkat replied to tjones87's topic in WIP: Model Cars
It's coming along nicely - I'll be watching this thread for sure. -
Finally, tonight's last posted update: The valve covers. This is what the stock Lindberg valve covers look like: While chrome with the three breathers would be more correct for Lee's car, this is not what we just found out to be the case for Richard's car. These need to be black and there is only one high-rise breather. So I cut off them, did a bit of sanding, glued the larger ones back on, and here's how they look: Next up - remove the rest of the chrome then paint them black as they should be. Dang, I need a new camera for these smaller pics - I tell ya!!
-
Well, I have a small update. Here is a pic of the seatbelts that came with the kit. While I am sure they will fit on the seat, you can see just how thick these things are. That's like a scale inch-thick seatbelt! Well, I decided that I should do better. I got some black ribbon, but it was too wide. So, I took my trusty scissors to it: I was going to simply glue the ribbon to the existing buckles, but then I remembered some old PE seatbelts in my old parts box. I pulled those out and made these instead:
-
Oh, wow - those pics are a great help!!! Thanks alot, man!!
-
Okay, it seems I was a bit off on the silver color of the radiator. From what I have been able to find out, it was actually aluminum. Not much progress made today - just started doing some of the Bare Metal Foil on the body. I'll try to have another update tomorrow or the next day.