

hooknladderno1
-
Posts
544 -
Joined
-
Last visited
Content Type
Profiles
Forums
Events
Gallery
Posts posted by hooknladderno1
-
-
Harry,
I stumbled onto this beautiful thread by chance. I have long planned to build a backdated version of the Christie kit sans motorized tractor. I already have two "Breyer" horses to pull the rig, and reference materials on the harnesses and other equipment that will need to be fabricated. I still need to source the front wagon wheels. Can't see buying an $85.00 kit just for a set of wheels. Harry, fantastic job! Thank you for sharing your step by step photos!
David
-
Does anyone know if a long bed 1960's Chevy or GMC pickup? I bought a 1964 Chevy kit at a show and want to convert it into a longer chassis utility body. Any help? Thanks!
David
-
Any surface that is to have Alclad applied has to be ultra smooth. Thee are a few ways you can acheive this. There are some products for 3-D printed parts. Smooth On makes a coating that can be applied to the parts, let dry and sanded to fill in the lines left by printing process. I have also heard that some 3-D filaments can be sanded to remove the lines. The gloss black undercoat used by many when put on a little heavily can also help. I've used Tamiya gloss black spray from a rattle can with good results. As mentioned above, Alclad sprayed at as low a pressure as you can get away with, very thin mist type coats, and at multiple angles is the key to success. You may wish to try a gloss gray enamel instead of black to reduce the "dark" tone of the "chrome". Hope this helps!
G
David
-
Great tip! I have a Dodge Power Wagon project that I have the same problem with. I'm going to try this
David
-

So, the metal chassis plate has also been cut and extended and the grille is mocked up with some Blu-Tac. Let me know what you think. Still lots to do!
David
-
Making some progress on this project! Fabricated the bottom raised panel with vertical fins to close up the bottom of the grille face. The diecast comes with this area cut out, so I had to first close up the space with Evergreen strip and putty. The grille comes from Ken Kitchen at Kitchen Table Resins. Great quality, fast shipping, and Ken is great to deal with. The grille did require some modification to fit into the opening. It was cut, narrowed and glued to a strip of brass to give it strength. Gaps will be filled in and sanded.
Still challenged by trying to smooth all of the putty and plastic filling the gaps. The 1:1 truck also had a wide vertical rub rail all around the base. It is being added with Evergreen strip CA glued in place. Additional progress not pictured is the floor pan has been cut, and the chassis cut, extended and glued together. After setting up overnight, I'll take some photos with her up on her wheels. Lots more to do, but she's getting there. Thanks for looking!
David
-
I use Bare Metal Foil, trim , paint with Tamiya clear. When dry, use Glossy Accents clear acrylic to provide dimension to the lens.
David
-
JT,
Another stunning build! She looks AWESOME! You are like Midas - all of your builds looks great! What ever came of the Simba ARFF project? Life has kept me away from the forums pretty much...
David
-
West Coast Autocar
Junkyard Brockway 361
Terry,
What an AWESOME collection of "In Progress" projects! I think we have about the same amount! I like the modification and bodywork process, but get hung up on the "completion" aspect... I really like the tanker above and the Mack AK Bulldozer hauler! Can you share the source for the modified tanker body above? I'd like to give that a try! Great mixer build thread by the way! We have several similar mixers in use here in the Orlando area. Fantastic workmanship! I'll be following this build for sure!
David
-
Here is a little update. The rear body is glued together and the roll up door panels have been secured in place. Working on a hard suction hose. Roughed out the outlining of the windows with a custom mixed Vallejo "rubber" tone. Lots more to do!
-
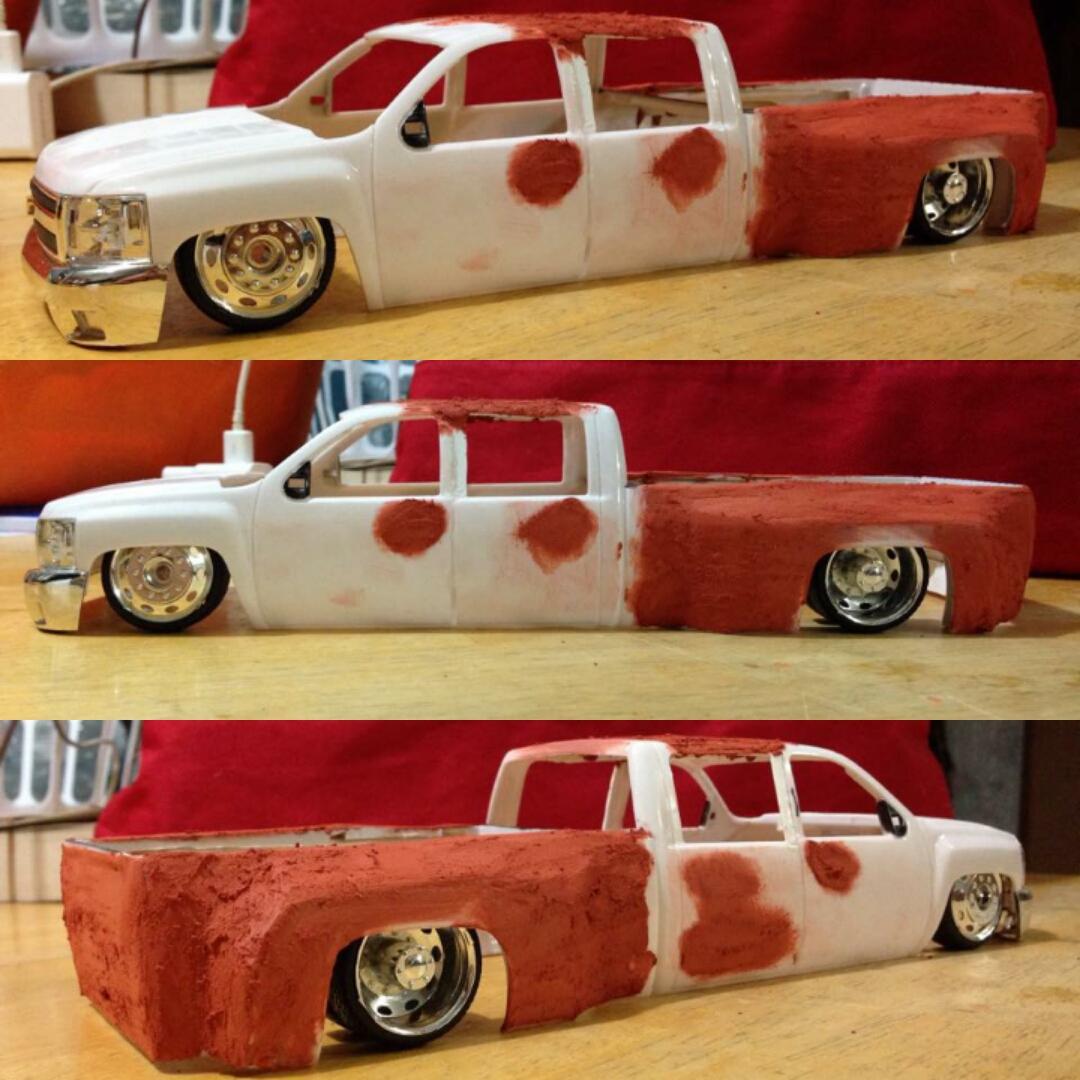
This isn't really a model and if it isn't allowed my apologies...2012 ish body style silverado single cab toy trucks turn into a crew cab and stretched the bed then built dually fenders..I have it on some semi rims for the time being I'm not sure if I'm going to keep them on it for good or not just yet..don't quite have a plan for this thing yet just kinda going with what comes to mind.
Is this close to 1/24 or 1/25 scale? I may have to take a ride over to Dollar General. ..
David
-
Has anyone cut down the Meng Ford f-350 cab into a regular cab? Been thinking about doing it to mine... Would love to see anyone's photos if you have done the conversion! Thanks!
David
-
Is this kit out now? If so, anyone know if Hobby Lobby has them yet? I have a project that I was working on that I heavily modified the kit sides to resemble a 1920's ambulance. Got stuck with smoothing the areas of modification (now solved) and realized that the kit sides were too short. So, I scratchbuilt new sides, cut the roof and chassis. So, I need replacement a chassis, roof and floor pan.
-
Is this kit out now? If so, anyone know if Hobby Lobby has them yet? I have a project that I was working on that I heavily modified the kit sides to resemble a 1920's ambulance. Got stuck with smoothing the areas of modification (now solved) and realized that the kit sides were too short. So, I scratchbuilt new sides, cut the roof and chassis. So, I need a replacement chassis, roof and floor pan.
-
Alain,
I once again marvel at your craftsmanship and level of detail! I am thoroughly enjoying this build!
David
-
Another little update. Finished the rear bumper. Besides that been draw up some parts for 3d printing.
i have a question for anyone who can help what's the best to use for making linex spray in bed liner?
Joe,
Awesome work! I use Rustoleum Black Texture paint. You can get it at Walmart. Perfect for bedliners and other exterior parts where you want a textured finish.
David
-
JT - saw this from a Facebook post. Several other orange rigs from this gentleman as well
! this HTML class. Value is [URL=http://s176.pho
David
-
..thank you Mike...their 1/24 16" wheels. The tires are about scale 28" tall...
Really nice Danny! I'll definitely be placing an order for these!
-
You did a fantastic job on this conversion! As a builder of primarily emergency vehicles, I like the stock mock up! I can see some emergency lighting, creative graphics and gold leaf lettering... AWESOME!
David
-
For those of you who have ever wanted combine paint with decals instead of all decals there is a great article in the July/Aug issue of Airbrush Action Magazine
The subject matter is Don Schumachers 1967 Dodge Charger Stardust Funny Car.
The process is fairly simple for those with Airbrush Experience or for those who want to just give it a go!
If you are familiar with this car, the paint scheme is Paneling with Fades (which is making a come back in the custom 1:1 arena) the results are very impressive! To duplicate this build with decals alone and have a really nice show piece IMO is not in the cards (I have the decal set)
The article also shows the use of FBS automotive tapes which I have been touting for sometime vs Hobby tapes (automotive tapes less $$$$, more product per $$$, better performance)
Check it out!!! It will be well worth the $ 7.99 if you are serious about taking your paint skills to another level.
Jimmy "RASS"
Jimmy,
I don't have access to the publication you mentioned, but am always looking to improve my builds. The FBS tape you mentioned - can you specify which one? I am waiting for my new Grex TG 3 and fan spray nozzle to arrive. Thanks!
David
-
So, the Rough Country straight bar comes in a 50" length by 3.45" depth by 3" height, which would be 2.08" by 1.44" by 1.25" in 1/24 scale. An easy way to make this would be to cut a strip of 0.125" square strip styrene (or .125" by .158") to 5.3 cm. Paint the bar black, then print this image on glossy paper (height should be 0.125").
http://img.photobucket.com/albums/v285/explorer2770/bar1_zps5omekjfb.png
Cut out bar face image and glue to the styrene. Then, either cut a strip of clear acetate, mylar, or Dura-Lar to cover the face or use a clear epoxy to give the smooth glass look to the face of the bar. Then, use some aluminum or sheet styrene to make the mounting brackets.
A curved bar can be made in the same way, just heat the strip styrene in hot water and bend it to the shape you want.
Here is an example of what Brandon referred to above. Don't mind the cut out paper gaphics. Easiest way I know to "mock up" graphics instead of wasting decal film and ink.
David
-
Cary,
Awesome work so far. I like your color change. It really pops! The engine looks great as well as the chassis. I also like creative builds like this. Look forward to future updates!
David
-
As many of you may know, I am replicating many of my hometown fire department's apparatus of years past. Our first "Emergency Unit", an early 1950's Ford stepvan carried ropes, hand tools, air packs, fuel , life jackets and other supplies for our marine units(boats). As a past member of the department, "close enough" just wasn't good enough! Follow along as I bring you up to speed on the project thus far.
There are a few makers of diecast collectible vans and banks. I chose this Sentry Hardware bank, as it was cheaper AND I planned to cut it up anyway to lengthen the body/frame. The bank came with horizontal side moldings that the 1:1 truck never had. So, the question was - how do I remove the moldings without damaging the sides of the van? Well, with less precision that a surgeon, My Proxxon rotary tool (think Dremel) made pretty quick work of it.
The body was stripped with aircraft stripper. It made quick work of the paint and was scrubbed with Dawn dish detergent after a thorough washing. The body was then shot with Duplicolor self etching primer(olive green color).
Next came time to cut the body. Good old Dymo label tape was used to guide the hacksaw blade in cutting the roof and sides of the van. After that was accomplished, The halves were thoroughly dried,
The gap was bridged with brass sheet and secured with JB Weld. Seams were filled with Evergreen sheet and Perfect Plastic Putty.
Still lots to do on this project. More photos to come!
David
-
As many of you may know, I am replicating many of my hometown fire department's apparatus of years past. Our first "Emergency Unit", an early 1950's Ford
stepvan carried ropes, hand tools, air packs, fuel , life jackets and other supplies for our marine units(boats).
There are a few makers of diecast collectible vans and banks. I chose this Sentry Hardware bank, as it was cheaper AND I planned to cut it up anyway to lengthen the body/frame. The bank came with horizontal side moldings that the 1:1 truck never had. So, the question was - how do I remove the moldings without damaging the sides of the van? Well, with less precision that a surgeon, My Proxxon rotary tool (think Dremel) made pretty quick work of it.
The body was stripped with aircraft stripper. It made quick work of the paint and was scrubbed with Dawn dish detergent after a thorough washing. The body was then shot with Duplicolor self etching primer(olive green color).
Next came time to cut the body. Good old Dymo label tape was used to guide the hacksaw blade in cutting the roof and sides of the van. After that was accomplished, The halves were thoroghly dried,
The gap was bridged with brass sheet and secured with JB Weld. Seams were filled with Evergreen sheet and Perfect Plastic Putty.
Still lots to do on this project. More photos to come!
David


![URL]](http://%5BURL=http://s176.photobucket.com/user/hooknladderno1/media/1443369924_20150927_114747_RichtoneHDR-picsay.jpg.html%5D%5BIMG%5Dhttp://i176.photobucket.com/albums/w171/hooknladderno1/1443369924_20150927_114747_RichtoneHDR-picsay.jpg%5B/IMG%5D%5B/URL%5D)


Hi JT!
in General Automotive Talk (Trucks and Cars)
Posted
Don't know the status of your Simba ARFF build, but saw this and thought of you!
David