Search the Community
Showing results for tags '1/24 tamiya'.
Found 7 results
-
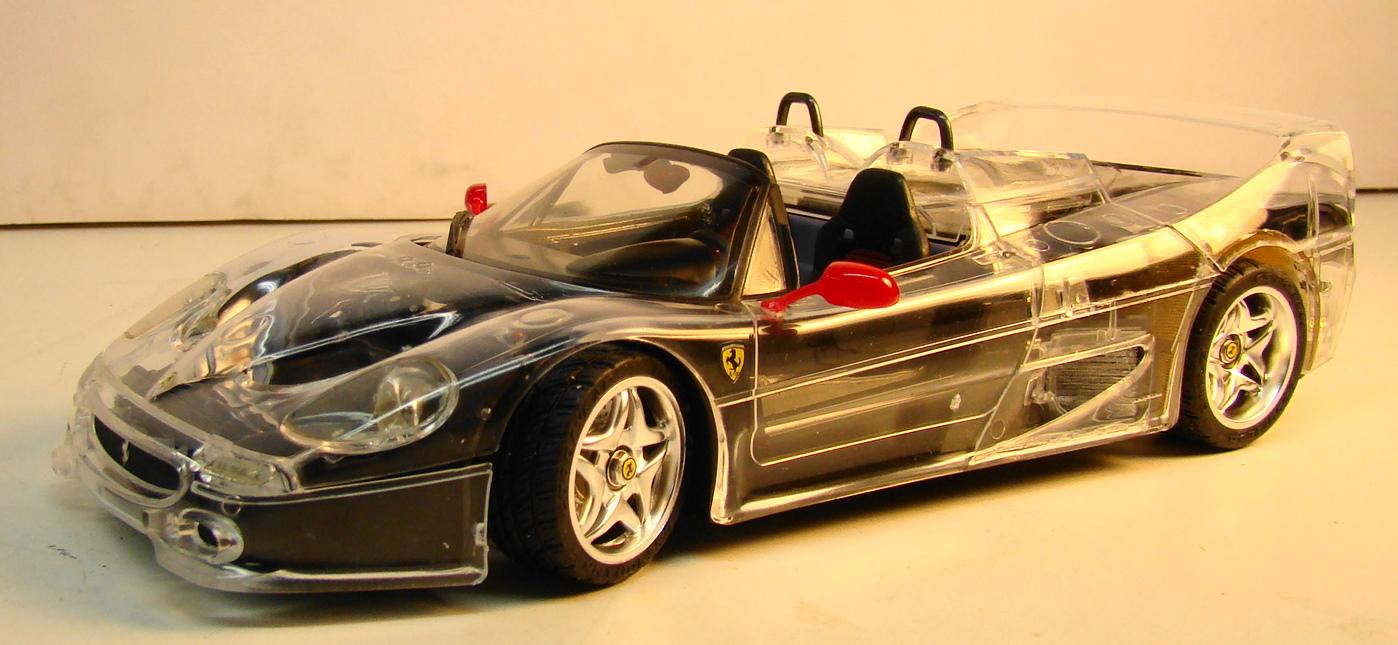
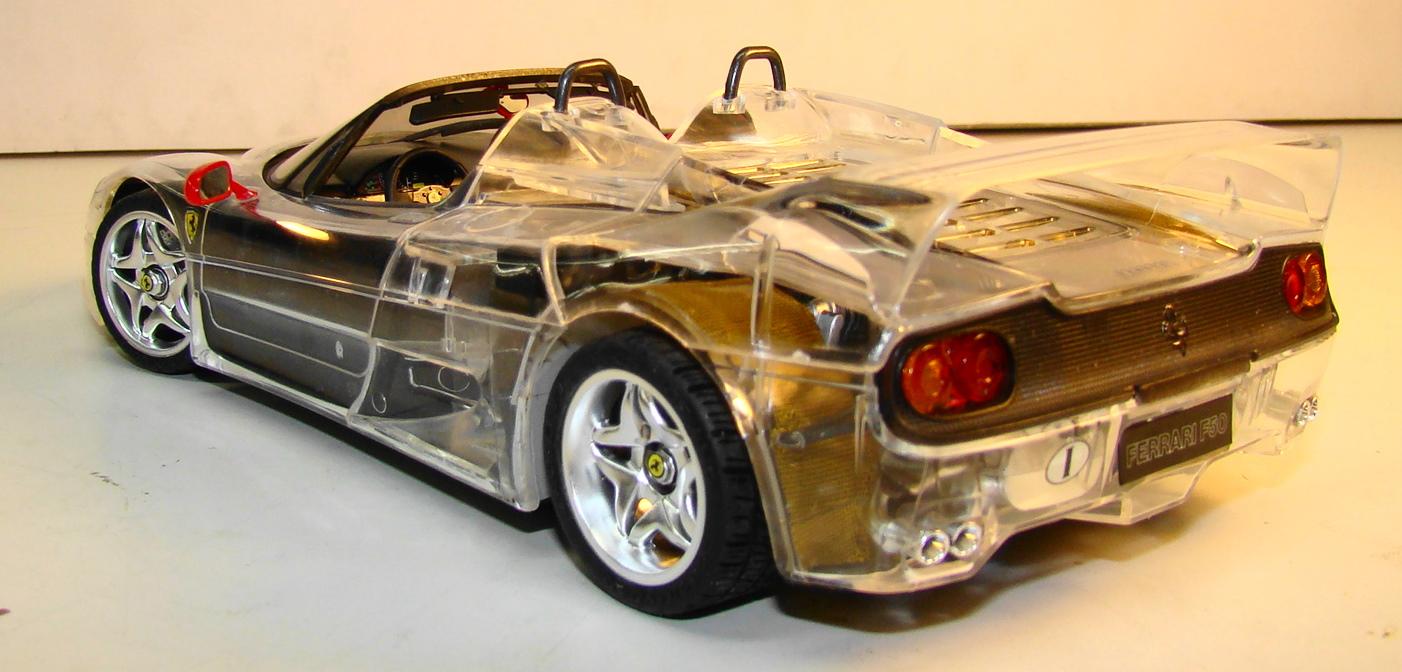
My local hobby shop is running a clear body challenge. Everyone in our group has some kind of clear body model. Had this Tamiya 1/24 Ferrari in the stash and already had its painted body counterpart done. Kit went together well (except some decals) but special care had to be taken assembling the body. Mostly clear type glues were used and they don't have a tremendous amount of strength. But assembly went well and it has stayed together. More info below pictures. Only the mirrors were painted red. Mr Color #5. Chassis slipped into the body fairly easy...whew! Rear view is where most of the detail is. Metal emblems were included in the kit...a nice touch. Side view with the optional berlinetta top. It replaces the headrests in the previous picture. Lots and lot of engine detail so I didn't bother to add much more. Interesting feature of this kit is that the engine assembly attaches to the upper body instead of the chassis. Once I figured out how it slipped in (goes in fully assembled BTW) it was pretty slick and stayed in place. Tried as hard as I could but those wrinkles just wouldn't come out of the decals. Rear deck opens but you don't notice them with it closed. Had to take a picture of the whole tribe. Back two are 1/18 Maisto diecast, berlinetta hardtop is the Tamiya version of this kit, spyder is a Revell, two smaller diecast are both Hot wheels. Thanks for looking and comments welcome.

-
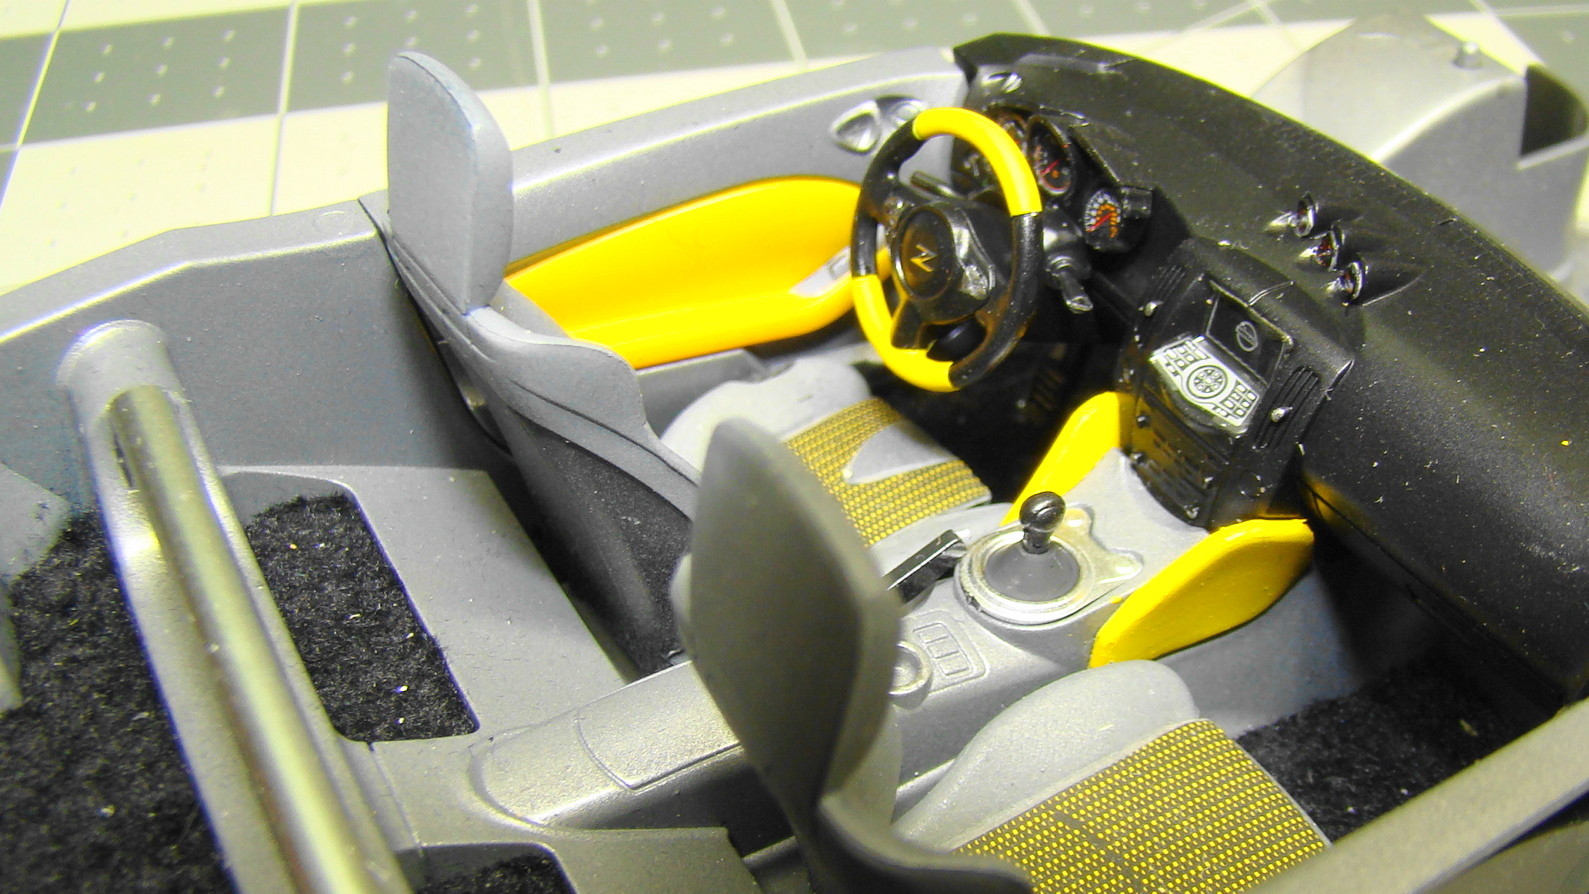
I had this kit almost 75% complete about 6 months ago but quit when I decided to fabricate the door struts. Dug this kit out again and decided that the kit struts were more than adequate, so I finished it. Turns out this kit was an absolute joy to build. Tamiya left very little out on this one. Of particular note was the fit of the doors. I have a few other Gullwings and this is always a huge problem. The chassis and engi9ne are also very nice. Tamiya provide a clear belly pan so you could see this and I fastened mine on with jewelers screws so it could be removed but probably never will. Color on this is Tamiya TS7 Racing White which is slightly off white. Interior is Tamiya XF7 flat red with and umber wash over it. some extras include carpet and engine wiring and some extra hoses. More details under the pictures. Thanks for looking and comments welcome. Finished model. Tamiya included some center lock wheels with knock offs but I liked the stock ones better. Rear view shows all the nice detail on this kit. I chose the Euro style bumpers that don. have the largish bumperettes on them. Looks sleeker this way. The famous gullwing door in the open position Best shot I could get of the interior which was exceptionally well detailed. Note the chrome emblem which was included...a nice touch. engine compartment was very well detailed and little had to be added. The hood brace to keep it open was also in the kit. Another view with the door open. Everything on this kit fit like a glove and it was a joy to do. On a side note, one of my neighbors ran crashed into the side of my building right where the electrical box and cable were. The majority of the final construction was done by flashlight as I was without power for 8 days. That's dedication.
-
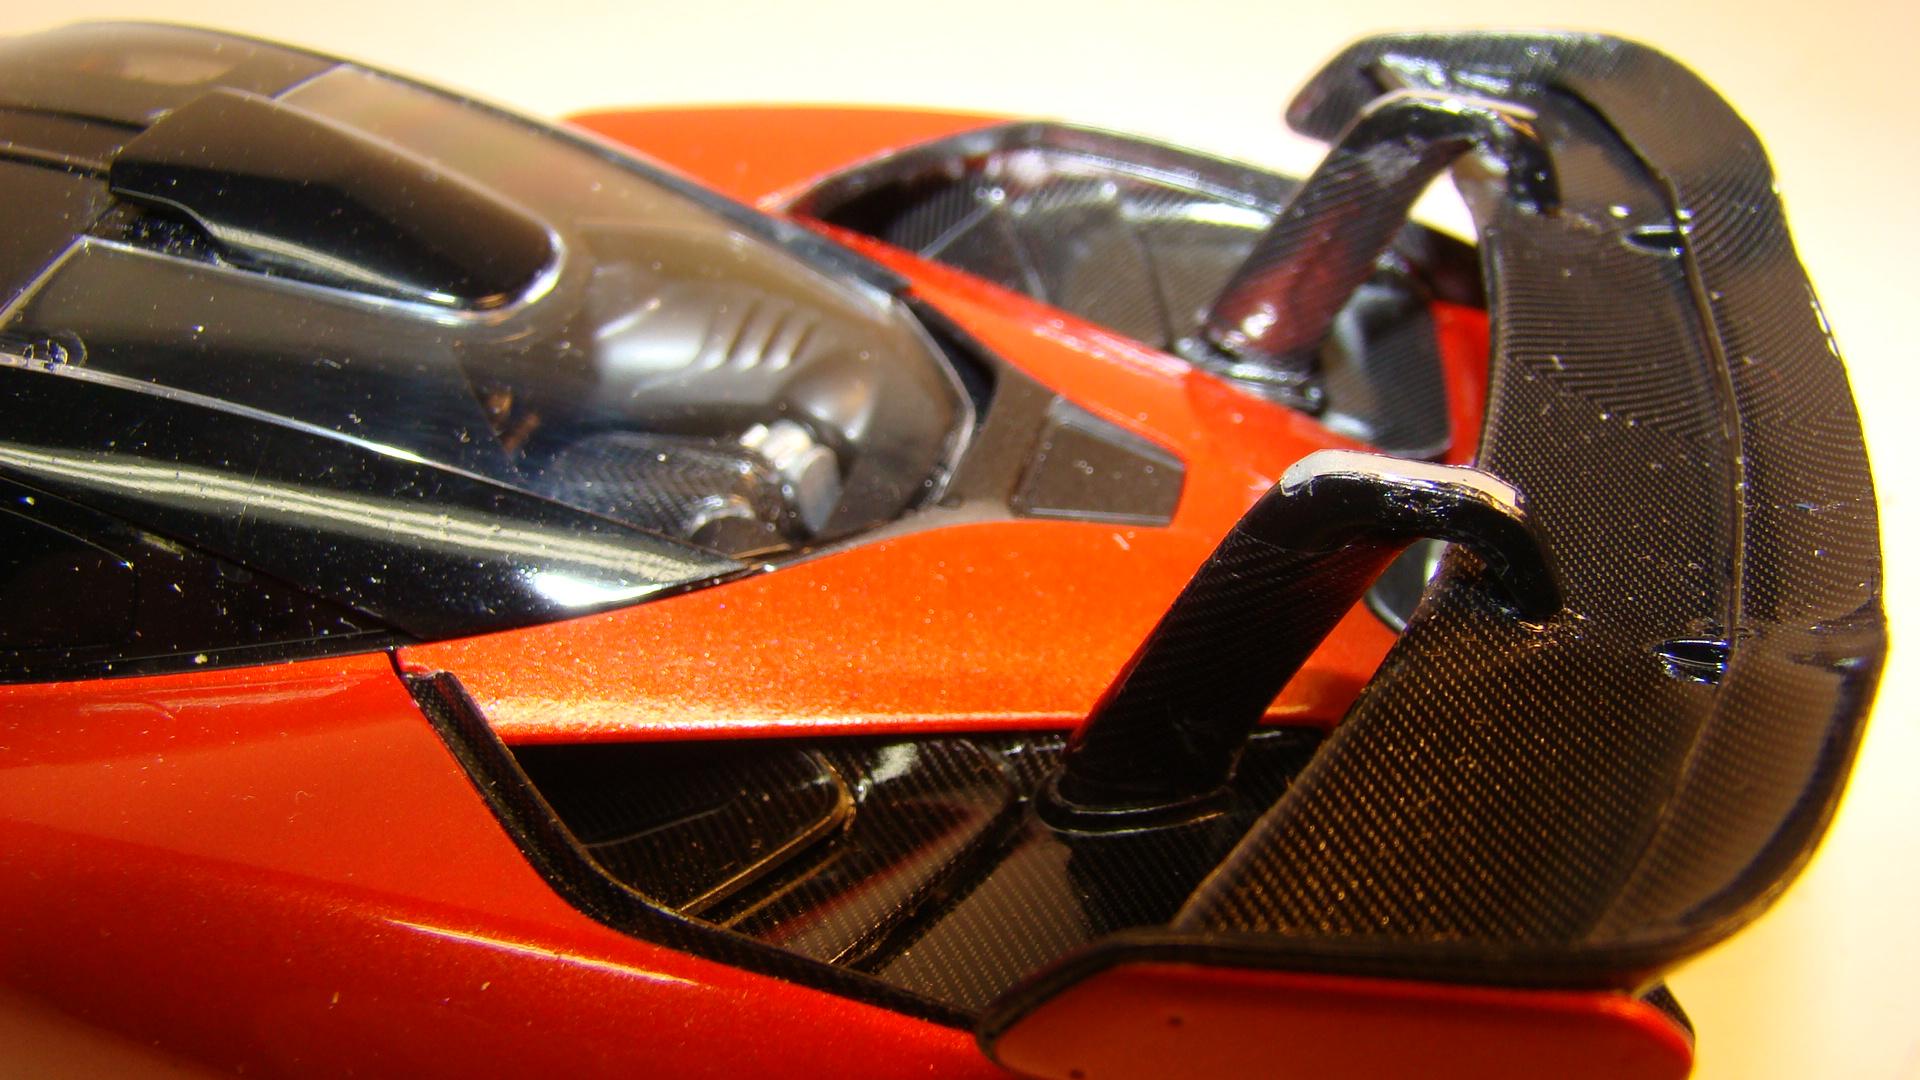
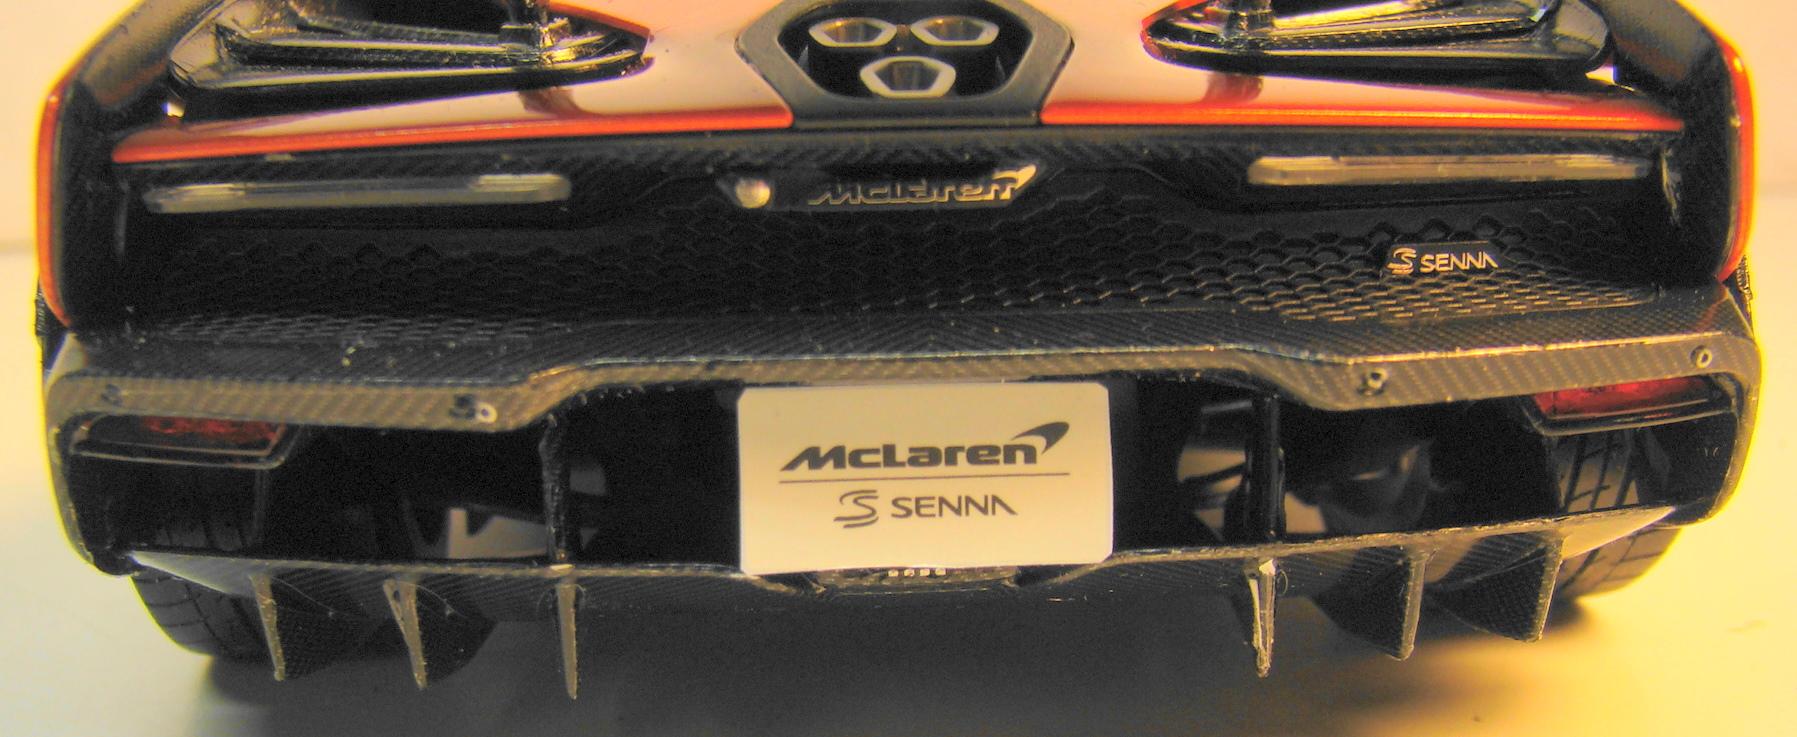
All I can say is wow what a kit. Most impressive in the fit and finish. Especially the body panels and glass. What started as a painting excercise turned out to be a 2 week project. Finished it yesterday. Color is a custom mix of the Tamiya LP line. LP42 Mica red (45%), LP44 Metallic orange (45%) and LP62 Titanium gold (10%). Clearcoat was with LP2 and the black is Tamiya TS14 spray. Extras include the Studio 27 carbon fibre set and some scratch built seatbelts. Lots of detail pictures with captions. Thanks for looking and comments welcome. Engine and rear suspension detail. This was so well done and fit precisely that it would have been a shame not to take a picture. Brake discs rotate with the wheels....an interesting feature. Tamiya spared nothing on the interior. Studio 27 spared nothing on the either. Those blue things in the doors are the exposed struts to hold the doors open. Kit did not have working doors as they were quite complex to begin with. The rest of the interior. There were 3 stainless steel bezels for the air vents that didn't make the picture. They almost did make the model. The body had to be removed so they could be added. Luckily it was very well engineered and went on and off easy. Finished car. I was looking for a very reddish orange with a hint of gold. I liked this color and wound up finishing the kit. Lots of detail back here. Really liked how the wing fit and the fact you could adjust the angle. There are lots of little winglets all over this car. That little pieces of carbon fibre just behind the rear wheel has two of them. I went with the optional window on the lower door. The driver sits so low in this car it is necessary for vision. Carbon fibre everywhere. 150 pieces in total that all had to be massaged into place with heat and solvent. Then clearcoated. I used a new varnish called Just Like Glass that works a looks a lot like Future. Two coats brushed on and it really made the CF pop. Some more of the rear end detail . There were 50+ decals for the splitter and bumper. The chrome stick on logos were a nice touch. My growing Mclaren collection. The two silver ones are diecast, the 570S is an unbuilt (but started) Revell 1/24, the orange racing version is an Aoshima (I think) , the white one a Fujimi and the good ole Mclaren Mustang. Enjoy!
-
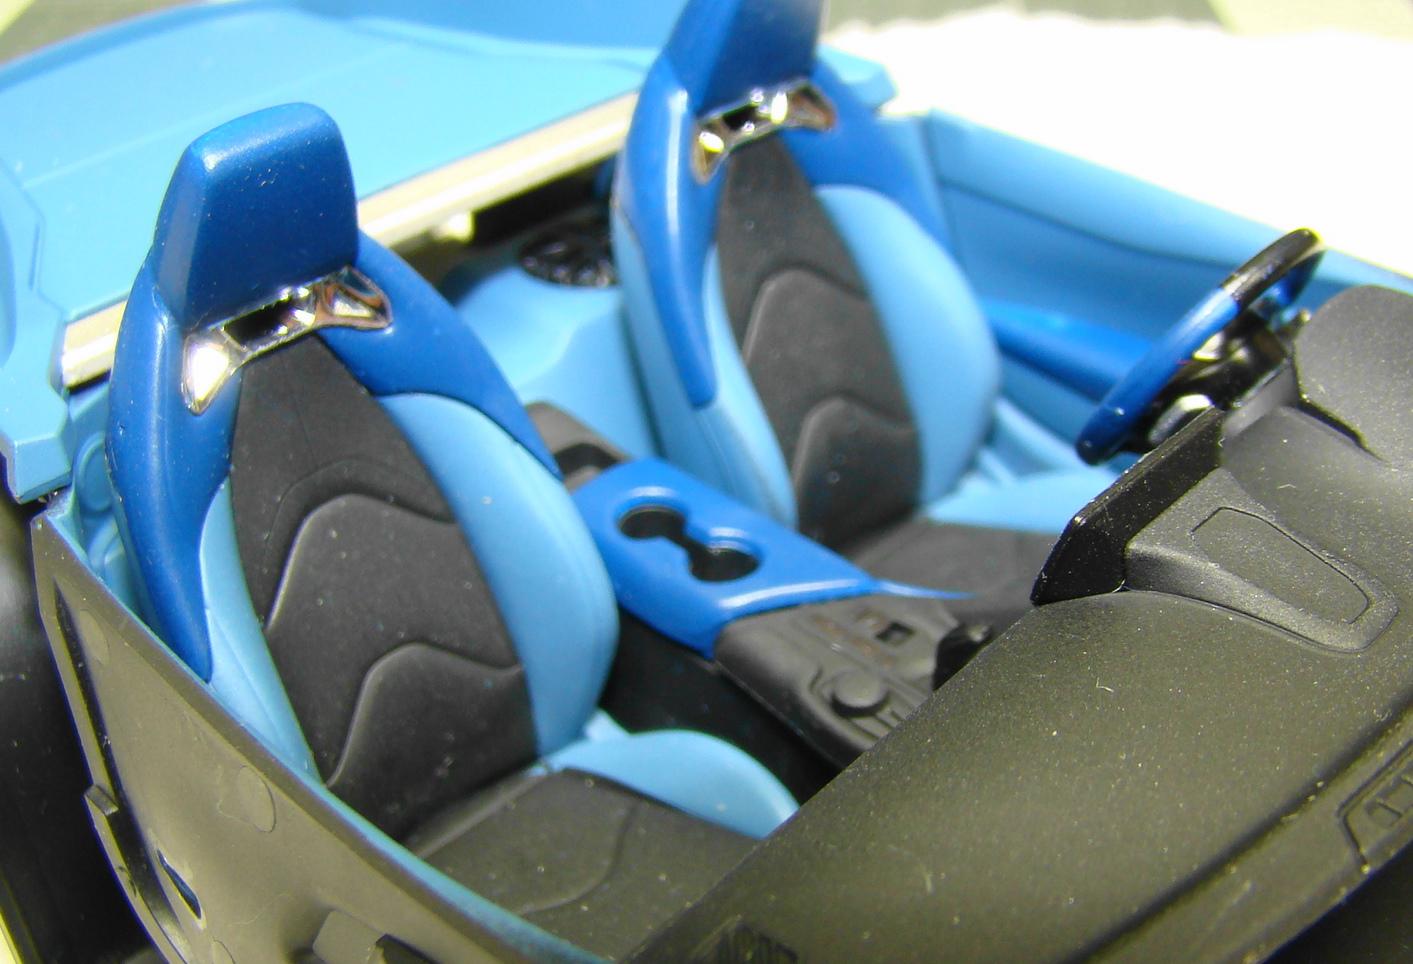
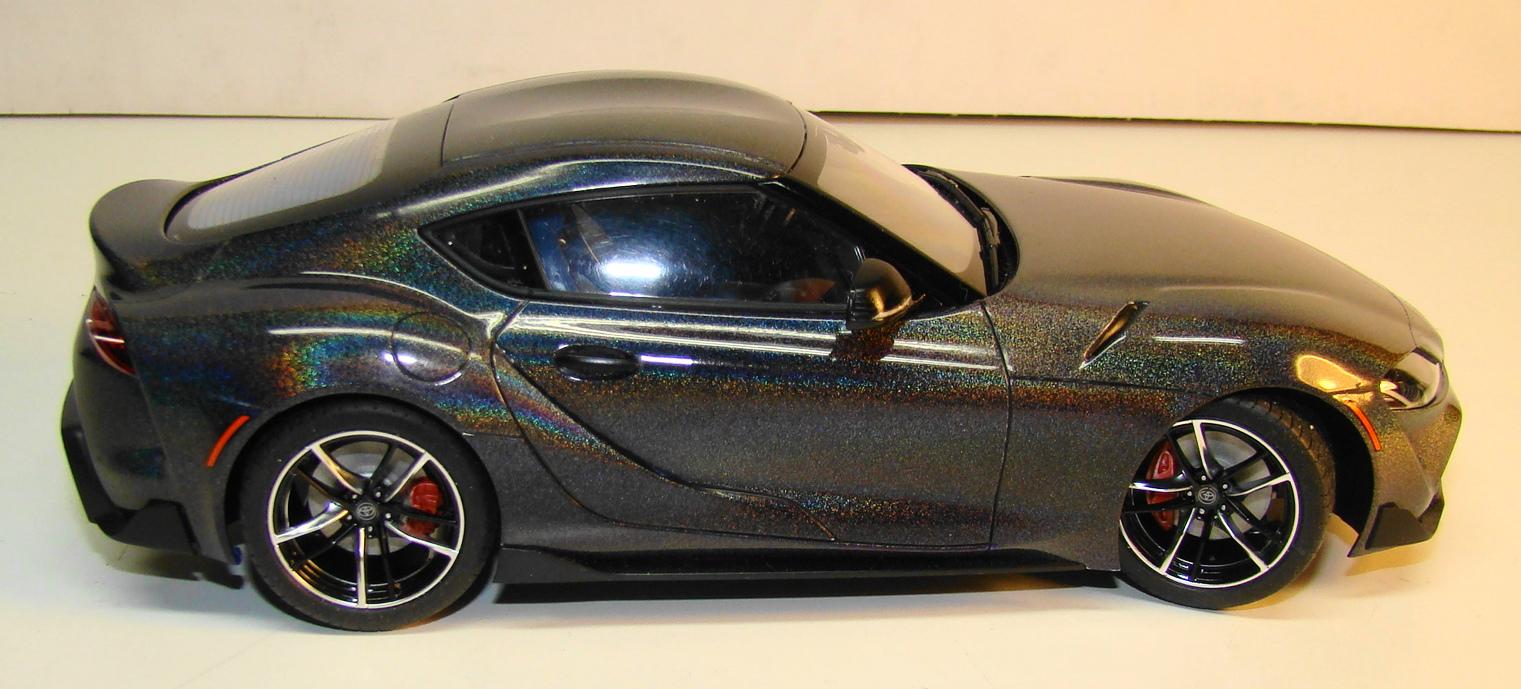
For the last 10 yrs I have had this custom of finishing a project on New Years day. It takes some planning but I manage. This years candidate is Tamiya's Toyota GR Supra in 1/24 scale. Colour chosen was Alclad Holomatic Spectral chrome which was sprayed over Tamiya TS-55 dk blue. Clear coat was Krylon latex clear. Interior was done with Mr Color #70 blue, Mr Color #328 blue and Mr Color #182 flat clear. This kit was a joy to do. The fit and finish of the parts was amazing. I would highly recommend this kit to anyone. See the photo captions for extra details on this build. Thanks for looking. This is one of my favorite interiors. I had a flocking that matched the light blue quite nicely. These seats were in multiple parts and helped create the paint division lines. I don't usually take a picture of the chassis, but Tamiya went to so much trouble to extra detail I thought it was worth seeing. The rear ind alone was 16 pieces Finished car on its wheels. The fit of the glass in particular was awesome. I usually sweat over installing the glass and Tamiya made it easy peazy Quite a bit of detail work went into the rear of this car. The chrome emblem in the kit was a nice touch. The wheels and tires on this kit are something else. The black spokes were a separate insert and fit like a glove. This photo doesn'rt do justice to the headlight treatment. Many pieces just to keep it accurate. This photo was taken back in June while the clear coat cured in the sun. It give the best idea of how chromatic this paint is. Krylon Latex clear takes a couple months to cure before it can be sanded and polished. This was painted several times before I found a clear that would not distort the very thin metallic finish of Alclad. Krylon now makes this finish as Lo-Odor clear.
-
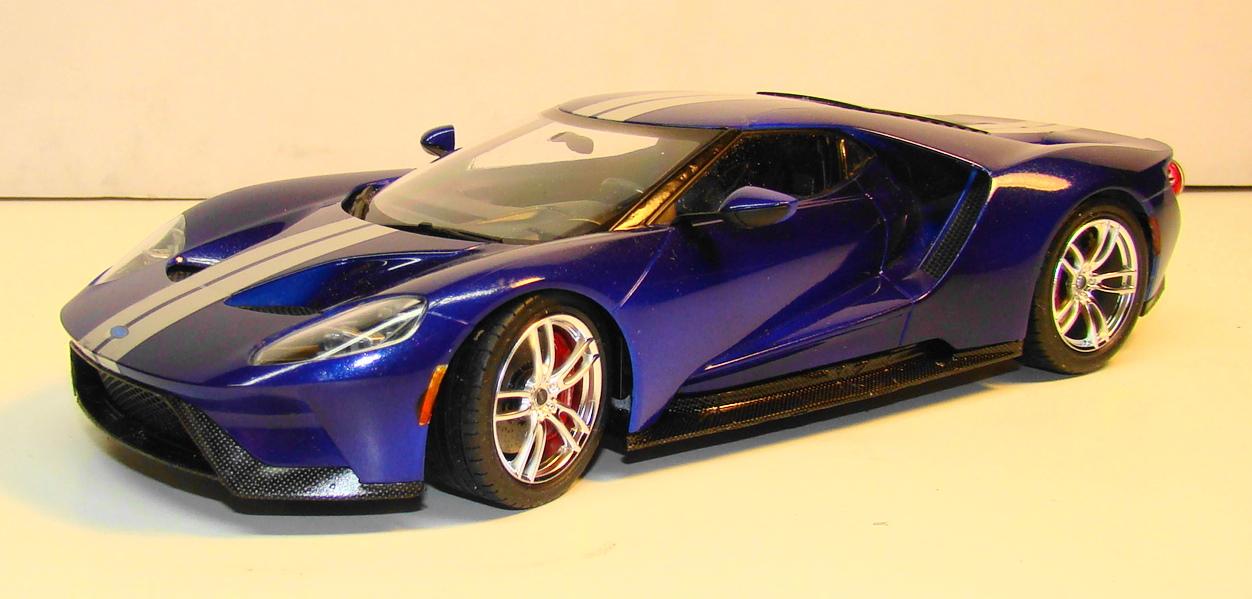
This kit was a lot more simple that i first thought. Once all the the parts were sorted into painting piles and some sub assemblies done, this kit wnety together surprisingly quick. Panit is Tamiya LP45 Racing blue with a mixture of LP49 Pearl and LP9 clear as a final coat. Kit is mostly box stock and the only major addition is some carbon fibre work on the chassis. Thanks for looking and comments welcome. This cars styling really shows its Ford GT heritage with a more modern look. Tamiya put lots of detail in the back of this kit. This veiw shows the aggressive styling a little better. That extra large windshield didn't show much of the interior which was rather sparse anyway. I like this veiw as it shows some of the extra detailing. Silver stripes were kit decals.
-
Looking to complete another and found this one in the stash already painted. Paint is Boyd' s Aluma Pearl yellow with Testors Crystal clear topcoat. Kit was very nice except for the decals. Mine cracked badly when I went to do the seats. A little varnish solved the problem for the rest of the decals. Never had this problem with Tamiya. Rest of the kit went together without much fuss. Tamiya went all out on the detail. See photo captions for extra info. Thanks for looking. Interior had loads of detail. I added black flock for carpet, Interior was painted a silver/grey to match the outside stripe. Seat fabric was sprayed flat. Those decals went on in many pieces. Don't usually photo the under carriage but this had so much detail it would have been a shame not to. I used various shades of Testors metallizer. I lied the stance of this model right out of the box. Rear end had lots of detail too. Chrome insert behind the tailights was a nice touch. Licence plate came out of the spares. Didn't like Tamiya's offering. Wheels were satin chrome and I sprayed them Tamiya X-18 semi black. I over thin the paint and spray it at high pressure in very thin coats. Gradually lower the pressure til I get to the wet coat. That pulls away from the edges slightly giving it the color and allowing some of the chrome to peek through. Dry brushing with silver would do the same thing but you wouldn't get the color and it wouldn't be as subtle Headlight also had the same chrome insert but had to be painted black. This is the length Tamiya went to for detail. This is 3 pieces. A clear insert glued in from behind and painted Tamiya smoke, and 2 of those rub on chrome emblems. Sorry about the hair....the camera picks up everything at high zoom.
-
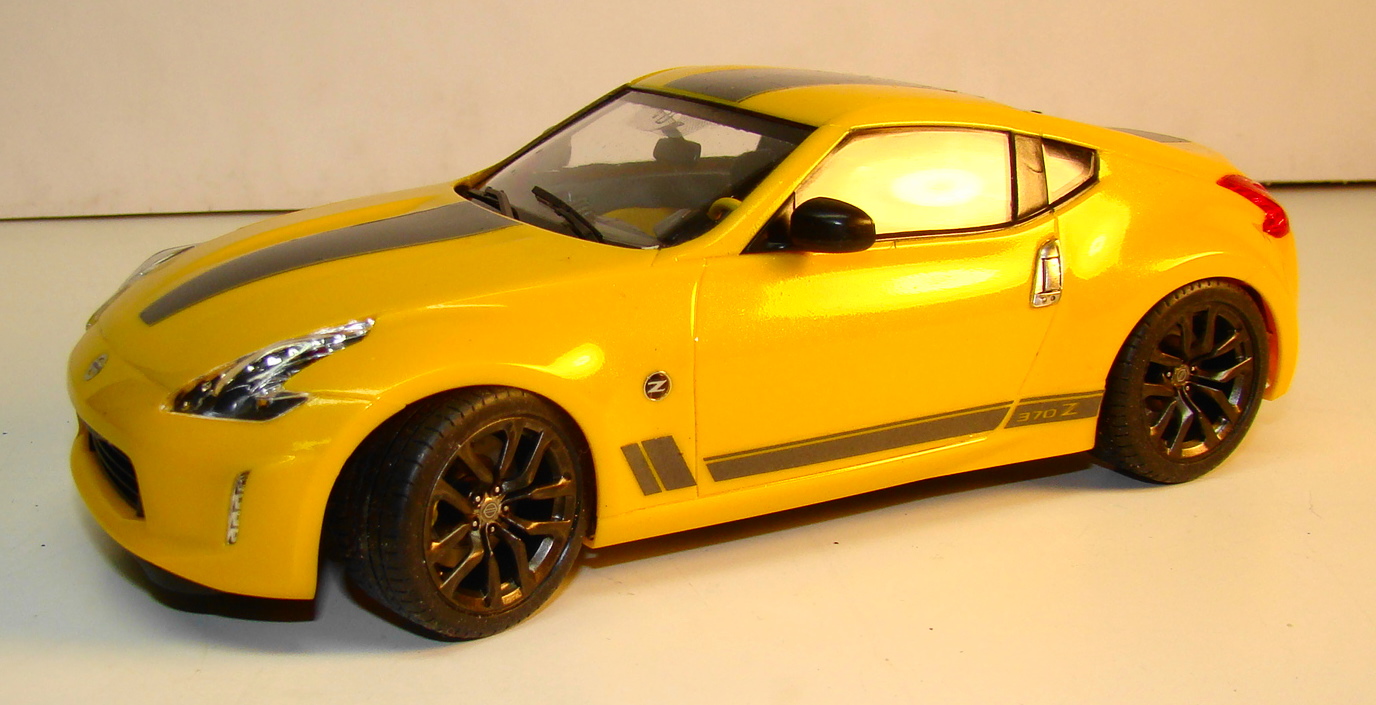
Aston Martin DBS (Pearl White Custom) (1/24 Tamiya) Well after a long time she's finally done... Loved this kit and enjoyed building her a lot!.... Swapped the Stock rims for the sexier Aston spoke rims, and added a lot of wiring and plumbing details to the engine... Enjoy the pics...


.JPG.e6b72453336fa4e568f2471b15b70c87.JPG)
.JPG.126c9a63cb3cf1bd61ce201ce304533a.JPG)


.JPG.e32e004be11885495633628da9dd7ea4.JPG)