Search the Community
Showing results for tags 'diy'.
Found 5 results
-
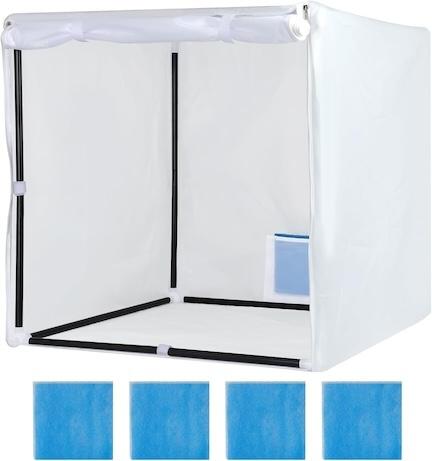
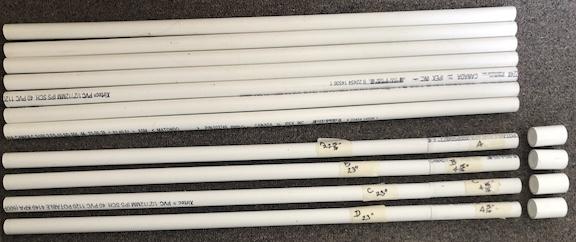
 A model building website had the motto “Completion, not perfection”. The participants referred to themselves as The Nerd Herd. Those are hard words to abide by if you constantly set perfection as the bar to achieve. LOL I really like a YouTube website called Barbatos Rex. He does a lot of hobby product introductions and reviews. My problem is that as soon as he features something of interest, it becomes a “need” for me. Thankfully, he makes it easy to obtain by providing an Amazon link. And thus starts the “Siebwin Airbrush Paint Spray Booth, 30” x 30” x 30” Portable Spray Paint Booth” adventure. Even though it was listed on Amazon.com, I still got a reasonable delivered cost as there were two discounts available. These are pictures of the item as listed. These are the received contents laid out. I haven’t even looked at the enclosure material, nor the filters, as they did not concern me. It was the pieces used to construct the skeleton that did. The plastic corner pieces did not look substantial. The “spring-loaded” assembly of the two-piece tubes did not impress me either. What would I use to replace these? PVC tube and fittings came to mind. With PVC in mind, I started looking at the Home Depot website. I don’t know why, but my mind settled on ¾” PVC and fittings. Home Depot had no fittings that resembled the plastic corner pieces, for obvious reasons. I decided that I could mimic the corner piece by using a combination of T and Elbow fittings joined together for each corner. When I asked a Home Depot rep if there were pieces specifically made to join a T to an Elbow, they told me no. I had to cut up short lengths from a pipe to do this. With this information, I purchased 8 T’s, 8 Elbows and 4 x 10’ lengths. I was so happy with my purchased! Remember that perfection thing I mentioned at the beginning? To have the tent actually fit on my replacement skeleton, a certain degree of precision would be required. I am very much a visual person, so I drew scale pictures of the fittings involved. These would assist me in determining cut lengths of the PVC pipe pieces. I was well and truly happy with my progress. Then reality set in. Staring at the PVC pipe and fittings, I realized that ¾” was way more than overkill. From having gone to the store already, I knew there was a smaller size, ½” which would be more than adequate. So I took all of my purchases back to Home Depot for a refund, and purchased the corresponding pieces in 1/2” sizes. I also realized I could complete this with 3 x 10’ pieces instead of 4. Doing this cut my Home Depot expenditures by half! After getting all the new PVC home, replacement scale drawings were done for the fittings. Measurements of the fittings openings help me make length calculations. I also made notes as to how to apportion the cuts over the 3 x 10’ lengths. Some research was involved as to the best tool to cut PVC. You can cut PVC with many manual tools; a hacksaw / PVC pipe saw, a conventional pipe cutter or a ratcheting style pipe cutter to name a few. Using either type of saw was ruled out because of the challenge of getting a square cut. A square cut is a definite requirement when close to exact length cuts factor in. That left a conventional pipe cutter or a ratcheting type. Looking into ratcheting types, they definitely win in the ease of effort category. However, many are challenged to produce a square cut for many reasons. That is unless you are willing to spend $100 plus for a brand name piece. I opted for a Rigid brand conventional cutter. Little did I know the work/effort that would be required to complete all of the cuts. So I set to cutting all of the pieces. I think it took somewhere around five hours. After making the cuts, I wanted to test fit a small joining piece to see how well the pipe would fit into the T and Elbow fittings. Joining a T with an Elbow was a failure. The T did join with Elbow, but was off by 90 degrees. The fit was so tight that once they were together, the T could not be twisted the 90 degrees. On the up side, it showed me that the outside diameter on both ends of each pipe piece would need to be reduced to the point where the fit was still snug, and yet could still be disassembled. Why couldn’t Home Depot have had a single fitting for the corner? Why was I thinking that the only possibility was to MacGyver my own version? That’s when it occurred to me to take a peek at Amazon. Amazon had many, many vendors selling the ½” PVC corner piece. Now what do I do. Should I be stubborn/proud and not admit that my initial attempt was not optimal. There were so many offerings to choose from on Amazon. Would these corner fittings, designed for furniture etc. actually work with standard PVC pipe? The only thing that concerned me with most of them were the specifications listed. Inch dimensions were provided with decimals. Why not with fractions as is the normal custom? What the heck is 0.82 inches. I spent a lot of time on a website to do conversions. Eventually common sense won over pride and I placed an order. At the same time I ordered a pipe reamer, as I knew that reducing all pipe OD’s by filing, scraping or sanding would more than test my patience. With this change in structural design, a new problem came to light. When planning the cuts, 8 pieces needed to be 28”. These were for the pipes connecting horizontally and from front to back. The pipes connecting vertically were 23”. So I headed back to Home Depot (AGAIN!) and got a refund for 7 x T fittings and 7 x Elbow fittings. Remember, I prior failure left one of each unreturnable! LOL As I was driving to the store, my thought was that I would need to buy another 10’ length so as to make 4 more 28” pieces. While driving my thoughts went to the leftover off-cuts. Would there be enough to join to the 23” pieces to make them 28”? What were the offcuts – 8”, 8” and 16”! Yes, all I needed were 4 x connector pieces. Well my Amazon order was delivered today. I was happy and relieved to find that the reamer did the job well. Once reamed the pipe fit snugly into the newly arrived corner fittings. Also, from the off cuts, I cut four new pieces to extend the 23” ones to 28”. Well all of the peces have now been cut. They still have yet to be reamed with a test fit So back to that nagging perfection thing. When I make something, I want to do it to the best of my ability. That means taking the time to do calculations, take measurements and make cuts with precision. If I am getting finished dimensions within a 1/16” of accuracy, I am pleased. Like many things in life steps backward always seem to accompany steps forward. Onward and upward!
-
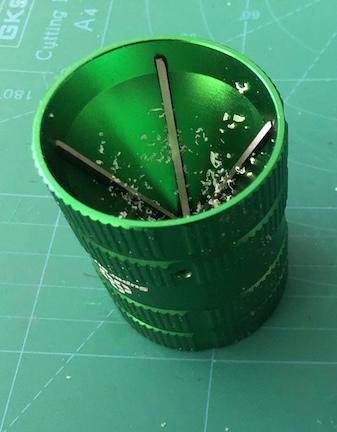
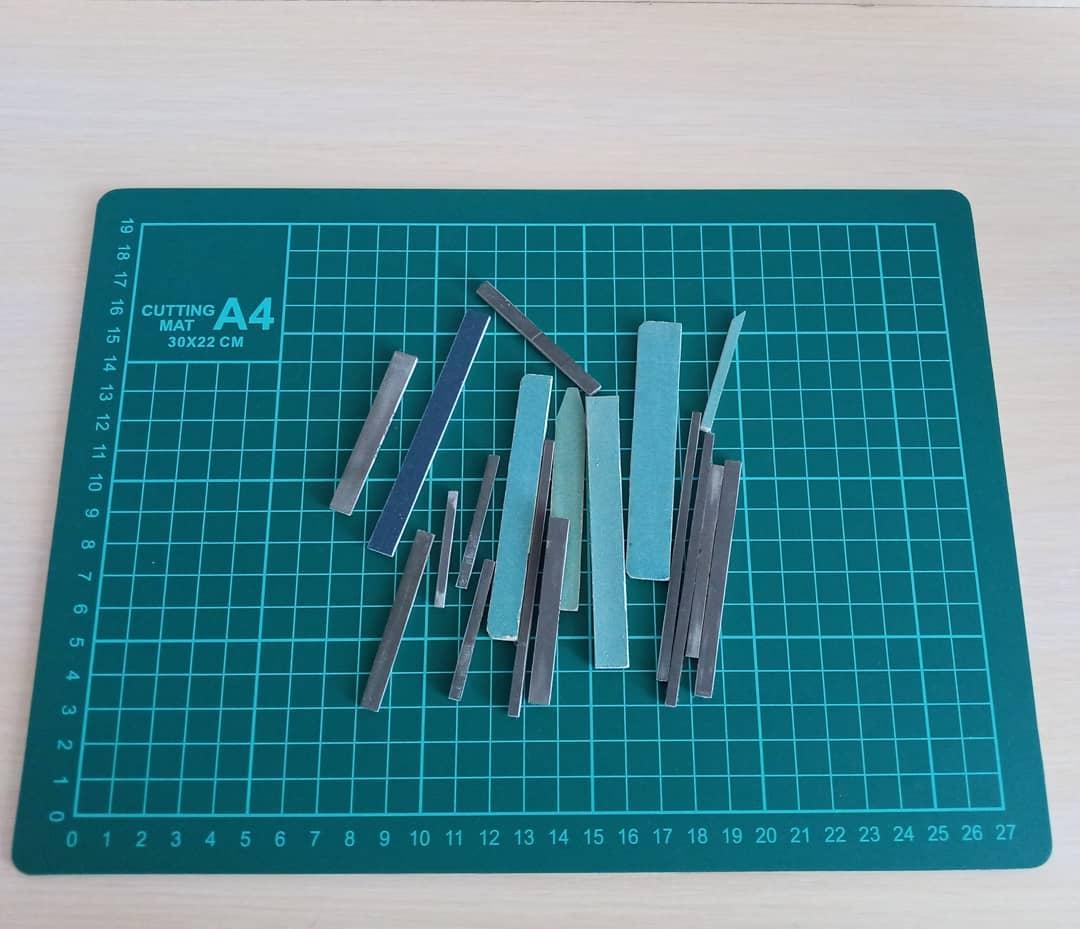
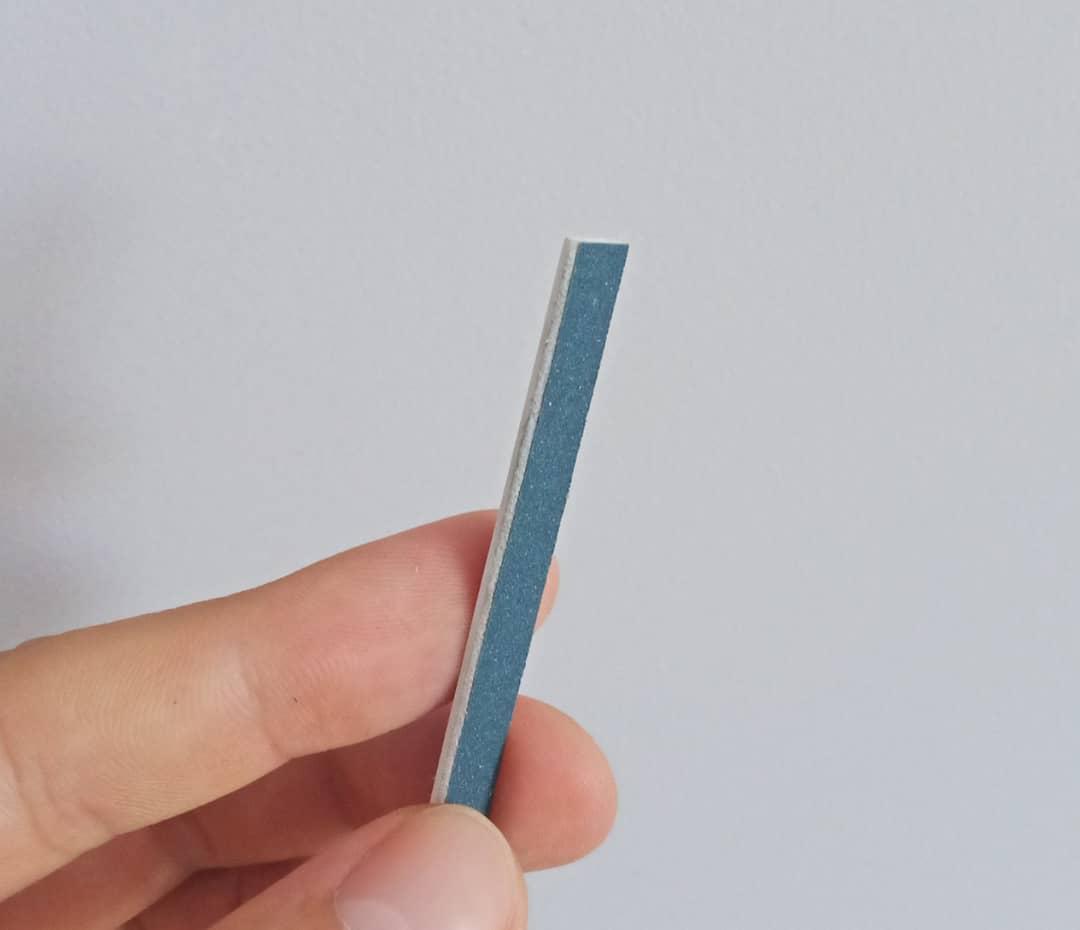
Hi there! #DIY Sanding stick. During building my models I need to sand plastic. Sanding sticks are the best way to do this. I make them myself. For this you will need: -sanding paper(any grit you need) -double side foamed tape -plastic card or any piece of plastic -sharp knife -ruler First cut strip of plastic and sand edges to make them smooth. Then cut a piece of foamed tape and glue to plastic strip. Cut off excess tape. Cut necessary strip of sanding paper and glue it to the stick with tape. If you need double side sanding stick then glue sanding paper from another side.
-
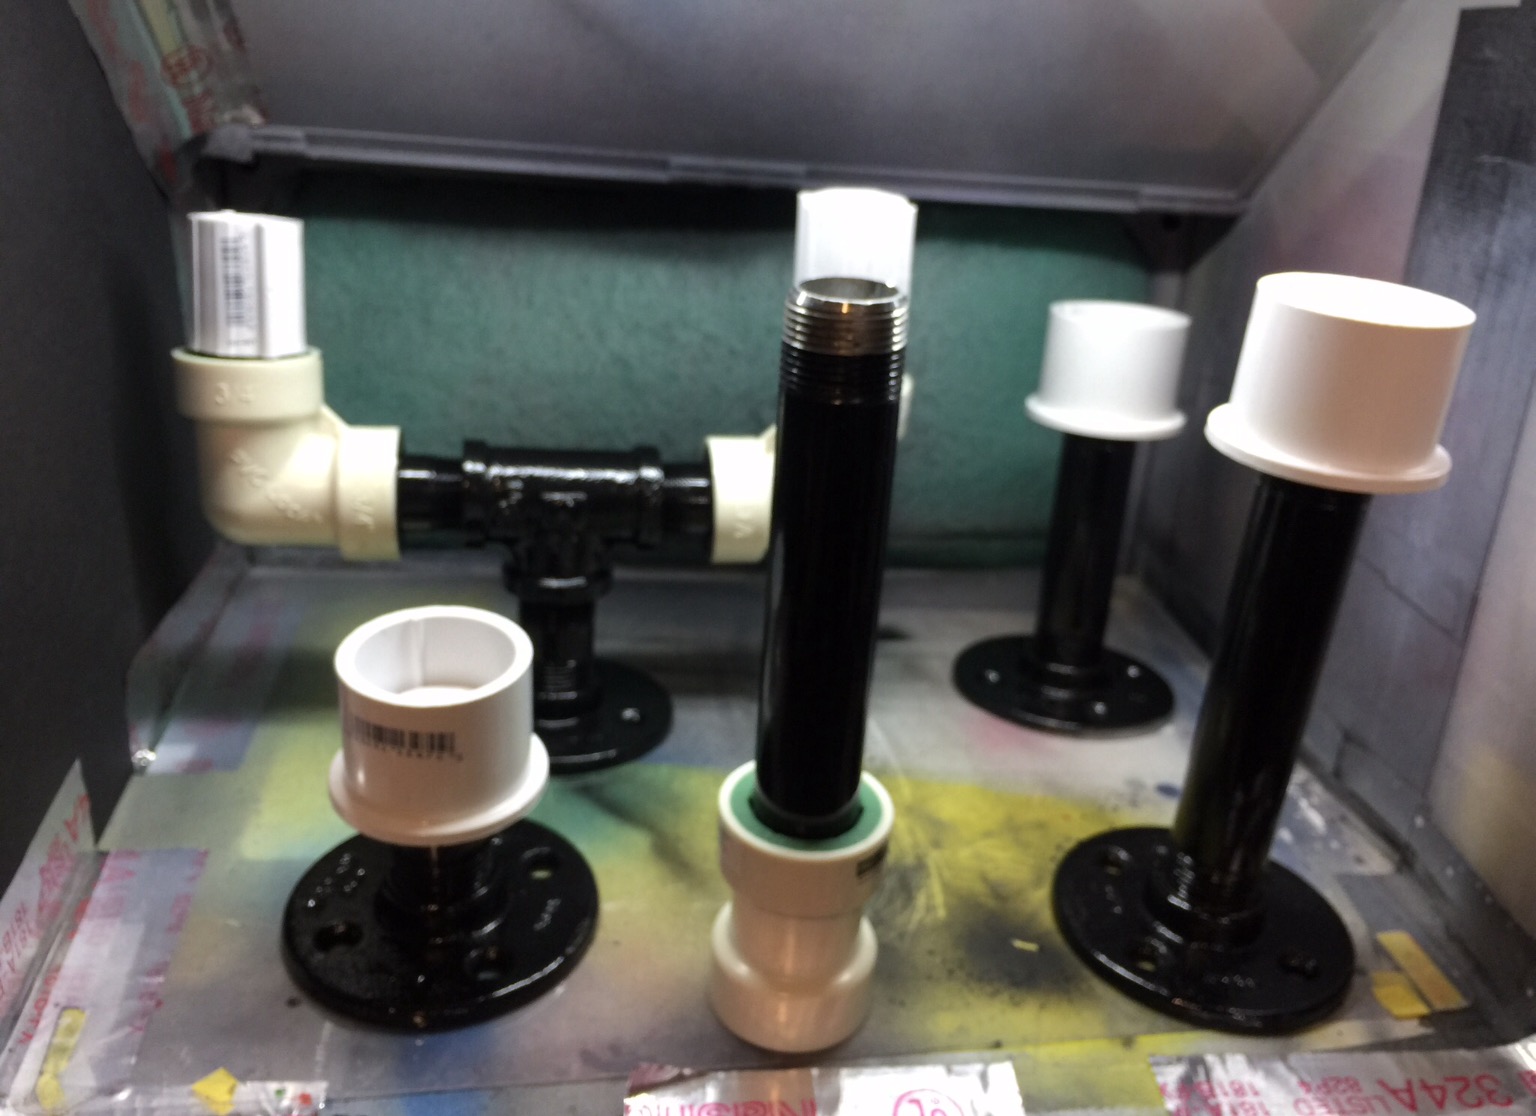
These are Some DIY AB Paint Stands that my buddy "FREDDIE" helped me with. They are totally interchangeable & capable of moving in just about any direction or angles needed (the goalpost looking ones arms & base swivel) for your part needing to be painted. I built them using cast iron flanges 3/4" + all 3/4" pipe & fittings. I just add some 10-15lb mounting tape to the different size plastic bushings, that hold the part. The Iron Flange & Pipe fittings add enough weight to give your part that nice STURDY SOLID feeling to your parts needing paint! I added some leftover gloss rattlecan black paint enamel on the iron sections making them cleanable & looking nice.... Very Simple to make, inexpensive & easy to locate parts at most any Hardware shop.... enjoy, Lee
-
hi guys, im getting heavy into my diorama with ideas that come into my head, i actually enjoy making stuff for my "i wish i had the money for this garage and cars in real life" diorama haha anyways i made a video to share my hobby and to help others, its a 40x48 pallet, weather with a torch and made of popsicle sticks and other little sticks with a bit of time ive created something i finally am accoplished with, i hope to help another member out.. total cost of build- about $4..and that will make alot of pallets (i was on short supply of materials in video) total time to build- 10-15 minutes, with weathering if i get enough intrrest i will be sure to make more videos on DIY stuff
-
Im looking for Merc. grills for my rat rods... im looking for that old school Desoto / merc. Big tooth grills for my 1/25 rat rods... i love the look of the big teeth in the grill i feel its very aggressive.


.jpg.667509fc59dfa77e69f01c2b8a9cff76.jpg)


.jpg.be77b03e4a5a659cbb40259406953ed0.jpg)