Bumblebi Posted March 31, 2015 Posted March 31, 2015 Bought this kit this weekend for next to nothing this weekend, and even though it's 26 years old, the quality is amazing! So far, I've only opened it up and looked at what's in it, and I quickly decided to change the wheels and modify the suspension similar to what i did with my Mini. Problem is, I don't have any rims that will look good on it, so what to do? Scratchbuild the rims of course! I started with a strip of 0.5 mm styrene... ...Which was wrapped around the super glue cap because that was the one thing that had the right diameter. Over the big strip, I added a 0.25 mm strip to strengthen the shape. It may look a bit messy, but since the outer side won't be visual I didn't pay much attention to it to be honest. And here it is inside the tire. There's a bit to clean up, but overall it looks pretty good. Next up is to make one more ring of this width, and then move on to the front rings, and after that, I'll make the face, out of either 1.0 or 1.5 mm styrene. Thanks for stopping by, I'll update later tonight when I get back from school //Bumblebi
darthsideous Posted April 1, 2015 Posted April 1, 2015 Really looking forward to seeing how the rims turn out
Bumblebi Posted April 1, 2015 Author Posted April 1, 2015 Really looking forward to seeing how the rims turn out They're my first scratch built rims so I'm looking forward to it too It's tough to make the outer rings completely round, but with some experimenting I think it'll turn out good.
Brizio Posted April 1, 2015 Posted April 1, 2015 Nice kit, I build one years ago. The rims that are you making are on the stock size tires or bigger, the first step you did look promising.
Bumblebi Posted April 2, 2015 Author Posted April 2, 2015 Nice kit, I build one years ago. The rims that are you making are on the stock size tires or bigger, the first step you did look promising. Yes indeed, so far everything fits together nice and there's not a single part that needs fixing. The rims will be the same size and width as stock, but the offset will be lower so the wheels will be further out. So yeah, I've been looking into the stance I want on the car.. The stock suspension is 17 mm tall, but I want to shorten it about 4.5/5 mm, to 12.5/12 mm tall. Here's a few pics of how low I first wanted the car to be, but I dont think I'll be able to do that since the inner fenders are in the way. So yeah, it won't be able to sit this low, I think it'll be 1.5 mm higher, because, as I said, the inner fenders are in the way. I'll see what I can do about it... //Bumblebi
Zarana-X Posted April 2, 2015 Posted April 2, 2015 I'd definitely pick up this kit for the right price. It's admirable that you're gonna make your own rims. I would've just bought a set of Aoishima or Fujimi wheels.
Bumblebi Posted April 6, 2015 Author Posted April 6, 2015 I'd definitely pick up this kit for the right price. It's admirable that you're gonna make your own rims. I would've just bought a set of Aoishima or Fujimi wheels. Yeah it's definitely a nice kitand you should I got mine for 200 krones, which is about 23 US dollars, and that is very cheap here in Sweden actually. I don't really have the money right now to buy a set of those, plus I like to challenge myself to build stuff from scratch With that said, if the rims don't turn out good, I'll probably go ahead and buy a set of wheels from ebay.
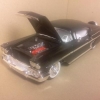
Bumblebi Posted April 22, 2015 Author Posted April 22, 2015 Sooo... I tried to paint the body yesterday. I found a nice metallic blue car paint, and decided to try it out on the 300. It turned ut BLAH_BLAH_BLAH_BLAH! The paint both egg-shelled and orange-peeled, plus that the can started spitting... I started stripping the paint off and that's a real pain in the ass as I think almost everyone knows... Unfortunately, the hood, which is clear plastic, cracked, and a part of the body was also cracked... At least now I know not to use that paint again. I've used that paint before, but this time it was reeeeaaaally bad..
niteowl7710 Posted April 26, 2015 Posted April 26, 2015 Lesson learned, you can't put automotive paint on a model without applying primer.
Bumblebi Posted April 28, 2015 Author Posted April 28, 2015 Lesson learned, you can't put automotive paint on a model without applying primer. The thing is, I've done it before, same brand and all, and it turned out great then, and the chassis plate on this build was painted at the same time as the body and hood, but it turned out more or less perfect..
Dominik Posted April 28, 2015 Posted April 28, 2015 same problem i had also with to different kits from Tamiya. the one, paint was perfect, the other one same mistake as yours...dont know, what the problem was. Perhaps it was the different age of the kits...
1hobby1 Posted April 28, 2015 Posted April 28, 2015 if you want a great looking blue with a small hint of metallic flake try Duplicolor BFM0340 Royal Blue. Just shot a Camaro with it and it's a beautiful color.
Drake69 Posted April 28, 2015 Posted April 28, 2015 1: Primer is supposed to help protect the body from "hot" paints, or those paints that contain chemicals that can harm some plastics. You're using automotive paint on your model and it's having a reaction to it. I've heard people say it has something to do with the color of the paint, others say it's just a different formula batch of paint from year to year. 2: Primer is supposed to assist in adhesion of the top coat of paint to your model. Without it, it can cause the paint to flake off or bubble up, causing egg-shell cracking and orange peel like you're seeing. 3: Tamiya and Fujimi are famous for using clear hoods as part of the build. This is because Japanese modellers can build the car with a visible engine bay without popping open the hood. Clear plastics are NOT THE SAME as white model plastic and therefore are going to have a completely different reaction to direct contact paints. Primer goes on clear parts quite well and protects them from the chemicals in top coat paints. Bottom line: Primer paint is not a waste of money. If you care how your model looks, consider using primer on at least the outside parts of the car (body panels, hood, etc...). Not only will it help how it's put together, it should look nice and hold its color for a long time.
Bumblebi Posted April 28, 2015 Author Posted April 28, 2015 Thanks for the tip Steve, I'll look into that! Allen, primer will be used from now on, that's for sure. I actually went through my paint stash and found a primer, so I'll give this another shot in a while. As I said, I've already used this brand before on this plastic so I thought it was alright, but yeah.. Lesson learned, that's for sure!
Recommended Posts
Create an account or sign in to comment
You need to be a member in order to leave a comment
Create an account
Sign up for a new account in our community. It's easy!
Register a new accountSign in
Already have an account? Sign in here.
Sign In Now