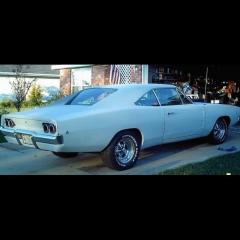
MOPARmaniac Posted July 26, 2015 Author Posted July 26, 2015 I put the wheels on and tested the turning and its a little off If you turn left they're fine, but for some odd reason if you turn them right the driver side wheel doesn't even go very far and the passenger side wheel doesn't do that when I turn left so somethings up ok nevermind they were just wobbly and because of that didn't go over all the way but when I gave it a tap it went all the way so i am going to glue the wheels on and keep in the position it needs to be
MOPARmaniac Posted July 26, 2015 Author Posted July 26, 2015 I swear every single part ive touched on this car has had to be sanded. when i first put the chassis under the body the tires were crammed into the wheel openings, so I had to sand the back part off a little bit and stretch the mount on the body back so it would go back farther. Well once that looked good, I saw the passenger side and got frustrated. The driver side was perfect but the dope heads who came up with this model didn't measure it very well because the passenger side wheel openings were too far back so then I had to turn around and sand the turds out of those. Anyway after a whole bunch of frustration I finally got it picture ready so here you guys are and for exhaust, well the instructions say I have to put chrome sidepipes on it to go on the turbocharged engine. I thought about just putting a different engine in it several times but I thought of a better Idea. just put different exhaust on it. The other day, my dad gave me a turdload of spare parts from all the cars he built when he was my age and one the things that came with them was side exhaust not shiny sidePIPES just the ones that are angled to go out the side. I have spare exhaust line that I will bend to fit position and engine The first pics have the ones that with the kit in them all the other pictures have the ones I want to put on in them. I figured since you guys have been telling "they never showed that in the show" why not put whatever exhaust I want on it here are the desired exhaust for this car
MOPARmaniac Posted July 26, 2015 Author Posted July 26, 2015 Hey TFchronos ive always wanted to build one of the trans ams you have to make a smokey and the bandit trans am. How about since you're complementing me on my build after Im finished you could build yours and i can complement you
MOPARmaniac Posted July 26, 2015 Author Posted July 26, 2015 Thats one custom manifold complete Im stupid its supposed to go on the turbo do not look at that picture thats wrong
MOPARmaniac Posted July 27, 2015 Author Posted July 27, 2015 It turns out I can't put the angled exhaust on either because these fatties make them stick below the tires.
MOPARmaniac Posted July 27, 2015 Author Posted July 27, 2015 here are the correct turbo mounted manifolds I put some rust on the turbos to make it look more realistic
MOPARmaniac Posted July 28, 2015 Author Posted July 28, 2015 sorryguys yesterday was my break day but I'm back in the business now here is a picture of ONE custom exhaust, gotta work on the next one
MOPARmaniac Posted July 29, 2015 Author Posted July 29, 2015 I got one of the custom exhaust pipes installed now still working on the other one though
MOPARmaniac Posted July 29, 2015 Author Posted July 29, 2015 Its coming together very slowley, It might not even be strong enough to hold together. I accidentley broke it trying to bend it to shape, and very weak now
MOPARmaniac Posted July 30, 2015 Author Posted July 30, 2015 Introducing my new pet! shes 3 months old she has a sister but shes not in here right now so I took a picture of this one. Also potty trained but no name
kruleworld Posted July 31, 2015 Posted July 31, 2015 Nice work so far. I noticed the same issue with the wheel not fitting properly until i gave it enough force. i do recommend when you get to the taillight, cover the inside with chrome foil to reflect more light back through. If you're really 'into' Knight Rider, you can install a led scanner into it. Hey TFchronos ive always wanted to build one of the trans ams you have to make a smokey and the bandit trans am. How about since you're complementing me on my build after Im finished you could build yours Just for you Mm, the KR kit makes a good S&B3. one needs to fill in the front scanner. The real trick it to find the stock emblems.
MOPARmaniac Posted August 2, 2015 Author Posted August 2, 2015 Sorry that I havent been building here these last couple of days I just got two kittens and got excited to play and spend time with them and forgot about the model building. But I beter get into it again or it will be a year before i start building it again like on my mustang. Anyway I finished the right exhaust and finished the gas tank.
MOPARmaniac Posted August 2, 2015 Author Posted August 2, 2015 got exhaust installed now to paint dirt on then interior
MOPARmaniac Posted August 3, 2015 Author Posted August 3, 2015 ok i got the base of the interior painted
GrumpyGrowly Posted August 3, 2015 Posted August 3, 2015 Awesome work on KITT and nice use of Cat. Kitt-Cat . Looks like a ferocious feline, mine likes to take the chrome bits and hide them. Great weathering, keep it up! Jonathan
MOPARmaniac Posted August 3, 2015 Author Posted August 3, 2015 I painted dash, put decals on, steering wheel
MOPARmaniac Posted August 3, 2015 Author Posted August 3, 2015 I painted the T.V screens with a paper clip
MOPARmaniac Posted August 3, 2015 Author Posted August 3, 2015 The interior is now finished Yaaaaaaaaaaaaaaaaaa!
Dominik Posted August 4, 2015 Posted August 4, 2015 What Kind of camera did you use? has it a "Macro mode"?Sorry Jericho...but your pictures are too bad, to see your work you've done yet. I think, it is good work!
GrumpyGrowly Posted August 4, 2015 Posted August 4, 2015 Ya some pics are blurry, but I get what you are showing by the captions you've give. Great work, keep it up!Jonathan
MOPARmaniac Posted August 4, 2015 Author Posted August 4, 2015 It is the camera on my phone, no it doesn't have a macro setting either. It doesn't even have focus it SUCKS! thanks for the god comments everybody, You guys are encouraging me to build more models
MOPARmaniac Posted August 4, 2015 Author Posted August 4, 2015 Also making me want to buy a new camera Ok, got the washer bottle in, radiator, radiator hose, now for battery, heater hoses, and A/C line.
MOPARmaniac Posted August 4, 2015 Author Posted August 4, 2015 well I put the accumulator and master cylinder on the firewall
MOPARmaniac Posted August 4, 2015 Author Posted August 4, 2015 oops, engine is too big for firewall, I have it back so far that it is against the interior wall, but the engine is still bending it just to fit
MOPARmaniac Posted August 4, 2015 Author Posted August 4, 2015 well I got the windows on but ive reached the upload limit so sorry guys, just my mouth on the rest of this build, no mo pictures ok I test fitted it and works great! just got to put rear view mirror and roof mounted computer on and interior will be complete
Recommended Posts
Create an account or sign in to comment
You need to be a member in order to leave a comment
Create an account
Sign up for a new account in our community. It's easy!
Register a new accountSign in
Already have an account? Sign in here.
Sign In Now