gino Posted November 26, 2015 Posted November 26, 2015 my pete coe project is on hold due to the fact I ran out of primer. I need to stock up on supply's. this is a snap kit I 've had in the stash for a long time. it is nearly complete except for the front steer axle which I used on another build. I had cut off the aerodyne bunk to make the big bunk for my k/w coe build (posted earlier) , and had originally planned to do a flat top double bunk but never got around to doing it. looking at the kit I thought I would do a relax build of a work truck day cab, spoke wheels, short wheelbase, etc. I used a piece of sheet styrene heated up with a hair dryer, bent over a screwdriver handle to make the missing rear roof section. the rear cab wall is from the back of the original sleeper wall. I flipped it and used the slot that was at the bottom to cut out the rear window. for the rear of the interior tub I cut out a section from the sleeper interior and fitted it to the rear of the tub.
Old Buckaroo Posted November 26, 2015 Posted November 26, 2015 This and the Pete has to be the best kits ever manufactured. The possibilities with them are endless and they are affordable. I really like your method for shaping the curved panel . This will be a fun project to watch One of the coolest tips I have seen with these snap trucks on hiding that tab on the battery boxes - It was painted amber to look like a chicken light.
angelo7 Posted November 26, 2015 Posted November 26, 2015 I've done this twice. Once for a Snowman and currently working on a Movin On version. Great kit to modify.
gatorincebu Posted November 26, 2015 Posted November 26, 2015 (edited) Gino, Nice work on the roof repair! You have a good start on this one.. Be Well Gator Edited November 27, 2015 by gatorincebu Put the wrong name
angelo7 Posted November 26, 2015 Posted November 26, 2015 Angelo, Nice work on the roof repair! You have a good start on this one.. Be Well Gator Umm, thanks Gator but Gino is the one working this one
gatorincebu Posted November 26, 2015 Posted November 26, 2015 Umm, thanks Gator but Gino is the one working this one See that is what happens when I reply to posts before I have had my first cuppa joe! Gino, Fine work here man! Be Well Gator
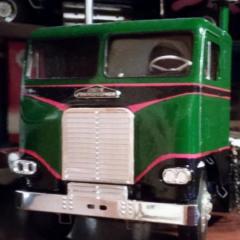
gino Posted November 26, 2015 Author Posted November 26, 2015 (edited) thanks for the reply's guys ! thanks sean for the chicken light tip I will definitely use it. while checking out w9 pics on the web to study battery box/fuel tank configurations I came across some of the custom trucks seen nowadays. the inspiration hit and I decided to try one. (so much for a relax build ). I cut the headlight pieces from the fenders, filled in the holes, and installed snap pete headlight brackets , and 32 ford lights from the American graffiti kit. the whole time I was sawing away at the hood, I had the song stuck in my head : "she's real fine my 409", but changed the words to "she's real fine my w9" !. I must be inhaling too many glue fumes ! as stated above, the possibility's are endless with these kits. here is what came out. [ Edited November 26, 2015 by gino
Petetrucker07 Posted November 26, 2015 Posted November 26, 2015 (edited) I like what you've done so far. I really like this job you did on the headlights. One thing I did on my snap KW, I lowered the boxes so the bottom step lined up with the step on the fuel tank. Edited November 26, 2015 by Petetrucker07
kilrathy10 Posted November 27, 2015 Posted November 27, 2015 Looking pretty good, so far.....I like what Clayton has suggested....Worked well for me, too.....Your idea for the headlights is pretty awesome, and the cabwork looks good, too...Awesome....
Truck parts Posted November 27, 2015 Posted November 27, 2015 I like what you have done so far . I will be following as you go on
Tesla Posted November 27, 2015 Posted November 27, 2015 Looks good Gino. I've built two KW daycabs and made the roof filler pieces pretty much the same way. I like your choice of headlights for this build.
gino Posted November 28, 2015 Author Posted November 28, 2015 thanks for the kind comments guys ! thanks for the tip on the battery boxes clayton !
Petetrucker07 Posted November 28, 2015 Posted November 28, 2015 Any time bud. I know it kinda peterizes the KW, but I think it looks better, a little custom.
gino Posted November 29, 2015 Author Posted November 29, 2015 managed to get some bench time in on the kw. I found a front steer axle in the parts box from a amt aerodyne coe kit . it has the bigger wheels and I found that the snap kit tires fit so I cut out the backing of the tires and installed them. also found that these tires fit the bigger wheels as used on the amt freightliner kit. I got an idea for the front wheels to drill out the lugs and installed round toothpicks to simulate the spike lug nut covers I saw on the web. definately wanted to lower the suspension so I notched out the top of the front springs with a file and mounted the front axle on top of the springs. test fitting revealed that the lowered front axle interferes with the oil pan on the engine. I'll leave that for another day for now. after cutting off the sleeper floor from the frame the frame seemed too flimsy, and I didn't care for it too much. I had a spare revell Germany w 9 frame so I built that up, cut off the kit frame and grafted on the new frame. it's a little longer now and the wheel base is a little further back than the kit had. I glued two pieces of styrene together and used it to box in the top of the frame. now the search is on for the rear ends. this is what it looks like now.
Petetrucker07 Posted November 29, 2015 Posted November 29, 2015 Looks really good man. That's a great idea with the toothpicks for nut covers.
gino Posted December 1, 2015 Author Posted December 1, 2015 Looks really good man. That's a great idea with the toothpicks for nut covers. thanks clayton ! progress report : after spending the better part of sunday I came up with a lowered rear suspension/rear end setup using parts from four different kits. it was very tedious test fitting and working it to get it to sit level , but I managed to pull it off. here are some pics.
Petetrucker07 Posted December 1, 2015 Posted December 1, 2015 Looks like you got it sittin my kind of low. I like it.
gino Posted December 1, 2015 Author Posted December 1, 2015 thanks clayton ! I put it next to another kw snap kit in the stash to see how low it was. looks like I need a scissor lift under the fifth wheel, whadiya think ?
Petetrucker07 Posted December 1, 2015 Posted December 1, 2015 Yep, just about as low as I got mine. I used Moebius rims with Class A resin drive tires. They are a bit lower profile than Revell tires.
kevjoh Posted December 6, 2015 Posted December 6, 2015 Another tip re the tires. The Italeri plastics two piece plastic tires fit these snap kit rims with a bit of work perfectly. You'll have to shim the center piece to slightly spread the tires apart.
gino Posted December 6, 2015 Author Posted December 6, 2015 nice looking truck clayton ! you nailed the look I'm after.thanks for the tire tip kevin ! will have to check that out.
gatorincebu Posted December 6, 2015 Posted December 6, 2015 Gino, I think you have it about as low as you can go with it. And I think you have done a great job on this project thus far. looking forward to further updates. Be Well Gator
landman Posted December 6, 2015 Posted December 6, 2015 Beautiful work.I wish I could splice in new styrene this neatly. Mine always winds up being visible. Great work on the rear suspension. You are right, it is tough getting all those sparate pieces straight.
gino Posted December 13, 2015 Author Posted December 13, 2015 Beautiful work.I wish I could splice in new styrene this neatly. Mine always winds up being visible. Great work on the rear suspension. You are right, it is tough getting all those sparate pieces straight.thanks Pat ! the frame wasn't that hard, I made nice straight cuts and super glue for filler. the suspension was tough but thinking about the end result kept me going and I pulled it off.
Recommended Posts
Create an account or sign in to comment
You need to be a member in order to leave a comment
Create an account
Sign up for a new account in our community. It's easy!
Register a new accountSign in
Already have an account? Sign in here.
Sign In Now