DrKerry Posted September 25, 2017 Posted September 25, 2017 Looking very nice!!!!!!! Looks awesome!!!!!
Fury556 Posted September 25, 2017 Posted September 25, 2017 Insane paint skills. What colour is the main body? I love a good electric blue.
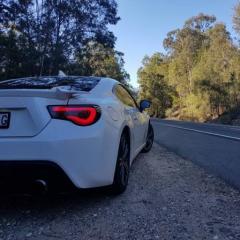
Mixalz Posted September 25, 2017 Author Posted September 25, 2017 Insane paint skills. What colour is the main body? I love a good electric blue. Tamiya Mica Blue (TS-50). Going for a blue body with CF aero and white rims
Fury556 Posted September 26, 2017 Posted September 26, 2017 Tamiya Mica Blue (TS-50). Going for a blue body with CF aero and white rims Ha! Same as my scoob. Maybe it's just the lighting but it looks a lot more vibrant, definitely a better finish!
Mixalz Posted September 27, 2017 Author Posted September 27, 2017 Ha! Same as my scoob. Maybe it's just the lighting but it looks a lot more vibrant, definitely a better finish! I looked at yours again and the only things I could think of is the camera used, the primer colour (I'm using Mr Finishing surfacer) and perhaps the spray distance as I'm am using these paints thinned further through an airbrush (far away = rougher surface = mild orange peel even with Tamiya's paints; which is why I started to thin them more)Yours is still amazing for someone early in the hobby. If you have any questions feel free to ask.
Mixalz Posted September 27, 2017 Author Posted September 27, 2017 Ugh absolutely gutted. I placed a carbon fiber decal on the front diffuser. In the front grill section I didn't notice that it wasn't seated along the 90 degree bend properly but was slopped instead. As I was clearing over the body the decal tore!! So upset. Not gonna be able to redo that without screwing things up further. Lesson of the day be careful with right angles and decals.... Might have to weather there to try and hide it. Its so large!
Fury556 Posted September 27, 2017 Posted September 27, 2017 I looked at yours again and the only things I could think of is the camera used, the primer colour (I'm using Mr Finishing surfacer) and perhaps the spray distance as I'm am using these paints thinned further through an airbrush (far away = rougher surface = mild orange peel even with Tamiya's paints; which is why I started to thin them more)Yours is still amazing for someone early in the hobby. If you have any questions feel free to ask. Yeah, that too, I'm just snapping with a Galaxy S6, so unless lighting is perfect it will always be a bit dark and grainy. I've got myself an airbrush now so I'm hoping I'll get better finishes from now on at least! I know that feeling with the decal tear - same happened to me on a bucket seat trying to sit it right and get bubbles out. Hopefully you'll get it looking right, I'm sure you will!
Mixalz Posted September 28, 2017 Author Posted September 28, 2017 (edited) Very exciting update (for me at least). Body was completed as follows: - Prep using cements (BSI) and putty (Tamiya tube and Mr Hobby Dissolved Putty and 500 Filler) - Sanded using Tamiya sponges - Primed using Mr Finishing Surfacer Grey - Above repeated multiple times (about 5-6 times) until I got a result I could live with. Pitting of the surface due to air bubbles in the resin and filling the panel join marks was difficult. - Sprayed with Tamiya TS-50 decanted and thinned with Mr Levelling Thinner - Surface touched up due to inadequate dust control (sand and recolour) - Badges attached via thin film of epoxy (BSI) - Cleared with Mr Color GX100 - Polished twice with Meguairs Scratch X - Waxed twice with Meguairs Carnauba Wax Really happy with the result. Potential improvements/defects/character features as follows: 1 - Notice the panel line on the bonnet is a touch wavy. Really tried my best to rescribe it straighter but the different material hardness made this difficult. 2 - Problem with rear right flare as above (notice the "colour variation" which isn't actually colour difference but is instead due to the light reflecting at the wrong angle due to my filler placement) 3 - The decal tore in the centre of the front bar during clear. This is not really noticeable unless under direct light source so I may leave it as is. 4. Air bubble in CF decal on LHS of front diffuser Advice on improving the above areas is welcomed Thanks for looking, Michael Edited September 29, 2017 by Mixalz Typos
Mixalz Posted September 28, 2017 Author Posted September 28, 2017 (edited) Oh you may also notice the two bits of piano wire under the rear bar. These were inserted to allow the diffuser to sit off the car as it does in real life. The gap without them didnt allow room for the exhaust (which would have been touching the diffuser otherwise).Inspiration for this model from:http://www.speedhunters.com/2010/04/feature_gt_gt__evasive_honda_s2000/ Edited September 28, 2017 by Mixalz Clarity
da_ashman Posted September 28, 2017 Posted September 28, 2017 Great Work! That colour looks stunning!!! Love the S2k, really wanted to get this transkit but went for the Spoon way instead.Cant wait to see more!!
Mixalz Posted September 29, 2017 Author Posted September 29, 2017 Great Work! That colour looks stunning!!! Love the S2k, really wanted to get this transkit but went for the Spoon way instead.Cant wait to see more!!Thanks! I'd love to see photos of your S2K model. Your builds are awesome from what I've seen. Don't find too many JDM cars on this board.
Mixalz Posted September 29, 2017 Author Posted September 29, 2017 During my lunch break today I started assembling the model (mistake!!!). I have always had a major problem with impatience especially when the model is just sitting there almost done. I rush to assemble because I just can't wait to see the results and screw things up. Above: Vallejo and BMF ready for Tamiya clear red Above: "Mistake" 1 - This one I'm not happy about BUT I don't think it was due to rushing. Essentially the Alclad cracked when placing the exhaust as its a custom fabrication job and the clearance wasn't large enough. I can accept this as a lesson unlike the other errors below which were due to rushing. Advice on spot repair/weathering to hide this would be appreciated. Above: Mistake 2 - Pure rushing. I had taped the exhaust to check the clearance for the diffuser. It looked like I could insert the body with the diffuser already attached so I decided to glue it on with the chasis not attached just so I can say the model is almost done. This was a mistake as I had to flex the body to fit the exhaust in the holes and resulted in chipping the blue tip I had painted. I taped them up and tried to spot repair with the airbrush but its not great. Above: Mistake 3 - This one is due to a combination of rushing and inexperience. I decided to trial gluing the taillight brake lights with epoxy. Having normally used CA glue (and the non-clear safe stuff at that lol!) on most of my old models, I thought I'd try technique I made up. Used a blob of epoxy, seated the lens and mopped up the excess with a microbrush. Worked OK but I think I needed more epoxy as I got a airbubble. Next time I think Ill just use CA glue. Oh well a learning process. These errors aren't the end of the world. The exhaust cracking is rather noticeable and upsetting but for my first bit of scratch building I didn't have high hopes and was actually impressed at how much creativity this hobby allows. PS: I chopped the windows because who on Earth drives a convertible with the windows up!!!
Mixalz Posted September 29, 2017 Author Posted September 29, 2017 I just noticed from the last photo. Gluing the diffuser first also resulted in me not having the rear bar as a reference when cementing the exhaust. Now the left tip is too far left! BAH I'll have to put a sign above the bench saying DON'T RUSH!!!
Mixalz Posted September 29, 2017 Author Posted September 29, 2017 (edited) Ah BLAH_BLAH_BLAH_BLAH. Rushing!!! why did I flip the model to take a photo. Now Ive lost the antenna.... Gonna cry nowEDIT: Found thank god Edited September 29, 2017 by Mixalz
Recommended Posts
Create an account or sign in to comment
You need to be a member in order to leave a comment
Create an account
Sign up for a new account in our community. It's easy!
Register a new accountSign in
Already have an account? Sign in here.
Sign In Now