fordlover632 Posted November 26, 2018 Posted November 26, 2018 I started a nother project just what I need lol. All I did is take the revells 1957 ford and revells 2010 GT500. I mounted the motor by sanding the stock motor mount. I also took the Center Consul of the gt500 and the screen (don’t now what to call it). Then I used some Tamiya basic putty to fill the gaps Still have some sanding to do. (I would hace some pictures Of the motor and the screen of what it looks like but for some reason it doesn’t let me upload a picture if anyone has the same problem let me now.)
Ich_Will Posted November 26, 2018 Posted November 26, 2018 I take my pictures with my phone and upload them, but I have to resize each one first...very seldom does it let me upload a photo without even some minor cropping.
fordlover632 Posted November 27, 2018 Author Posted November 27, 2018 7 hours ago, Ich_Will said: I take my pictures with my phone and upload them, but I have to resize each one first...very seldom does it let me upload a photo without even some minor cropping. Thanks for you help ?
Casey Posted November 27, 2018 Posted November 27, 2018 22 hours ago, fordlover632 said: I started a another project just what I need lol. All I did is take the revells 1957 ford and revells 2010 GT500. I mounted the motor by sanding the stock motor mount. I also took the Center Consul of the gt500 and the screen (don’t now what to call it). Then I used some Tamiya basic putty to fill the gaps Still have some sanding to do. The vertical part of the center console, where it flows up into the dash is referred to as the center stack. Looks good so far, but always remember to try to minimize any gaps-- the tighter the parts fit and the more surface area between the two parts that touch, the better. That also means less putty, and less sanding-- always a good thing. One suggestion when taking photos, too. Try turning the area you are focusing on so that the light hits it and illuminates that area. In your second pic, only the shifter boot and he area around it in the light, making everything else in the shadows, and more difficult to see. Not sure if you're headed in this direction or not, but if you plan to use the GT500's engine and trans, make sure you do some assembly (even temporary with white glue or similar) to check the fit up against the '57's floorpan and trans/driveshaft tunnel.
fordlover632 Posted November 27, 2018 Author Posted November 27, 2018 8 minutes ago, Casey said: The vertical part of the center console, where it flows up into the dash is referred to as the center stack. Looks good so far, but always remember to try to minimize any gaps-- the tighter the parts fit and the more surface area between the two parts that touch, the better. That also means less putty, and less sanding-- always a good thing. One suggestion when taking photos, too. Try turning the area you are focusing on so that the light hits it and illuminates that area. In your second pic, only the shifter boot and he area around it in the light, making everything else in the shadows, and more difficult to see. Not sure if you're headed in this direction or not, but if you plan to use the GT500's engine and trans, make sure you do some assembly (even temporary with white glue or similar) to check the fit up against the '57's floorpan and trans/driveshaft tunnel. Thanks Casey for helping me on how to take photos I will use your advise for the next photos I take. Here are some old photos that I got to work thank you ich-Will Oh and Casey here are some pictures of the motor of how it sets but I I’m thinking of moving the trance mount and the motor mount back to much of the bellhouesing is showing. But on they older 57s some of the bellhouesing so if I flip the motor mount it should be perfect.? Oh The center stack I messed up on the cutting as you can see on the old photos. But I got some pictures of it. I still have some filler to put on it but I still have some work to do to it to make it look good.
bisc63 Posted November 27, 2018 Posted November 27, 2018 (edited) Quick photo tip: if you really don't NEED color in a detail shot, convert the image to gray-scale ( black and white), it really decreases the file size, and is often just as good at getting your point across. Edited November 27, 2018 by bisc63 typo
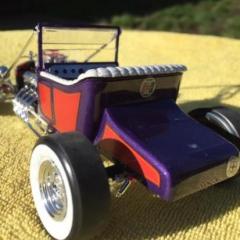
fordlover632 Posted December 8, 2018 Author Posted December 8, 2018 I mocked the Interior up and the shifter is from the 57 kit. I also mocked up they engine bay up to.
Recommended Posts
Create an account or sign in to comment
You need to be a member in order to leave a comment
Create an account
Sign up for a new account in our community. It's easy!
Register a new accountSign in
Already have an account? Sign in here.
Sign In Now