Jantrix Posted November 10, 2008 Posted November 10, 2008 Here's my Cherry 2000 Mustang chassis, that I did using Ryans acrylic mehtods. I also incorporated a bit of liquid mask and the sea salt technique. It is very easy to do and the results had my Dad's jaw on the floor. The base was red primer. Then I roughly brushed on three "rust" colored acrylics in a random pattern over the chassis and in some key locations I wanted rusty. Them I applied some liquid mask and sea salt stuck with a bit of tap water. After all was dried I sprayed Krylon Semi-gloss black. After that was dried I knocked off the sea salt and pulled up the liquid mask. Then I wiped down everything with rubbing alcohol through the black, to taper the edges of the spots from the liquid mask and salt and to thin the black down to the rust. After a few washes and some desert dust, she'll be done.
Guest JamesDE Posted November 10, 2008 Posted November 10, 2008 Ryan, I just tried your technique and seriously was amazed at the way the weathering turned out. I had a problem when it came to using the alcohol. I used 70% and it worked, but little too well, I managed to have the primer coat show through, so I redid the weathering, and I will be using the acrylics more often. Here are some pics of a 40 Ford Panel that I am working on.
RyanSilva Posted November 10, 2008 Author Posted November 10, 2008 Superb work Rob and James Im so glad you guys tried it, its...addicting The same thing happened to me James, the alcohol works a little too well sometimes, but thats where practice comes in.. Weathering is all about feeling, in the sense that In order to gauge how much, you just gotta try it and get a feel for what everything will do or react in combo to the other paints and chemicals your using. I usually lay a old towel on my lap, dip my brush into some alcohol whether its a black and Alc, or just pure Alc, and dab it all over the areas i want to weather, dap on top of the now pooled up alcohol, and either let it evaporate and sponge it up lightly. I usually go over a model a few times with alcohol mixtures, just to make sure all areas are even. Hosted on Fotki This cab was done almost like the tutorial, but the key difference was i did not coat the cab with full layers, i just dabbed a small amount of paint in areas i wanted, and let the alcohol pick up most of it off. The base coat was enamel green followed by almond, then green again (all layers cured before each layer of paint) I buffed through the green down to the white, then back to the green, then i used acrylics. Hosted on Fotki This was used with all acrylics, just like the tutorial, except the top layers were done with smal lamounts of paint dabbed around.
Guest JamesDE Posted November 10, 2008 Posted November 10, 2008 I did have one question, will the acrylic have a reaction when you seal it with dullcote?? I was thinking of using testors, but didnt know if the testors would be like their spray bomb cans, you know coming out too thick.
RyanSilva Posted November 10, 2008 Author Posted November 10, 2008 I have not seen a bad reaction with it, just use light layers. You can always do this trick..(i learned this from ###### cranky aka Virgil) Seal it with future floor polish, then coat it with dullcoat, if theres a white haze, seal it again with dullcoat and your fine. (white haze is a chemical reaction..nothing to be alarmed about)
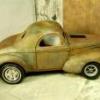
Guest JamesDE Posted November 11, 2008 Posted November 11, 2008 Thanks for the tip. Here are a few more pics from experimenting with the acrylics. What do ya think?
coopdad Posted November 11, 2008 Posted November 11, 2008 I thought I would share my experiences with my attempt at this tutorial. I had tested many, many variations of this process on spare fenders and most of my problems were paint lifting off the primer layer. 1. I found that the rougher the primer the less of a chance that the bottom layer of acrylic paint would pull off. In other words, don't use a gloss bottom layer or sand too much on the primer. 2. it seems to work best with many layers of paint. In my tests, I found that only one or two layers pulled away from the primer much easier than the four or five layer tests. 2a. removal of THIN paint was much harder to control than a normal layer of paint (don't want to say thick paint). Example: the left door had very thin paint toward the bottom (I thought I would be getting rid of it anyway so why waste paint). The paint instantly lifted off leaving only primer, requiring touch up: 3. In my arsenal of tools I found that a very stiff bristled fan brush (any shape should work but the smaller, stiffer the better) was very handy. It was good at very focused paint removal. I found it good on edges, such as door edge that had paint scuffed off. If the acrylic paint is not too soft, then you can use it to "sand" away the paint. Example: around the fender edge and where fender meets the body: Of course, I have not yet done Step 5 (rust streaks and black washes) but I have full confidence that after I do, the final project will be very realistic. John
RyanSilva Posted November 11, 2008 Author Posted November 11, 2008 Great work guys! Fantastic...that looks great, thanks for posting your progress! Paint lifting, I have the same issue in the past, i beat it by using artist quality acrylics for rust layers over the primer. The lifting , are the layers fully cured? sometimes when it isnt fully dry it will lift..in my case, it happens from time to time.
made007 Posted December 3, 2008 Posted December 3, 2008 i was looking for a tutorial like this one, wanted to try this on a rat rod, that i want to build, let see how it goes, i will ppost when i start my project, thanks ryan
RyanSilva Posted December 3, 2008 Author Posted December 3, 2008 Look forward to photos Jose! If you need any assistance.. PM me or email. Its not a problem at all.
RyanSilva Posted December 26, 2008 Author Posted December 26, 2008 I messed up my Photos! Sooo..Untill I fix it, we must use my journal entry! http://journals.fotki.com/73OldsOmega/weathering/
Jantrix Posted January 24, 2011 Posted January 24, 2011 Hey, glad someone dug up this tutorial again. It works good.
Recommended Posts
Create an account or sign in to comment
You need to be a member in order to leave a comment
Create an account
Sign up for a new account in our community. It's easy!
Register a new accountSign in
Already have an account? Sign in here.
Sign In Now