JayVee Posted September 1, 2008 Posted September 1, 2008 I'm going to spend some time learning how to paint traditional "crab claw" flames in the style of the master, Brian Nehring. I studied his tutorial numerous times, and I have a lot of reference photos of his work that I'm using to try to get the right look. I don't have the technique under control yet, but I have to start somewhere so this prebuilt Riv will be the guinea pig. I'm using Ultra-Bright chrome foil for masking, and it seems to work well. I finally freehanded some flames that look acceptable: Here's how the painting went. I can get the control that's needed, but I painted it too "spotty". I need to paint smooth strokes in between each flame lick. I'm also going to reverse the blue and purple colors in the scheme. I need to make thinner connections on the flame patterns, and fatter bases on each crab claw. This will allow the white color to show up on each crab claw base. This is not a keeper, but at least it shows what I need to work on next. It's all about the journey, right? I expect this process to take a few weeks (months?) before I end up with my first keeper.
Marc @ MPC Motorsports Posted September 1, 2008 Posted September 1, 2008 Not too shabby for your first attempt. I couldn't draw flames if I traced a template. I bet you figure it out real soon.
diymirage Posted September 1, 2008 Posted September 1, 2008 you definatly got the main gest of it now all thats lefts are the three Ps of modeling Practice Practice Practice i used to do this on a larger scale when i was younger (motorcycles, helmets and the such) and i must say your doing very well for a first attempt
JayVee Posted September 1, 2008 Author Posted September 1, 2008 Thanks guys, I think you're right about it being a matter of practice. I'm prepared for a few more attempts before getting a keeper. This is different than true fire flames in that it's hard to visualize the final result without removing the mask, and then it's too late to change it.
JayVee Posted September 6, 2008 Author Posted September 6, 2008 2nd attempt (on styrene sheet): For the next attempt the tips of the claws need to be extended and more slender, and I'm going to introduce a third color for the flame tips (darker blue). I can see that now I'll be able to practice making better flame shapes with pencil and paper, and then practice tracing the pencil lines with the airbrush until I can make smooth, even strokes. Once I get that under control I'll go back to masking and I'll seal the mask with clear to avoid the white bleed around the edges. Thanks for checking out the progress! -JV
CB Posted September 6, 2008 Posted September 6, 2008 Thanks guys, I think you're right about it being a matter of practice. I'm prepared for a few more attempts before getting a keeper. This is different than true fire flames in that it's hard to visualize the final result without removing the mask, and then it's too late to change it. Good lookin practise JayVee. One thing I notice on (obviously) 'backyard' flame jobs, which I've been guilty of too btw, is first, the shape--we tend to get too complicated, wanta put too many curves in and there just aint room for 'em all. Secondly, like you refer to above, is that we tend to lose 'sight' of the background color that the flames are going to be on when the masking is removed, usually making the flames way too 'dark' or too contrasty to the background color. It is sooooo easy to forget that and just keep working the flames colors. To help with that, I've tried spraying the cutout part of the flame mask the color of the car so I can lay it beside the flames and see how it looks. This looks way cool! Ifn you slide that styrene down over the front of dat Riv' you'd have the start of one fine lookin DeathRace Buick fer the DeathRace buildoff!
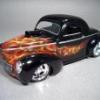
diymirage Posted September 6, 2008 Posted September 6, 2008 (edited) one suggestion i would like to make turn some of your tips the other way, if you look at the tips of your flames they all point the same way (the outside) in order to make it "pop" a little more flip some of those points the other way around kinda like this origenal and this is just a quick edit (changes are in the red circles) hope you dont mind me trying to show you how i would do it. not trying to disrespect your work, just giving you my 2 cents Edited September 6, 2008 by diymirage
JayVee Posted September 6, 2008 Author Posted September 6, 2008 All good points guys, thanks. Mirage, you're on the money with that hint. Next time, some of the flame tips will also be longer and have one more wave in them that ends up pointing the other direction.
JayVee Posted September 14, 2008 Author Posted September 14, 2008 Here's the third attempt. The flame shapes are not really smooth, they're more psychotic and edgy, but I'm ok with that. (reflects my personality, maybe?) The first shading layer (purple) came out clean and even, but then I got too heavy-handed and lost control of the second (blue) layer. The flame tips are lavender, but they need to be dark blue or some other color. I'm going to change the approach to the blue layer to allow the purple to show through more. I think if I start the airbrush at the inner base of each claw and just pull the brush to the tips it will give more direction and "motion" to the flames:
Uncle Mike Posted September 17, 2008 Posted September 17, 2008 Here's the third attempt. The flame shapes are not really smooth, they're more psychotic and edgy, but I'm ok with that. (reflects my personality, maybe?) The first shading layer (purple) came out clean and even, but then I got too heavy-handed and lost control of the second (blue) layer. The flame tips are lavender, but they need to be dark blue or some other color. I'm going to change the approach to the blue layer to allow the purple to show through more. I think if I start the airbrush at the inner base of each claw and just pull the brush to the tips it will give more direction and "motion" to the flames: Hint: For a great mask, use Parafilm, available thru Micro-Mark. Parafilm is (was) from the medical field. It is a sheet of plasticised material that cuts well with a sharp X-Acto (Testors #11 Black blade is sharper) Flame masks are ideal with Parafilm. I've also painted flames for years...I argued with Dean Jeffries in 1956 about the "non-fire" look that his 'crablike' forks had...later, I adapted that style myself! I apologized to Dean hundreds of times since. He just said it was all he expected from a "dumb kid"! George Barris took credit for that style of flame job, but it was Dean Jeffries who did it first. Barris's firsts were painted by Louis Stejanovich, in Barris's old shop (Lynnwood, CA) They looked nothing like crabs!
Semi Trailer Mechanic Posted September 17, 2008 Posted September 17, 2008 What's goin' on... Thanks for showing you're progress! I'll have to try that!
JayVee Posted September 19, 2008 Author Posted September 19, 2008 Hint: For a great mask, use Parafilm, available thru Micro-Mark. Parafilm is (was) from the medical field. It is a sheet of plasticised material that cuts well with a sharp X-Acto (Testors #11 Black blade is sharper) Flame masks are ideal with Parafilm. I've also painted flames for years...I argued with Dean Jeffries in 1956 about the "non-fire" look that his 'crablike' forks had...later, I adapted that style myself! I apologized to Dean hundreds of times since. He just said it was all he expected from a "dumb kid"! George Barris took credit for that style of flame job, but it was Dean Jeffries who did it first. Barris's firsts were painted by Louis Stejanovich, in Barris's old shop (Lynnwood, CA) They looked nothing like crabs! Good tips, thanks! I'll try Parafilm and the #11 black blade.
Jeff Johnston Posted September 20, 2008 Posted September 20, 2008 I've wanted to try that as well, as well as the true flames you are so good at. For me it's really just having the time to practice....and practice....and practice. I always would rather just build, but I saved a 49 Merc for the day when I can finally paint flames....
Recommended Posts
Create an account or sign in to comment
You need to be a member in order to leave a comment
Create an account
Sign up for a new account in our community. It's easy!
Register a new accountSign in
Already have an account? Sign in here.
Sign In Now