ZIL 111V Posted July 6, 2009 Posted July 6, 2009 Would like to spraypaint a tanker trailer with Model Master Aluminium 1452 can, painted small parts before but never a larger surface like a tank trailer.....will it give a good "polished aluminium" lifelike result Any tips, techniques used...or pix, by forum members will be appreciated: -How many coats.....several coats will give a better finish??? -What kind of tissue or cloth is recommended to polish the paint? -Was told to prime with testors silver can before applying MM Metalizer? on white or colored plastic to protect from "polishing thru" bare plastic. -MM Metalizer sealer will protect finish (finger prints!) &...decals? -Is it as effective on Resin parts? Thanks to all
Foxer Posted July 6, 2009 Posted July 6, 2009 The spray cams of metalizer will work well on large surfaces, just like any spray can. It does cover very well and I've never buffed through a single coat, but most of what I've done is small pieces. Best to use a cotton cloth to polish, like you would on paint. A couple coats is probably best to protect raised detail. Sealer is a must after you're done polishing on all the buffing metalizers. It's very sensitive to soaking up just about every material known to man! I really like the look of the aluminum when buffed .. has a nice low level gloss/shine ... just about right. Try it on a piece of scrap plastic if you're not sure it will do what you want.
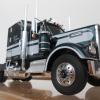
Bernard Kron Posted July 6, 2009 Posted July 6, 2009 (edited) I use rattle can Metallizer over large surfaces quite frequently. I find that some the tips that follow help me get consistently good results: 1) Make sure that the surface you are applying the Metallizer to is as smooth and faultless as possible if you want that smooth, shiny "sheet of metal" look. The Metallizer shows absolutely everything underneath it. It goes down very thin and is extremely sensitive to surface irregularities. 2) On styrene use a primer much as you would for any other lacquer paint. I use Duplicolor primers myself. 3) On resin make sure the resin is very clean with no trace of mold release. If you shoot Metallizer directly on the resin the Metallizer will flow off the surfaces completely fail to adhere at all unless the resin is clean. I virtually always prime my resin surfaces. 4) Choose the color of your primer with the understanding that it will effect the final shade of the Metallizer just as it would any other paint. Obviously the more coats of Metallizer the less the primer shade will effect the final color. I use white primer under Buffable Plate Aluminum quite a lot to ensure a bright aluminum look. Also, Metallizer is very fragile and will rub off if handled too much. Unfortunately Metallizer sealer will dull the sheen of Metallizer paints, particularly the buffable ones. If the look of unsealed Metallizer (for example to achieve a polished aluminum appearance) is what you’re after, either avoid handling the surfaces or assume that over time they will assume a more worn look where the primer might show through. This is another reason choosing the right shade of primer is important. Gray primers that show through create a nice industrial look when under most Metallizers, for example. 5) I find that polishing the primer is critical to getting an ungrained, polished look when using Metallizer. I will polish my primer with a very fine grade of sandpaper (at least 2000 grit) to make sure that the texture of the primer doesn't show through the Metallizer. 6) Also consider applying the Metallizer paint that comes in the small jars over large surfaces using a brush. I know this is against Testors recommendations but you can achieve some very natural looking and compelling effects. The shades that result from applying Metallizer this way are totally different than the same paint from an airbrush or rattle can. For example, I use brushed on Metallizer Gunmetal to achieve a worm undercoat look on chassis surfaces. Experimenting with this technique can lead to very rewarding results. 7) Remember to take advantage of the Buffable feature of some Metallizer paints. The difference between buffed and un-buffed can be quite amazing. Testors Metallizer paints are great stuff. They should be in every modeler’s kit bag of basic tricks. 60’s Bare bones FED: Body Panels – Buffable Aluminum Plate ’37 Chevy Salts Flats Coupe: Wheel wells and body under-pan – Hand brushed Gun Metal; Chassis and body extensions – Non Buffable Aluminum; Suspension parts – Hand brushed Burnt Metal; Oil Pan and Rear End – Buffable Aluminum; Push Bar and Exhausts – Stainless Steel. Edited July 6, 2009 by gbk1
Recommended Posts
Create an account or sign in to comment
You need to be a member in order to leave a comment
Create an account
Sign up for a new account in our community. It's easy!
Register a new accountSign in
Already have an account? Sign in here.
Sign In Now