Bernard Kron Posted April 18, 2010 Posted April 18, 2010 Glad to see this one moving along! The shortened side trim along the hood really sets off the pie section on the hood. The 5 spokes look great and the opened up side windows are killer. More. more, more...
jedimastergary Posted April 19, 2010 Posted April 19, 2010 Looking good lots of great detail going into this one will watch to see it finished I have the wagonrod but messed up the motor guesse Ishould not have tried to work on it when I was sick. Got a diffrent motor and been thinking of doing a custom maybe a hearse
Raul_Perez Posted April 19, 2010 Author Posted April 19, 2010 Thanks, guys!! I finally got the engine and chassis painted and assembled. It's Testors Honduras Maroon spray can lacquer, (the same color I painted my '58 Impala a couple of years ago). The air pump, reservior and airbags for the suspension have been plumbed with black elastic cord from Michaels. The brake lines have also been plumbed with the same elastic cord, but to distinguish them from the air lines, I added small pieces of aluminum tubing where the line enters the frame to represent the fittings that attach the steel lines to the rubber hoses. With the chassis mostly complete, I can now focus on finishing the bodywork and paint. Later,
Bernard Kron Posted April 19, 2010 Posted April 19, 2010 (edited) Wow! That chassis is a knockout. Great color with all the nice detailing we've come to expect in your builds. It's such a modern piece. I'll have to get this kit just for the chassis alone. I wonder what it would fit under? Hmmmm.... Edited April 19, 2010 by gbk1
Raul_Perez Posted April 19, 2010 Author Posted April 19, 2010 Wow! That chassis is a knockout. Great color with all the nice detailing we've come to expect in your builds. It's such a modern piece. I'll have to get this kit just for the chassis alone. I wonder what it would fit under? Hmmmm.... Thanks, Bernard!! Hmmm...modern chassis, a killer ZR-1 engine, big 'n littles...what will it fit under? I don't know either, but I will tell you that the center-to-center measurement for the axles is 4.55 inches. Later,
Raul_Perez Posted April 19, 2010 Author Posted April 19, 2010 Yeah...design-wise, the air pump is too close to the exhaust pipe, (even after trimming the mounting flange a bit), and the air reservior tank rubs on the muffler. But, by the time I realized the problems, (which was after all of the parts were painted ), I decided to leave everything as designed. Ideally, the exhaust pipes and the mufflers could have been moved closer to the center of the chassis. Other than that, everything went together pretty well. Later,
Alyn Posted April 20, 2010 Posted April 20, 2010 Raul, that chassis is really nice. The red and silver are striking together, and the clean detail really hits the mark. If that were mine, I'd be tempted to put tops on the mufflers and then put it on the shelf. It's a shame to cover it up.
Jeff Sauber Posted April 20, 2010 Posted April 20, 2010 Great detailing. Everything looks really clean. Nice!! Raul, is there anyway you can re-configure the exhuast just a tad to try get a little clearance between the air tank and the muffler? A couple of mild bends in the pipes might help fix things a bit. In any case, great chassis!
Raul_Perez Posted April 20, 2010 Author Posted April 20, 2010 Raul, that chassis is really nice. The red and silver are striking together, and the clean detail really hits the mark. If that were mine, I'd be tempted to put tops on the mufflers and then put it on the shelf. It's a shame to cover it up. Thanks, Alyn!! Yesh...I thought about filling the mufflers and the air tank, but from the bottom you can't see that they're hollow... Great detailing. Everything looks really clean. Nice!! Raul, is there anyway you can re-configure the exhuast just a tad to try get a little clearance between the air tank and the muffler? A couple of mild bends in the pipes might help fix things a bit. In any case, great chassis! Thanks, Jeff!! Yeah...I might play with it a bit more, but the two front mounting tabs for the exhaust pipes are right under the cross-members that are in front of and behind the mufflers.. There really isn't much room to change things without making the pipe too short to then reach the header. You know how it is...fix one problem, create two more... Later,
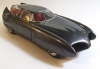
Raul_Perez Posted April 20, 2010 Author Posted April 20, 2010 (edited) After reshaping the grill, I didn't like the sharp curve at the lower front edge of the hood and side panel, (in front of the shortened side spear). BEFORE: AFTER: It's a very subtle change, but one that was necessary to sell the reshaping of the grill and the hood. I still need to decide what I'm going to do with the running boards and the tail lights before this one gets a good coat of primer and a bit of paint... Later, Edited April 20, 2010 by Raul_Perez
Jeff Sauber Posted April 20, 2010 Posted April 20, 2010 Thanks, Jeff!! Yeah...I might play with it a bit more, but the two front mounting tabs for the exhaust pipes are right under the cross-members that are in front of and behind the mufflers.. There really isn't much room to change things without making the pipe too short to then reach the header. You know how it is...fix one problem, create two more... Later,
doomcrew Posted April 20, 2010 Posted April 20, 2010 looking really good raul. i like treatment on the bonnet, are you going to hinge it? good job on those headlights, as the moulded ones were way too low. i had to think for a while on the removal of the running boards on my model, especially with the doors being opened up. if not removal, maybe reshape them? steve
Raul_Perez Posted April 20, 2010 Author Posted April 20, 2010 (edited) Yeah, I know what you mean. Sometimes adjusting a minor issue can turn into opening a big can of worms. Things are definitely looking great. The front end is comming along quite well. I tried to squeeze them together a bit, but they're too thick to move much. They're actually stonger than the frame!! Oh well, this was meant to be a quick, mostly box-build... looking really good raul. i like treatment on the bonnet, are you going to hinge it? good job on those headlights, as the moulded ones were way too low. i had to think for a while on the removal of the running boards on my model, especially with the doors being opened up. if not removal, maybe reshape them? steve Thanks, Steve!! Yes, the hood will have a side mounted hinge, opening on the driver's side. Yeah, the original headlights are way too low, and, they look like they droop down. I'm leaning towards reshaping the running boards, at least adding enough material to bring them up to meet the bottom of the doors. Later, Edited April 20, 2010 by Raul_Perez
Bernard Kron Posted April 20, 2010 Posted April 20, 2010 ...I'm leaning towards reshaping the running boards, at least adding enough material to bring them up to meet the bottom of the doors. ... Looking very good. The smoothing out of that radius in front of the trim on the hood was really needed and was well worth the effort, IMHO. Similarly, I agree, the indented area between between the bottom of the body and the running board needs to be dealt with! Another example of big effort on seemingly small things yielding big results. Don't stop finessing now!!!! It's looking too good...
Raul_Perez Posted April 20, 2010 Author Posted April 20, 2010 Looking very good. The smoothing out of that radius in front of the trim on the hood was really needed and was well worth the effort, IMHO. Similarly, I agree, the indented area between between the bottom of the body and the running board needs to be dealt with! Another example of big effort on seemingly small things yielding big results. Don't stop finessing now!!!! It's looking too good... Thanks, Bernard!! Yeah, I think it's the anal retentive bodyman that still live inside me that makes me fix even the small things in the body design like the arc of the front side panel and the hood. Though it's a lot easier to remove the running boards, I kind of like them. What I need to figure out is how to modify them to fit in with the Vette theme that this model carries from the engine, chassis and interior. An interesting task, considering there never has been a Vette with running boards... I'm still stuck on the tail lights, too. I'm leaning towards somehow molding in a set of stock ones. That would jive with the molded in headlights. We'll see... Anyway, once I sort out those two things, this one will get a bit of primer and a few shots of color!! Later,
Tumbler75 Posted April 20, 2010 Posted April 20, 2010 I have to say I really like the way you are doing this car! I've been wanting one or more of these kits for various ideas! I like how you "reworked" the headlights, much cleaner and more appeal, the hood truely needed work, you knocked that out of the ball park for sure! This is jus' turning into an all out "Van-tastic" vehicle!! Keep up the great work!
Raul_Perez Posted April 21, 2010 Author Posted April 21, 2010 I have to say I really like the way you are doing this car! I've been wanting one or more of these kits for various ideas! I like how you "reworked" the headlights, much cleaner and more appeal, the hood truely needed work, you knocked that out of the ball park for sure! This is jus' turning into an all out "Van-tastic" vehicle!! Keep up the great work! Thanks, Jason!! I may get another one or two of these kits just for parts, if the price is right. I've always been a big fan of the ZR-1 engine. The whole chassis on this model is really nice. I'm going to have to measure a few of my older AMT and Revell kits to see what else I can slide this chassis under without too much modification... Later,
Ken Posted April 21, 2010 Posted April 21, 2010 Outstanding work Raul!!!! I was a bit hesitant when you started, but you are knocking this one out of the park!! The kit chassis fits under a ton of stuff. It may need a bit of tweaking to get it to fit, but that is not hard. The frame is easy to shorten or lengthen due to the nice straight rails. I have shortened it to fit under the Revell new Willys You can see the frame in the above pics. Since the frame rails are straight it is easy to mate them back together and not get anything twisted or crooked. Wheels in the above pics are out of the Phantom Vickie kit, which is another great kit for both building and parts robbing.
Bernard Kron Posted April 21, 2010 Posted April 21, 2010 (edited) ...The kit chassis fits under a ton of stuff. It may need a bit of tweaking to get it to fit, but that is not hard. The frame is easy to shorten or lengthen due to the nice straight rails. I have shortened it to fit under the Revell new Willys... Hey Ken, great looking Willys. Thanx for the tip! I have been wanting to slam a Willys in the modern style and this does the trick. Also I've been collecting those Phantom Vickie wheels and that's a great use for them! BTW, looks like that thing is sectioned and has had extensive work done to the fenders... Yes? I'd love to see this one on the workbench forum. Meanwhile I'm sure we're all looking forward to Raul's next update.... B. Edited April 21, 2010 by gbk1
Raul_Perez Posted April 21, 2010 Author Posted April 21, 2010 Outstanding work Raul!!!! I was a bit hesitant when you started, but you are knocking this one out of the park!! The kit chassis fits under a ton of stuff. It may need a bit of tweaking to get it to fit, but that is not hard. The frame is easy to shorten or lengthen due to the nice straight rails. I have shortened it to fit under the Revell new Willys. Since the frame rails are straight it is easy to mate them back together and not get anything twisted or crooked. Wheels in the above pics are out of the Phantom Vickie kit, which is another great kit for both building and parts robbing. Thanks, Ken!! Typically models that are already stylized are difficult to improve on through customization. All I've really done is fix a couple of things that either didn't match well with Jarius' original concept or were omitted from the kit. The mods to your Willys looks AWESOME!! I am curious why you chose to use a different chassis, (unless you started with a dragster version of the kit instead of the street rod version). I've actually bought several of both the dragster and the street rod Revell Willys kits just for their chassis and engine parts. Both of them look GREAT when built. Based on my friend Bernard's comments, I too bought the Phantom Vickie for parts. I'm also looking for a couple more of the WagonRod kits to use as chassis and engine donors. The WagonRod chassis fits pretty well under the old AMT '51 Chevy convertible. The wheelbase is identical. Hey Ken, great looking Willys. Thanx for the tip! I have been wanting to slam a Willys in the modern style and this does the trick. Also I've been collecting those Phantom Vickie wheels and that's a great use for them! BTW, looks like that thing is sectioned and has had extensive work done to the fenders... Yes? I'd love to see this one on the workbench forum. Meanwhile I'm sure we're all looking forward to Raul's next update.... Bernard, I'm not sure, but I think Ken posted the Willys on the workbench forum a while back...I'll have to look for it again. With everything going on at work and home, there probably won't be another update until maybe Sunday...Too much to do and not enough time... Later,
Raul_Perez Posted April 21, 2010 Author Posted April 21, 2010 Looking good Raul, are you going to bring it to The show on the 16th? No...I probably won't make it to the next Stockton show...but...it might be finished (or at least close) by the following show...
Ken Posted April 21, 2010 Posted April 21, 2010 Yeah, I posted it a long time ago. Not much has been done to it since then. I have hit a stumbling block with the rear window treatment. Lots and lots of mods to that one. I will PM you about it to keep from cluttering up Raul's incredible build thread with my horrible skills
Raul_Perez Posted April 22, 2010 Author Posted April 22, 2010 Yeah, I posted it a long time ago. Not much has been done to it since then. I have hit a stumbling block with the rear window treatment. Lots and lots of mods to that one. I will PM you about it to keep from cluttering up Raul's incredible build thread with my horrible skills No worries here, Ken!! I don't get my feathers ruffled when someone posts a pic on my thread to share something that's part of the conversation. I saw the pics that you sent Bernard. The proportions on your most recent version look awesome. You've got to get back to getting it done!! Later,
crazyjim Posted April 22, 2010 Posted April 22, 2010 Your attention to detail is amazing, Raul. I love watching your progress on this build.
Recommended Posts
Create an account or sign in to comment
You need to be a member in order to leave a comment
Create an account
Sign up for a new account in our community. It's easy!
Register a new accountSign in
Already have an account? Sign in here.
Sign In Now