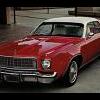
Railfreak78 Posted June 20, 2010 Posted June 20, 2010 (edited) Here is my newest adventure. I am thinking something semi custom. The kit comes with some but not all custom parts shown. I'm not sure what color or colors yet. Does anyone know where to get very thin masking tape? Maybe a car paint supply place? Anyway I think these wheels look good on this for some reason. Enjoy! Edited July 1, 2010 by Railfreak78
David G. Posted June 21, 2010 Posted June 21, 2010 Very thin in width or thickness? For width, I cut my own. I stick the tape (Scotch Blue) to a piece of glass and cut it with a knife and straight edge. Thickness, I can't help with. BTW, I agree with you on the wheel choice!
modelhut Posted June 21, 2010 Posted June 21, 2010 What a great body style that is. Dumb question, has that year and body style been released by any company recently? Also, do you have an idea as to what color you are going to paint it? Thanks, Rod.
Railfreak78 Posted June 22, 2010 Author Posted June 22, 2010 Thanks David! I was thinking width. Like a flexable thin pinstripe masking tape. I was thinking of less chrome on this on the sides and doing scallops or something.
Railfreak78 Posted June 22, 2010 Author Posted June 22, 2010 Rod this kit is actually a 2007 copyright from RC2. It is a re- release and the plastic seems a little different. It's almost transparent. Had a little clean up needed but not as bad as a resin usually dose. This may be part of a set as someone in my club has a couple of them and other cars in packaging like this. Color wise I'm going with an oddball shade of a gloss purple. I was thinking 2 tone with a light purple almost pink for scallops or graphics. I may ditch the 2 tone. I'm thinking white interior, white wall tires and it being full blown custom.
modelhut Posted June 22, 2010 Posted June 22, 2010 Thanks Brian! The color scheme sounds great Now I'll have to search for one of those. I am really falling in love with these older 60's, non-Camaro, Chevelle, Nova body-styles. They've been forgotten for the most part. I'll be watching your progress with anticipation! Rod
Railfreak78 Posted June 23, 2010 Author Posted June 23, 2010 Here is an update. Tuesdays are usually slow at work so I took paint, the kit, and some glue and got busy I put down the primary base coat as well as the white interior. I didn't take a pic yet but I did an over spray fade on the chassis too. I finished the base to the engine but there is a lot of detail to add still. This is based on an old AMT kit ( Even has a tv and phone) so the engine is not very well detailed at all and going with the blower I had to give up the intake manifold with the distributor.This is still all in moch up only. I'll update more when I can so Enjoy!
Railfreak78 Posted July 1, 2010 Author Posted July 1, 2010 Hey guys, Here is an update. Some good news and some bad news. I finally found a decal scheme I like with the interior which is the good news. Bad news is after paint I have to carefully open the hood more so it sits right with the engine in the car. The engine is to far forward using the metal axle set up. That I'm not worried about to much since I will not be using anyway more than likely. I have these tires/wheels just temporary. I have to strip the ones I want with Westley's Bleach White. Also my wash is not done yet on the front and back due to how shallow the chrome is. More soon Enjoy.
Harry P. Posted July 1, 2010 Posted July 1, 2010 Don't forget to either foil or paint the interior window cranks and door handles...
Railfreak78 Posted July 1, 2010 Author Posted July 1, 2010 Yeah I still I need to do that. I can't look at the car and leave that white I actually tried to foil the whole lower part of the dash but my skills are not there yet to get around all those knobs on the dash of this car. Someday... but I have only foiled one car so far so I'm not pushing issues yet
Railfreak78 Posted July 13, 2010 Author Posted July 13, 2010 Don't you hate it when you try to fix one problem and create another one? I took the dremel cutting wheel to open up the blower opening and didn't really pay attention to where the chuck was and messed up the hood. I had to sand it all down after body work. Oh well we get mulligans sometimes right?
Recommended Posts
Create an account or sign in to comment
You need to be a member in order to leave a comment
Create an account
Sign up for a new account in our community. It's easy!
Register a new accountSign in
Already have an account? Sign in here.
Sign In Now