David G.
-
Posts
11,165 -
Joined
-
Last visited
Content Type
Profiles
Forums
Events
Gallery
Everything posted by David G.
-
 Thank you most kindly Joe. The P-61, the 1962 Rolls and now this... I do tend to pick kits that are nearly unbuildable, don't I? Thanks again for your kind comment Joe. =D-
 -
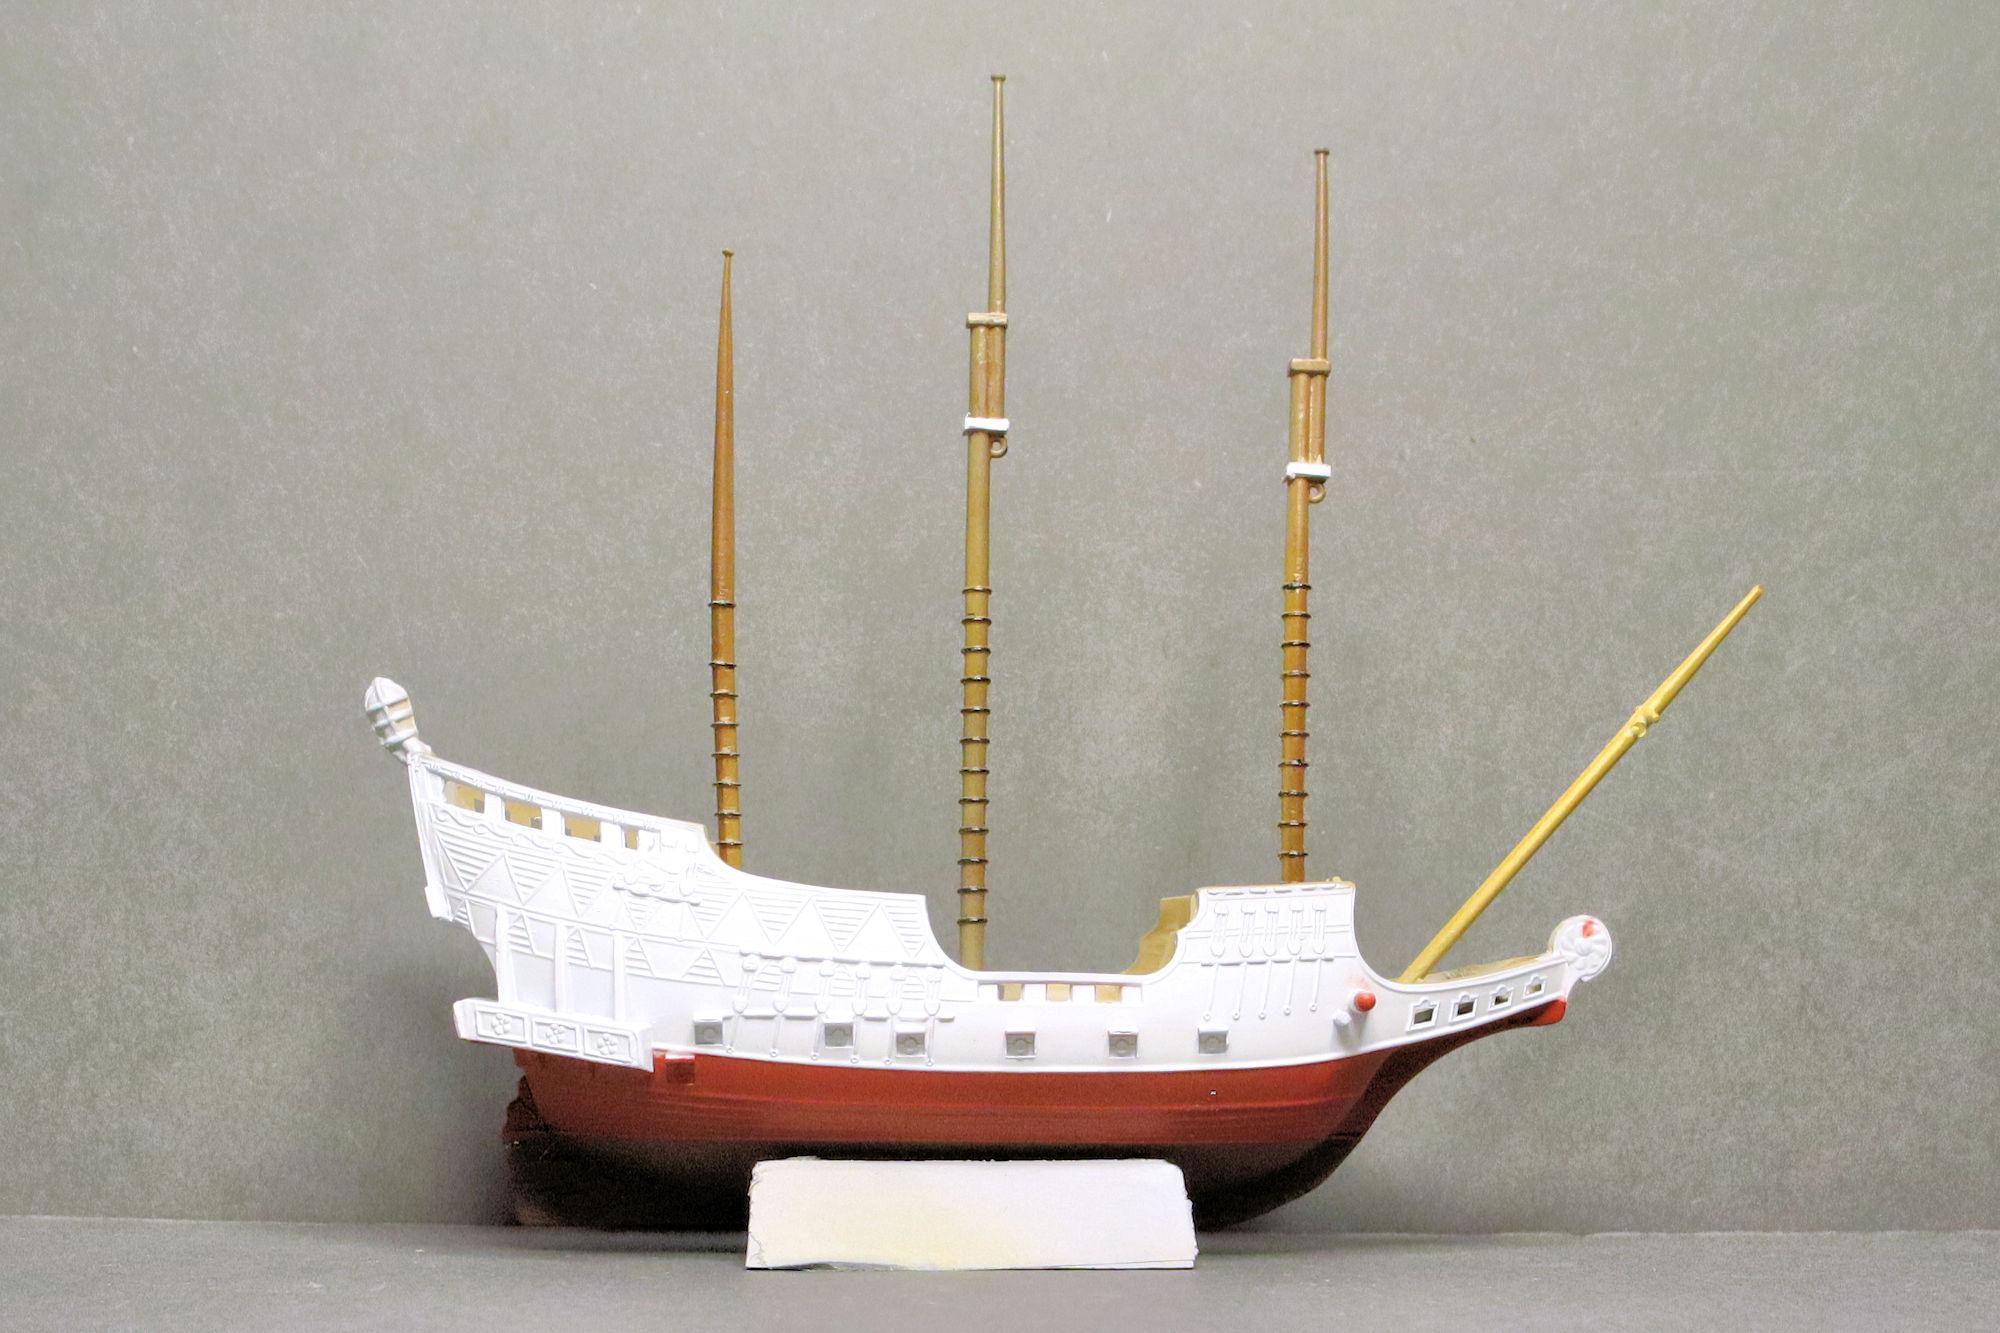
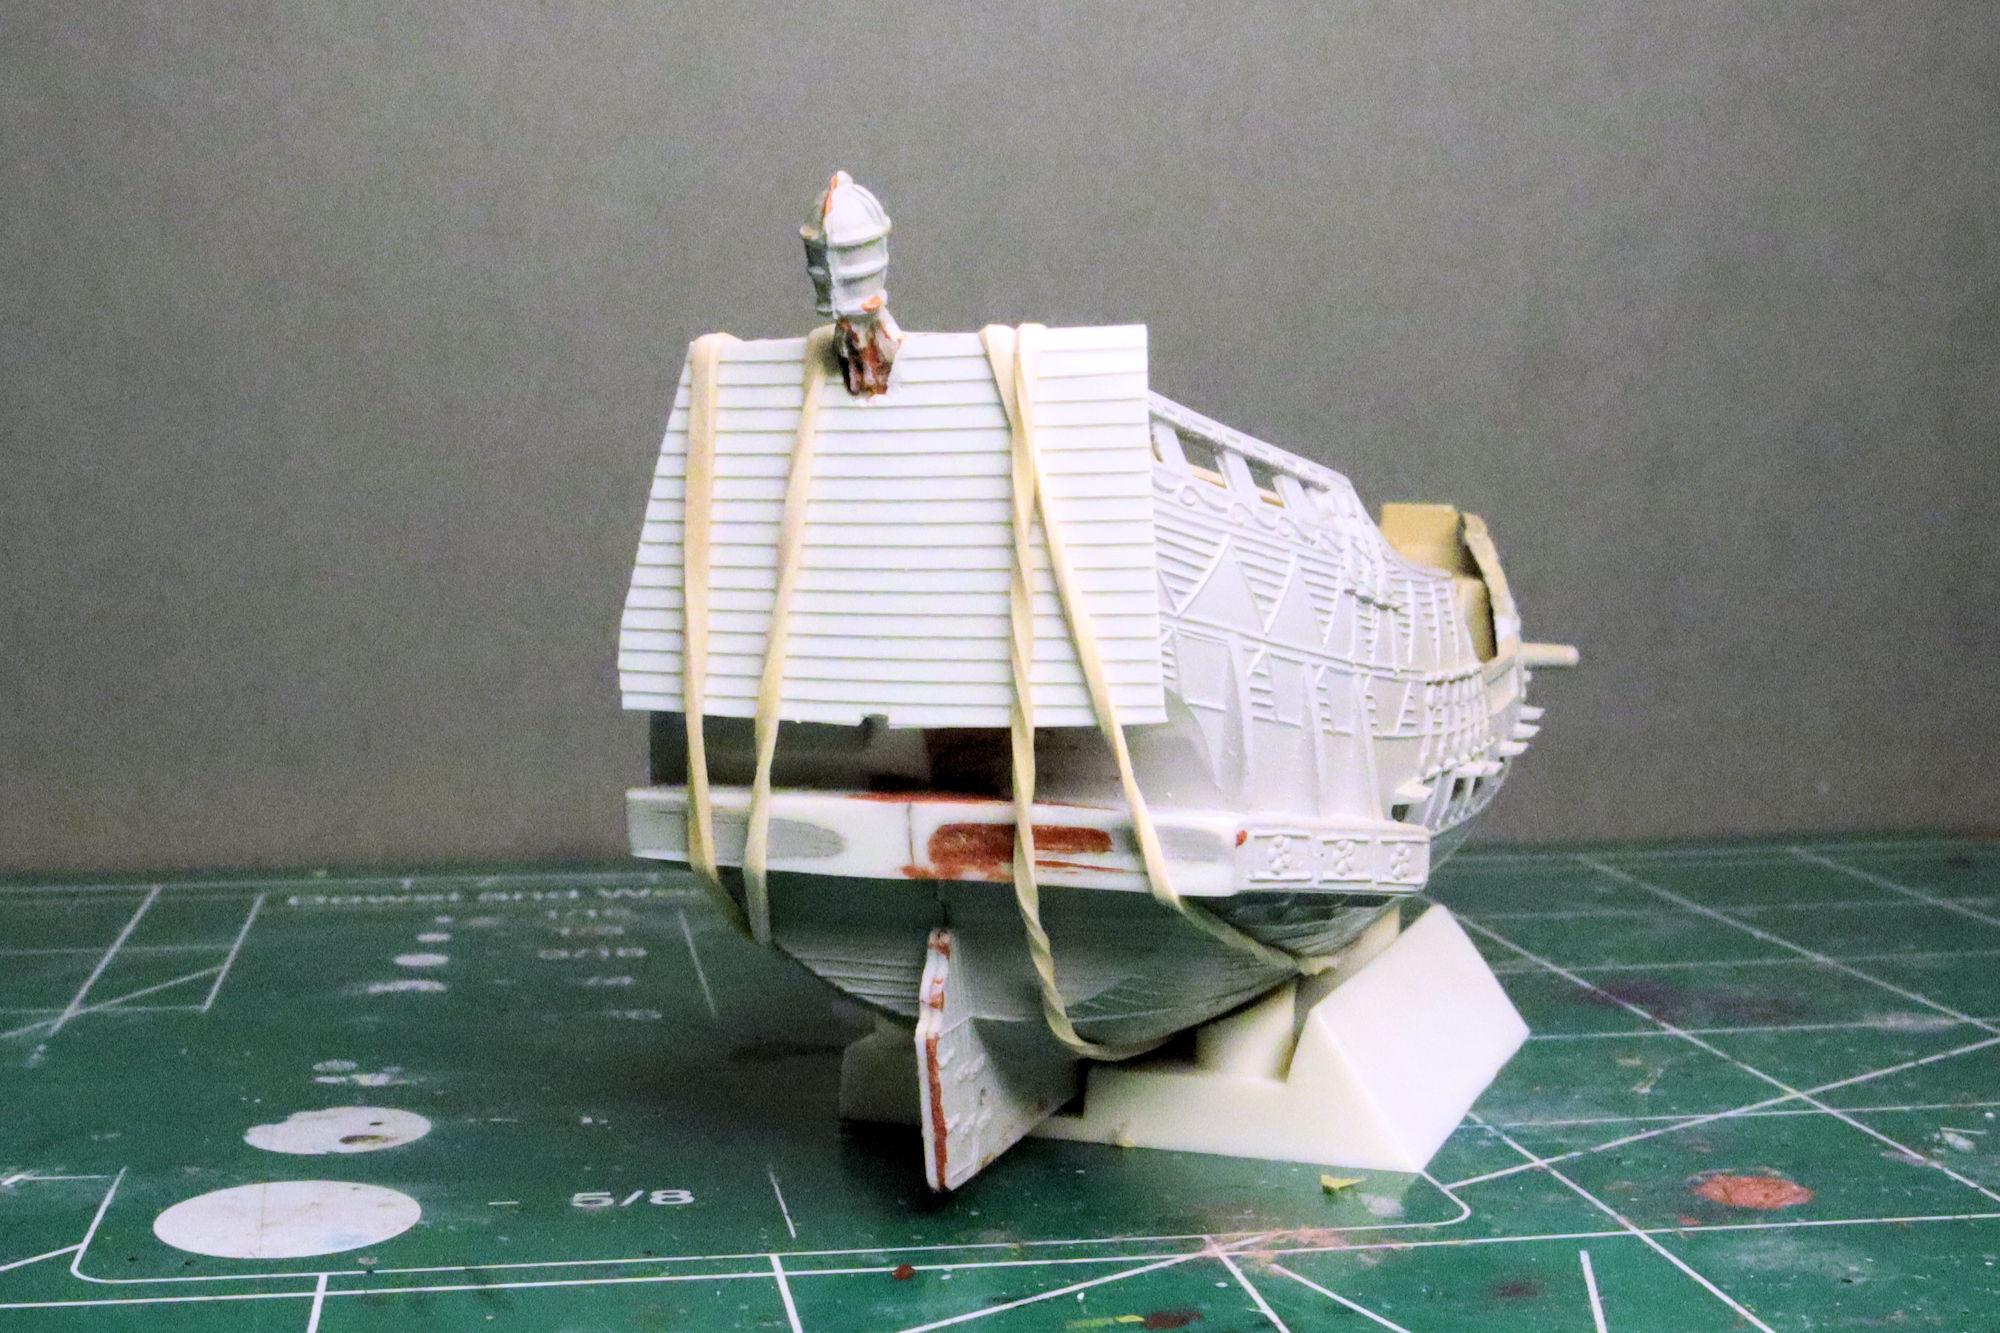
Hello Everybody! This ship hasn't sunk me yet and the sunk cost fallacy has yet to become reality, so on I go! I got some colors masked and sprayed, Tamiya TS-33 Dull Red and TS-69 Linoleum Deck Brown. The main deck color is Tamiya TS-46 Light Sand. Here's a quick mockup. It took me a while to work out the camera settings that would show the colors on the lower hull without completely blowing out the white upper portion. And oh yeah, I just realized last night that I'll have to make the ratlines for this... this... thing. The big clunky styrene ratline castings are a no-show. Ratlines made from actual lines rather than a webbing of phone-pole thick styrene will look better any how. As always, thanks for taking the time to look and please feel free to share your thoughts. Especially if you have any tips regarding making rigging for sailing ships. David G.

-
Much appreciated, thank you for your kind words David. In truth, I had considered setting this one aside on more than one occasion but I it's like I say; "Each kit I build is really only practice for the next one!" And it's so much easier to find the courage to practice on a kit for which I'm not overly concerned with the results. David G.
-
8 Car Transporter (71 Mopar’s)
David G. replied to Mopar - D's topic in WIP: Model Trucks: Big Rigs and Heavy Equipment
The trickiest thing I've found working with those lines is getting them to stay on the stubs. I used a tiny bit of PVA where needed but there's not really any adhesive that works well. Best of luck with yours. David G. -
I may not comment often but I do enjoy following along and watching your progress on this project. It's a shame about the downpipe. Isn't amazing how such things can seemingly just wink out of existence... only to show up again in the most unlikely place at the least useful moment? Oh, is that also the downpipe that you just eyeballed together on the first attempt? 🤔 Odd coincidence if so. David G.
-
I think it's a great color, no joke! Seriously though Jim, excellent body mods on this one and I do think the color is cool but it could do with some kind of accent somewhere. Though probably not bright green. David G.
-
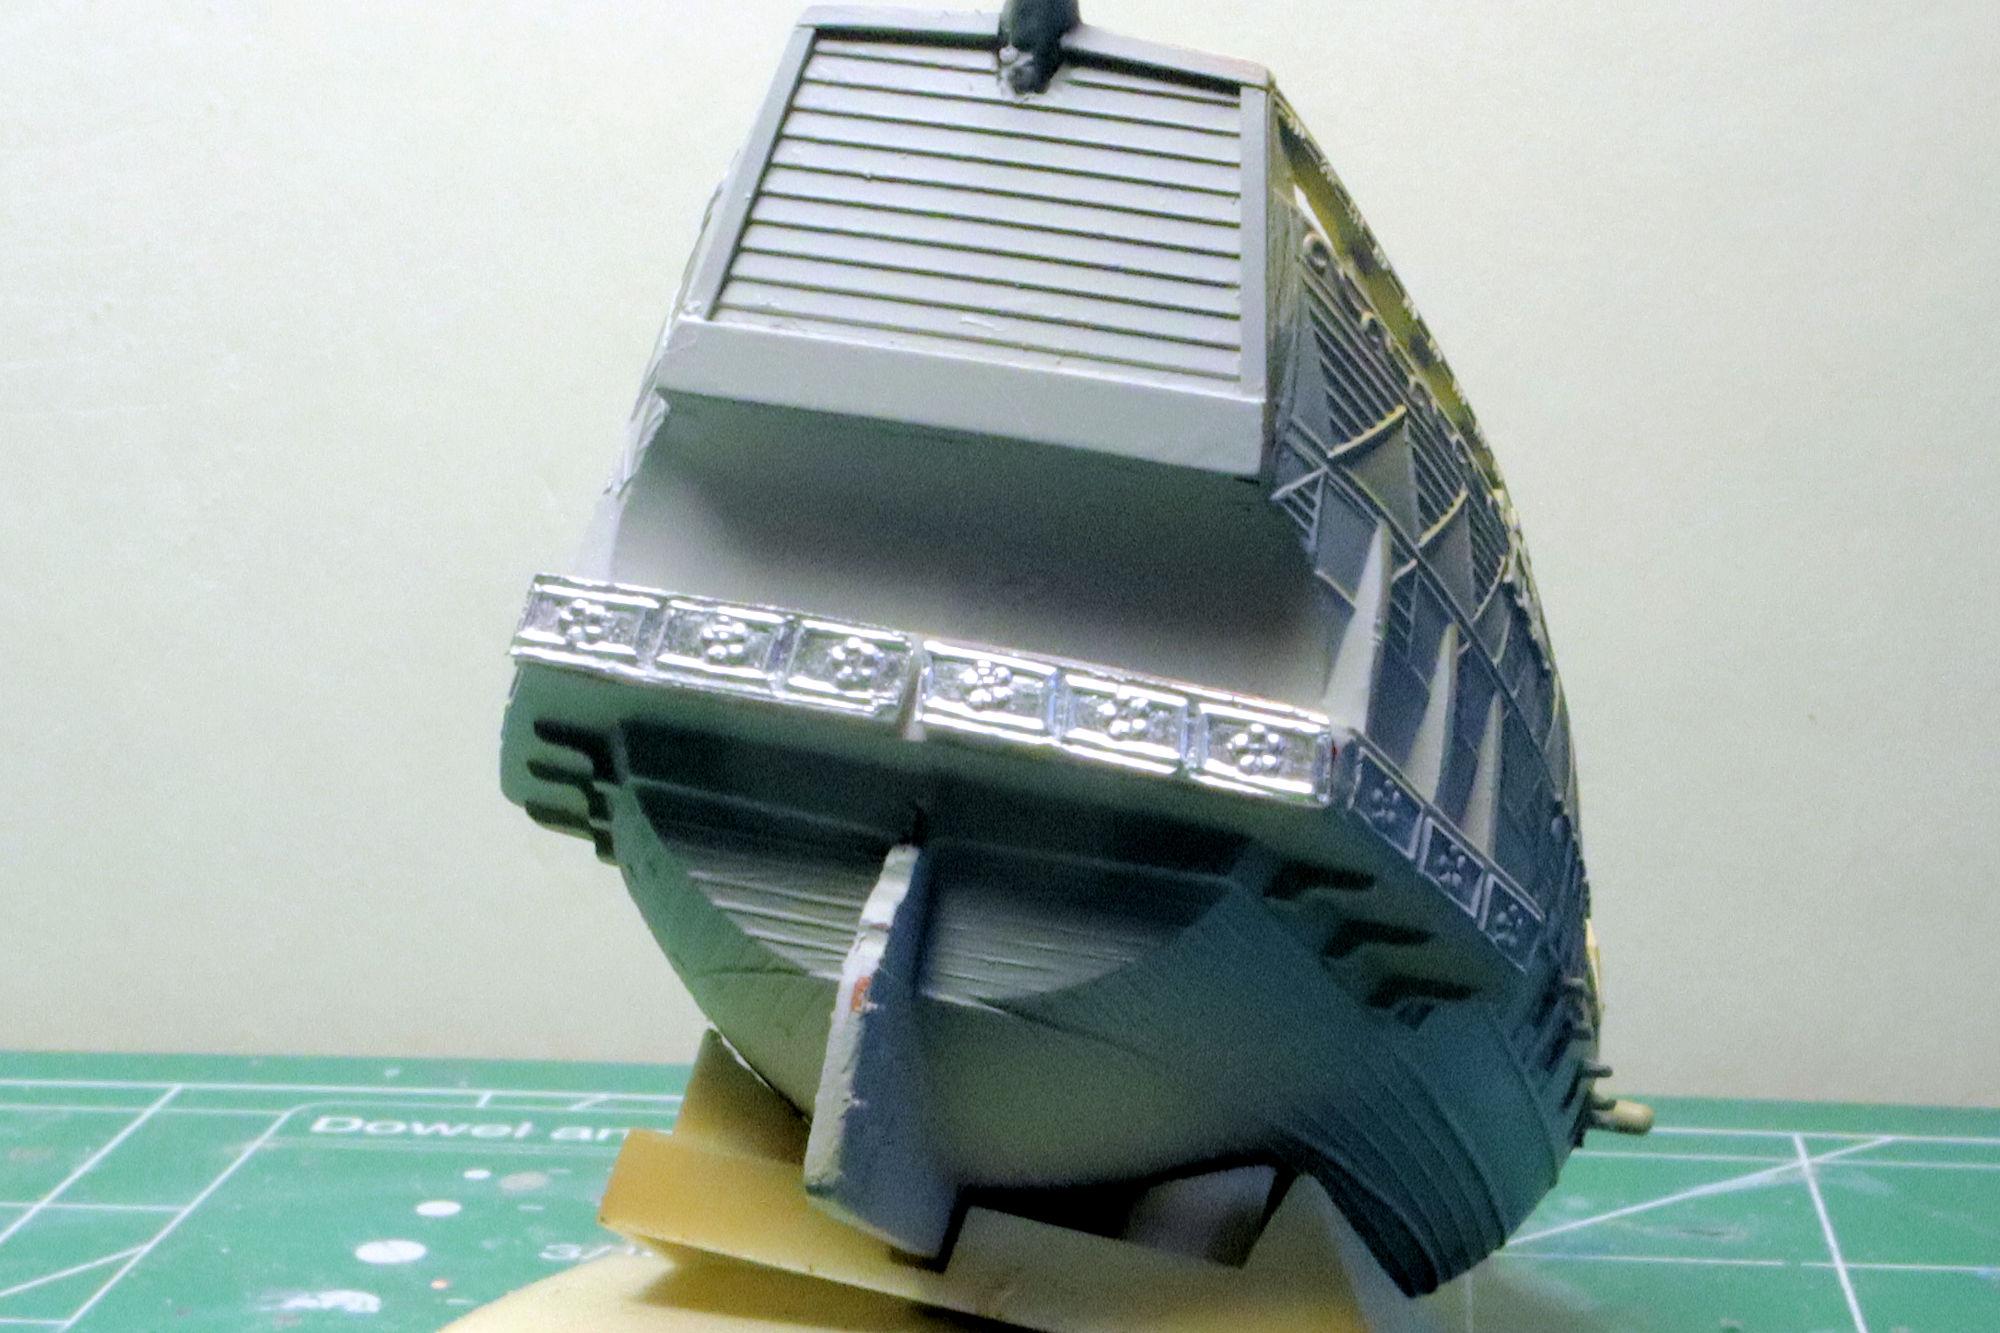
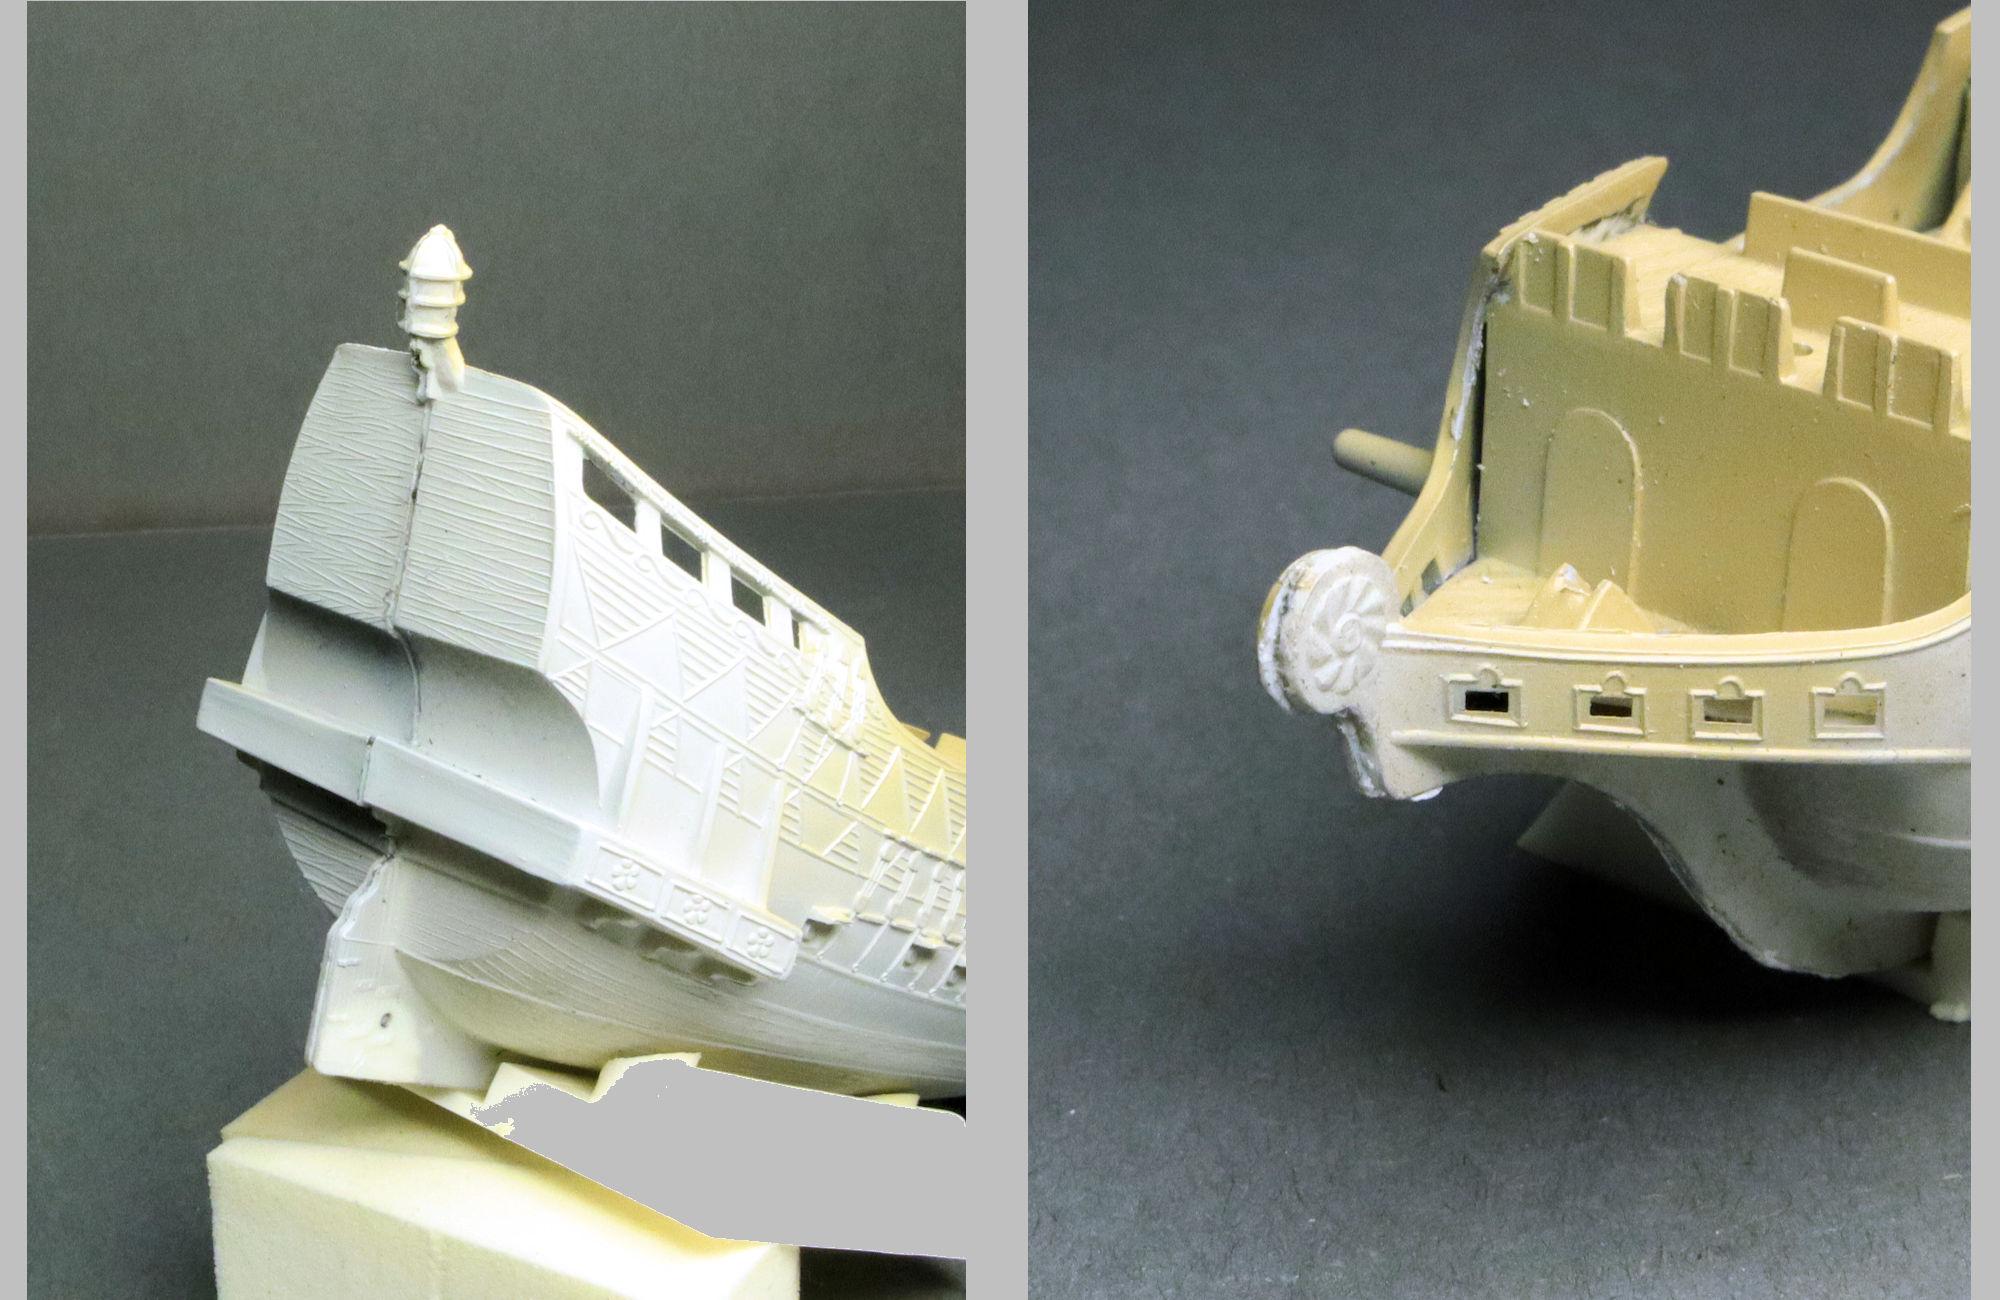
Hello Everybody! I'm pretty sure that I'm giving this kit more time than what it's worth. But I am trying to make it worth my time! To finish dressing up the stern of the ship I wanted to carry the framed rosette design around to the rear of the gallery(?) I started by creating a foil impression of each side. These two empty foil shells are then filled with medium viscosity CA followed by a sprinkling of baking soda. This mixture creates a workable plastic-like substance that gives the foil shells the strength to hold their shape. Here are the castings trimmed down, thinned out and mounted. I want to do a little putty filling to smooth it out a bit but overall, I'm pleased with the way this is going. After a little putty work, this is where it's at. I think I can live with it. It's not the greatest but it's better than what I started with and not a bad first attempt at foil casting. As always, thanks for taking the time to look and please feel free to post any comments you may wish to share. David G.
-
That looks great! I did mine in a very similar color. Getting that rear clip to match up to the quarter panels was a bit tricky. David G.
-
Thank you most kindly Alan. =D-
-
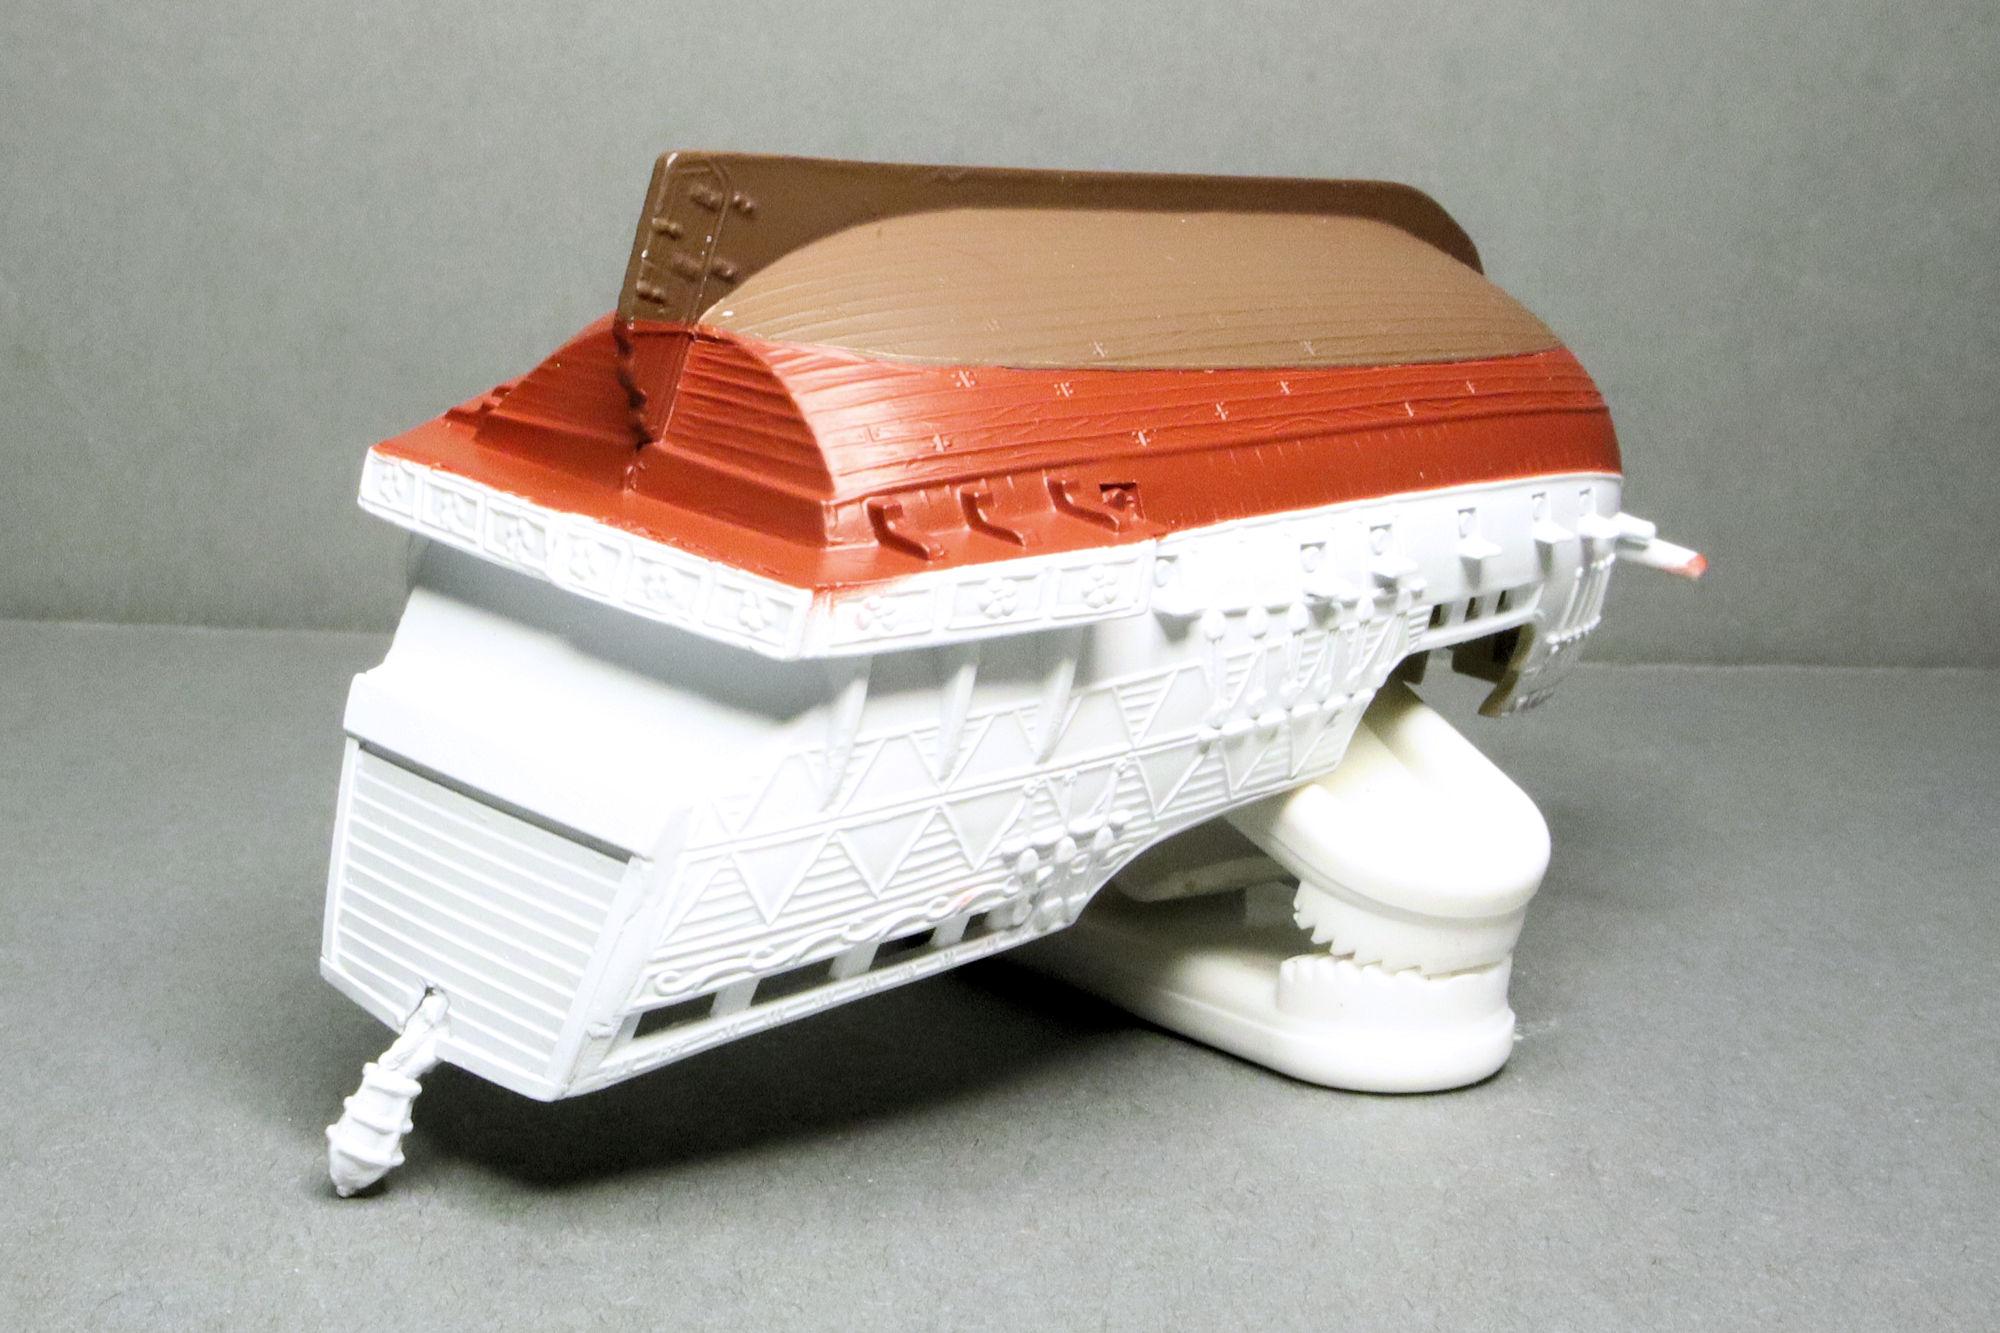
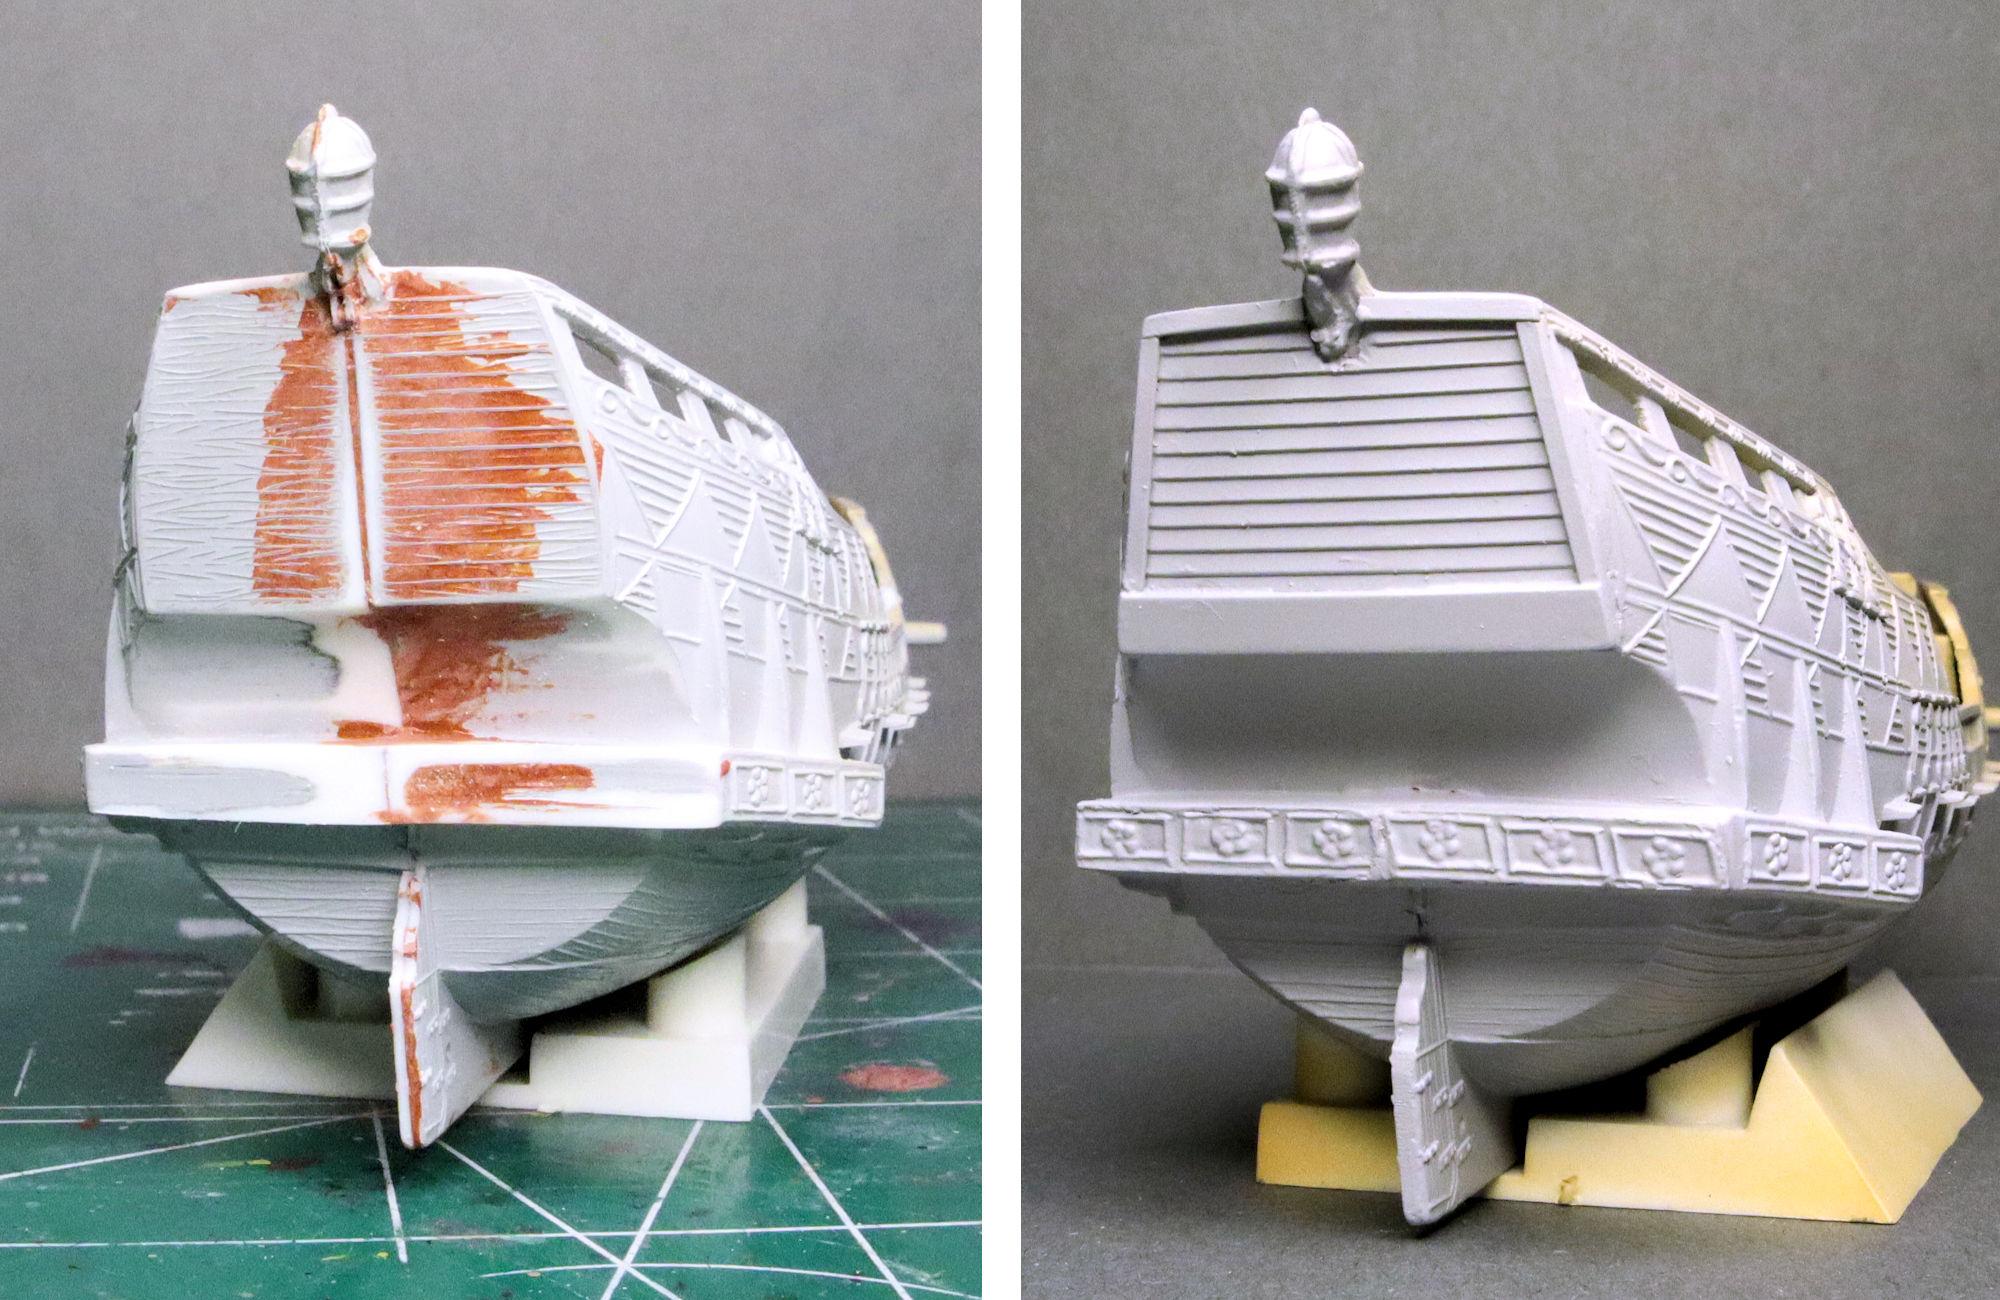
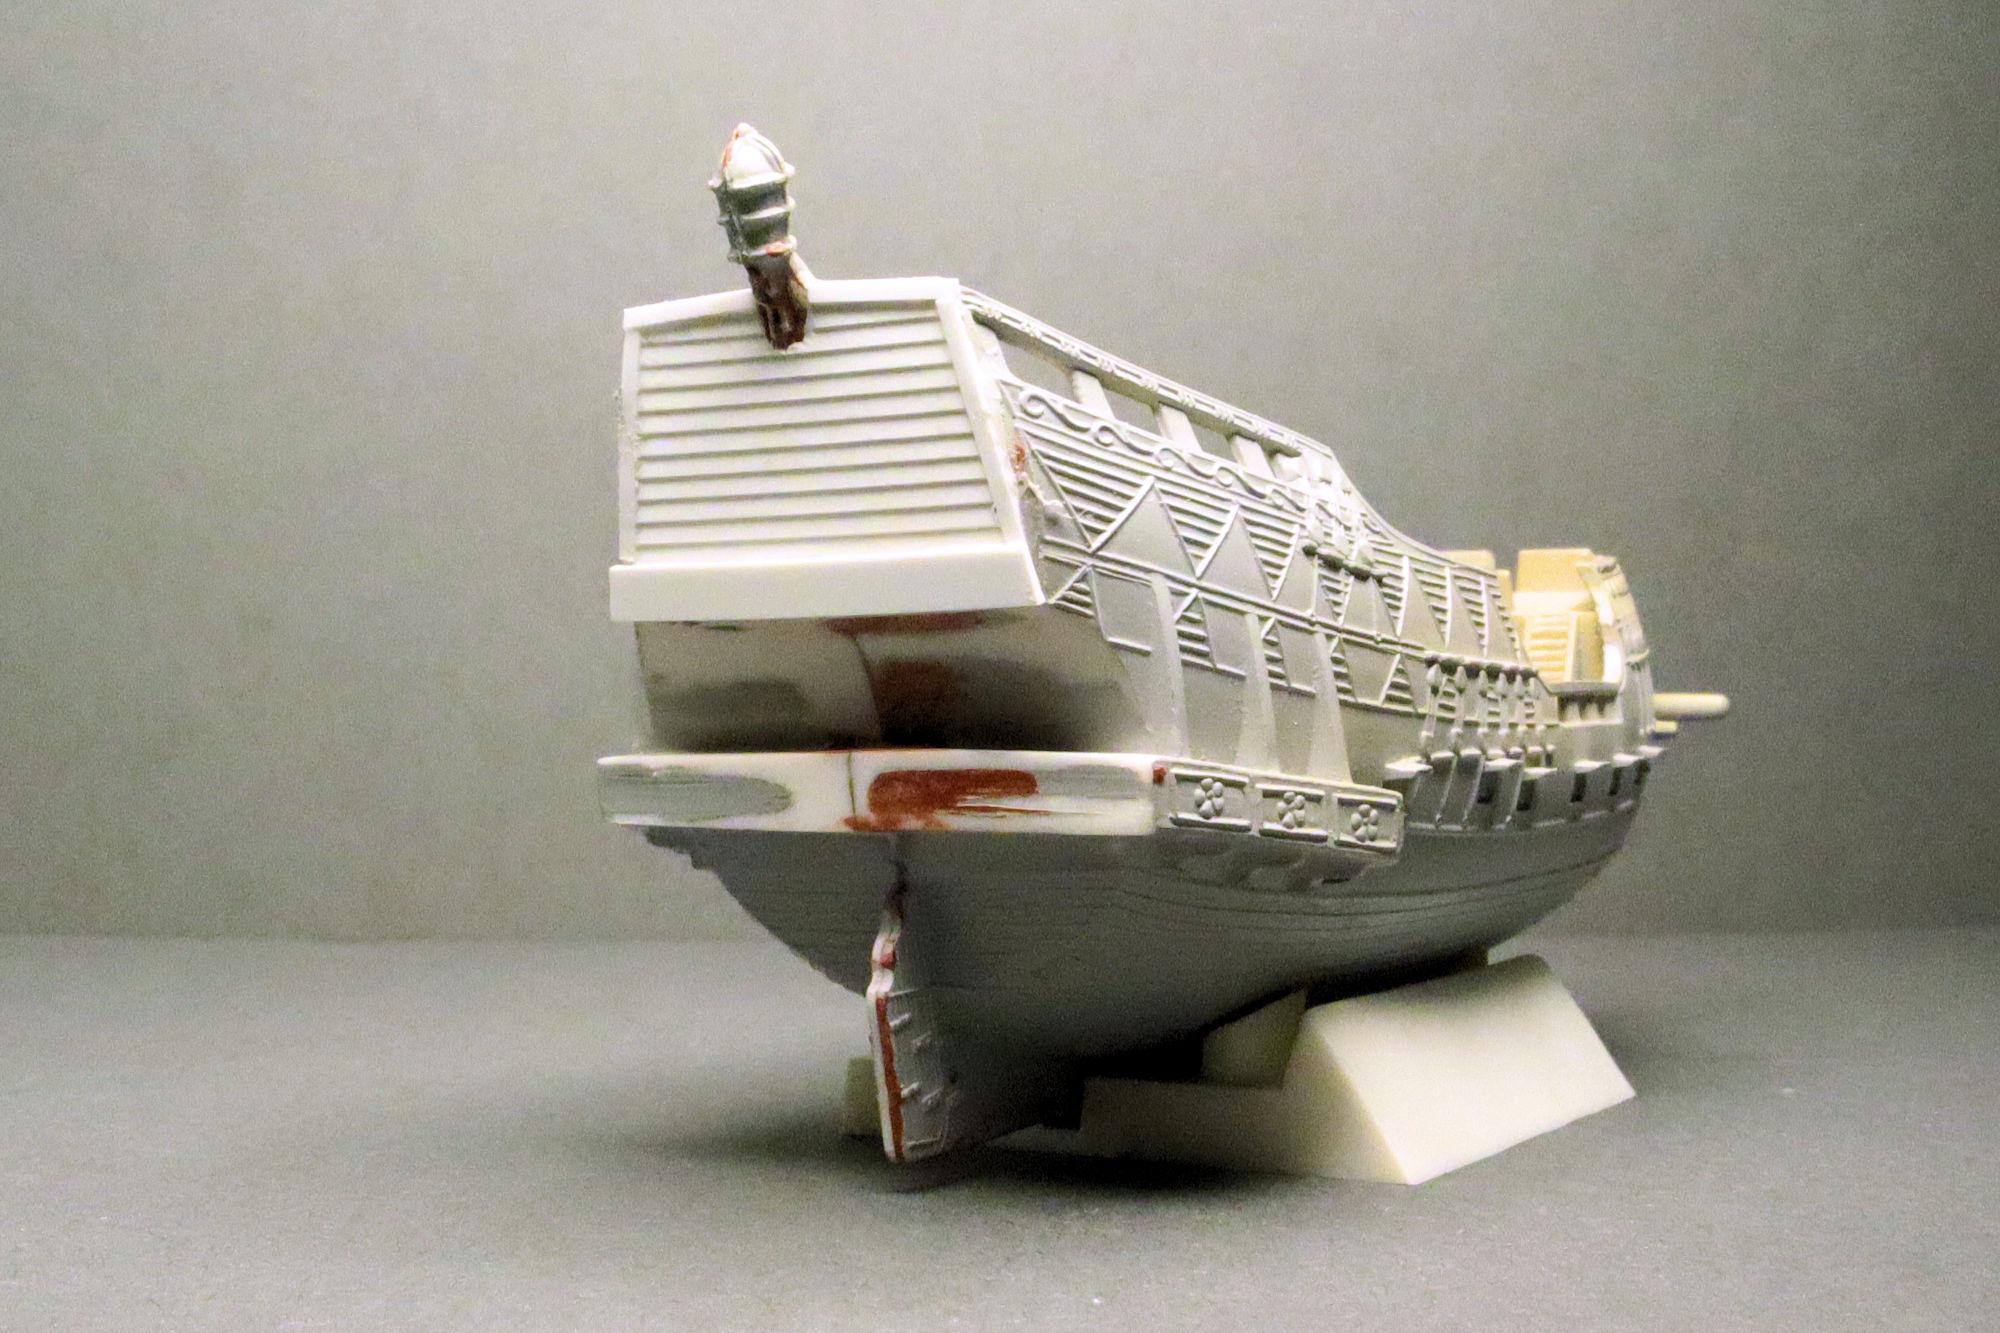
Hello Everybody! Work on the Golden Hind progresses and here's proof. On the stern, the two halves of the hull not only fail to meet evenly, they have completely different textures! One half looks like it's probably supposed to be shiplap and the other is some strange kind of wood grain. Luckily, I remembered that I had some HO scale clapboard siding sheet styrene left over from my model railroading days. Though not exactly correct, it should look better than that mess that Lindberg provided. I've cut a piece and thinned it down to better fit the stern and blend in with the rest of the ship. After trimming the panel to size I added some more styrene pieces to dress things up a little. I may still do a little more, I'll have to see how I feel about the overall appearance in a couple of days. Hopefully this is the last of the cosmetic surgery I'll have to perform. Now if I could just do something about that... rear bumper(?). As always, thanks for taking the time to look and please feel free to share your comments, thoughts and suggestions. David G.
-
The roof came out quite nicely David. Goo worn on the down pipe too. Isn't a good feeling when something works out right on the try? David G.
-
Good choice on the mesh and steering column Bob. This is all shaping up quite nicely. David G.
-
Thank you for your vote of confidence Joe. I sure do seem to pick 'em don't I? =D-
-
Thank you Elliot. Thanks Carl, it's good having you along for the ride. David G.
-
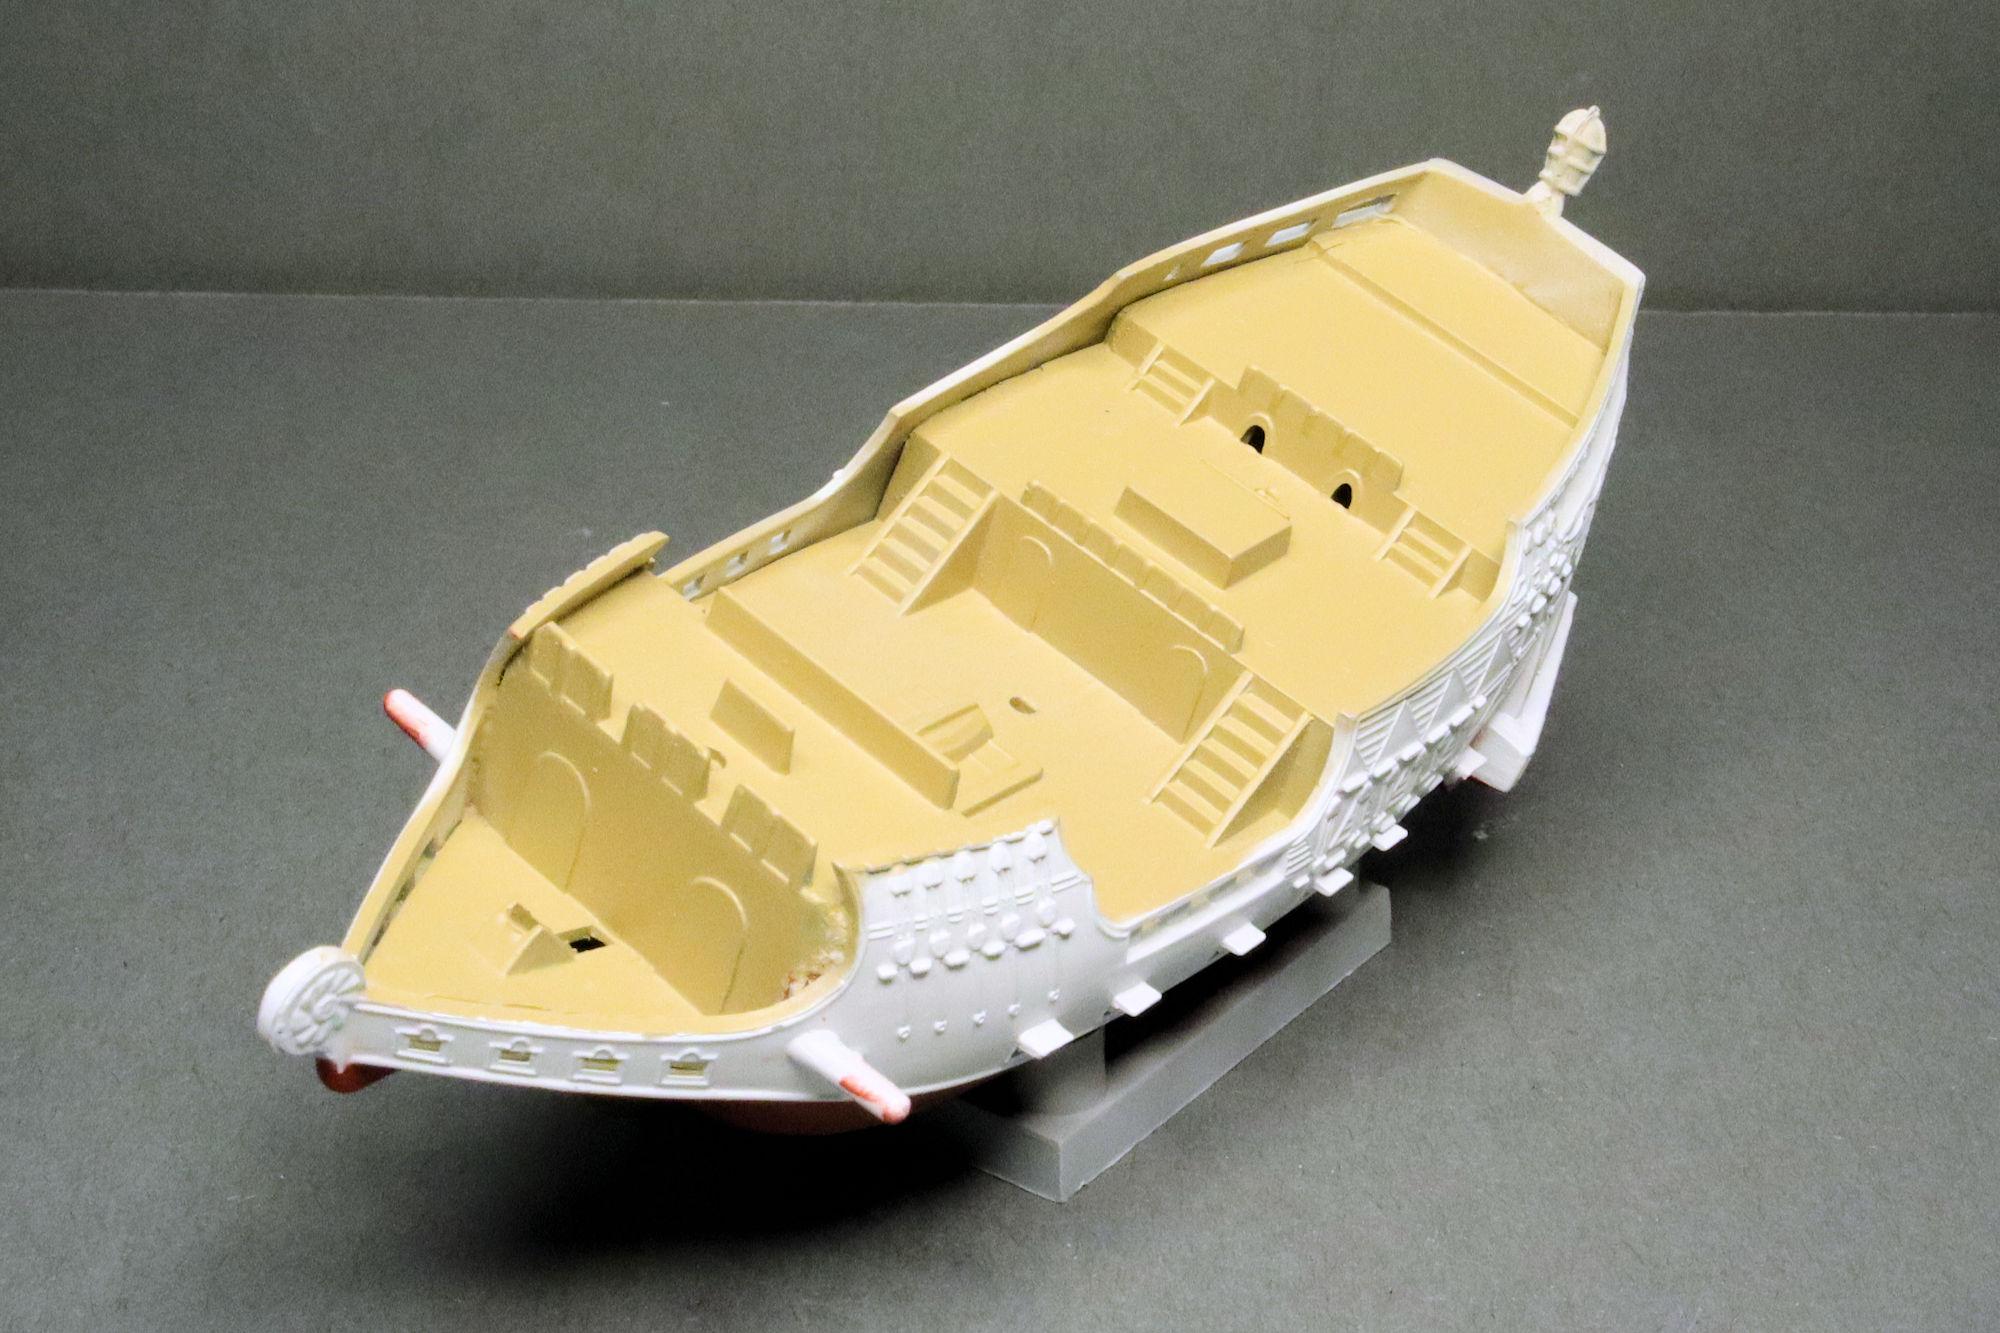
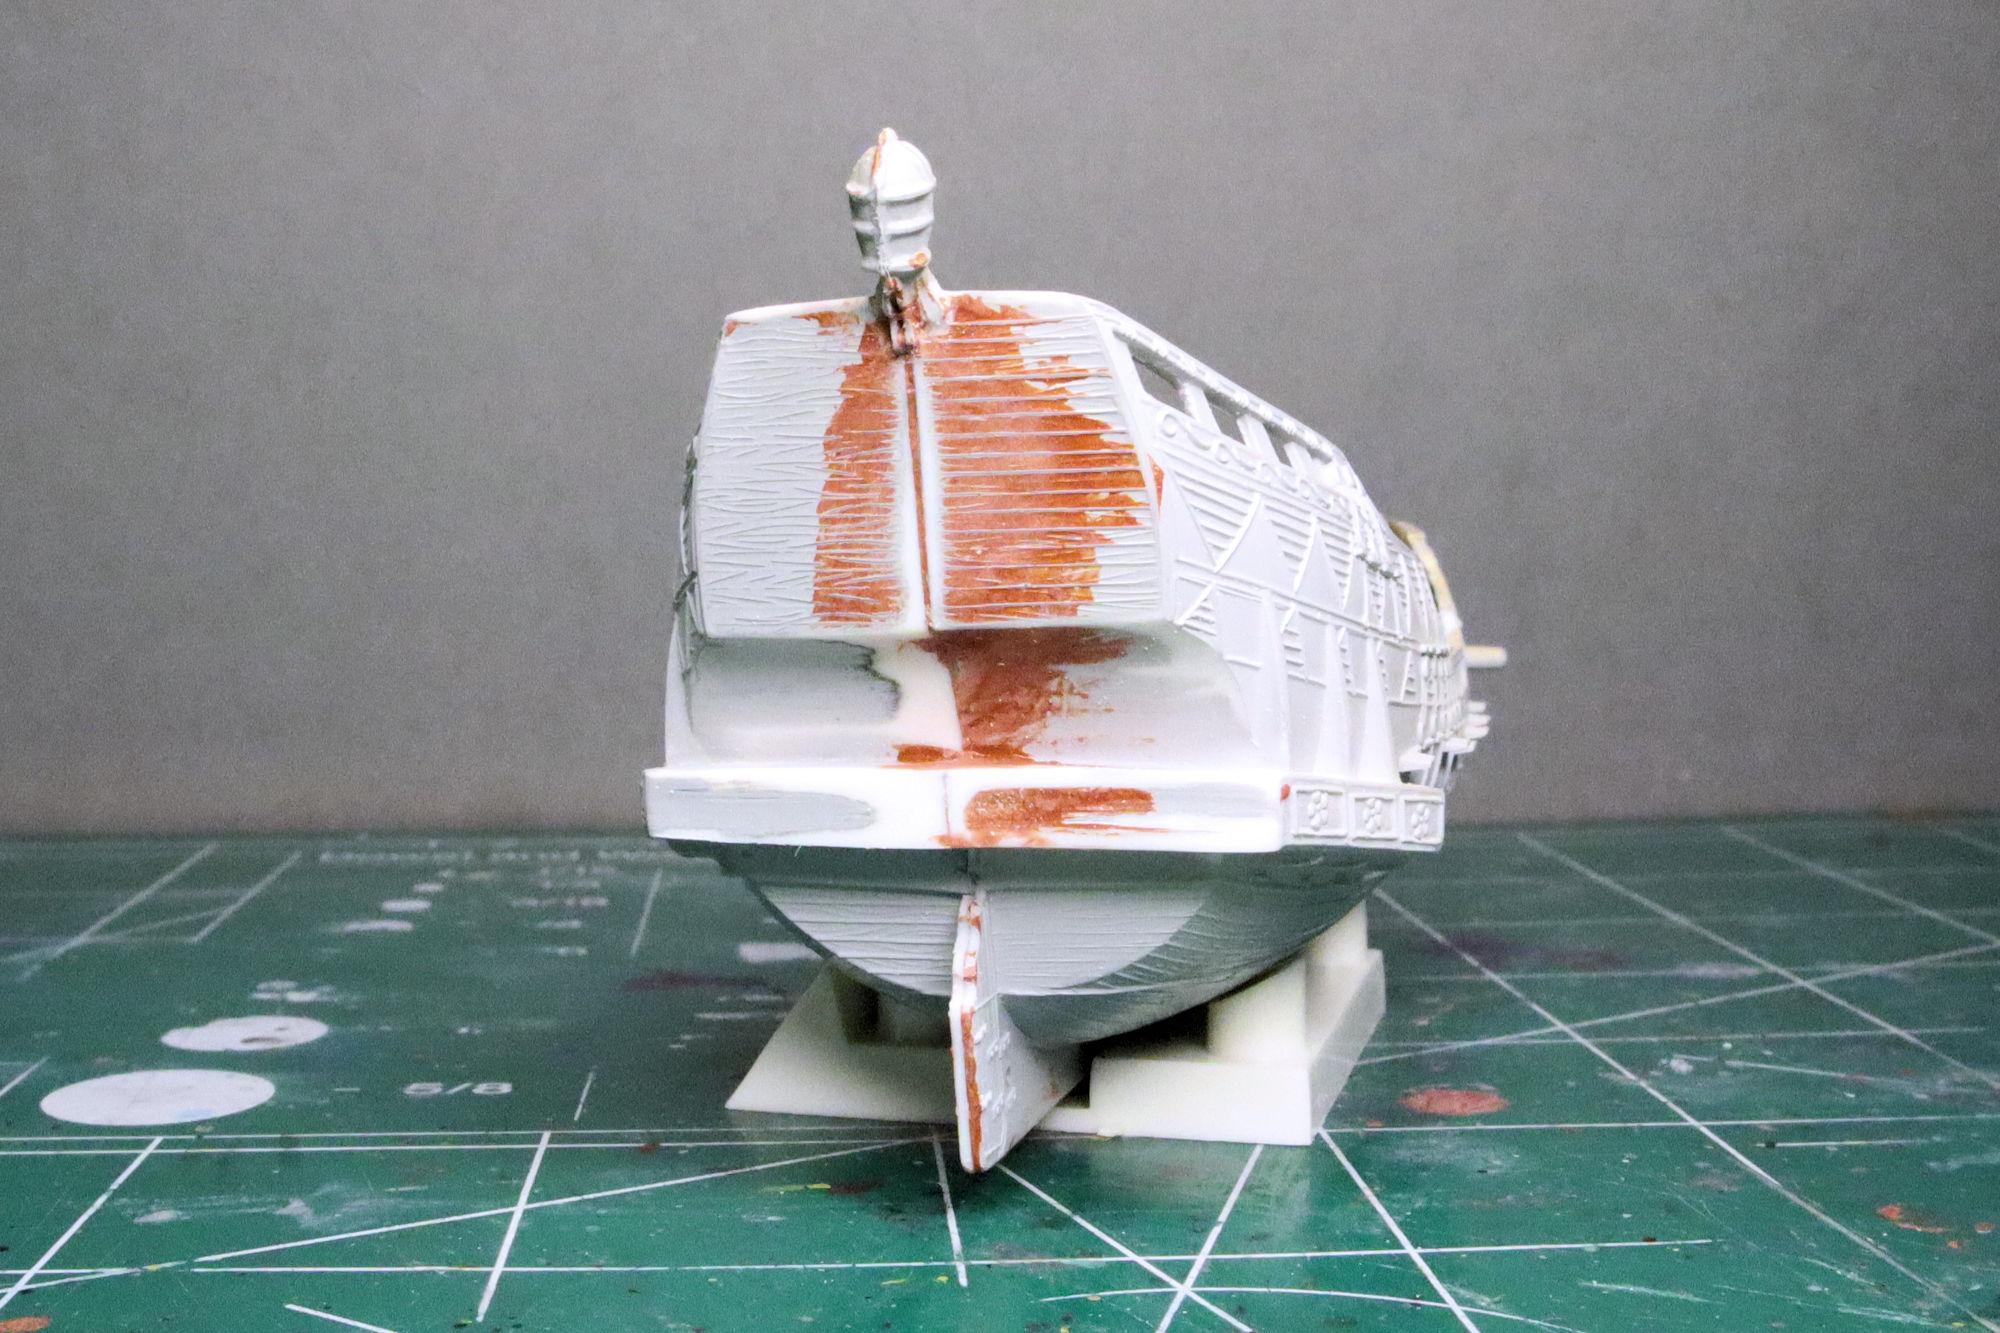
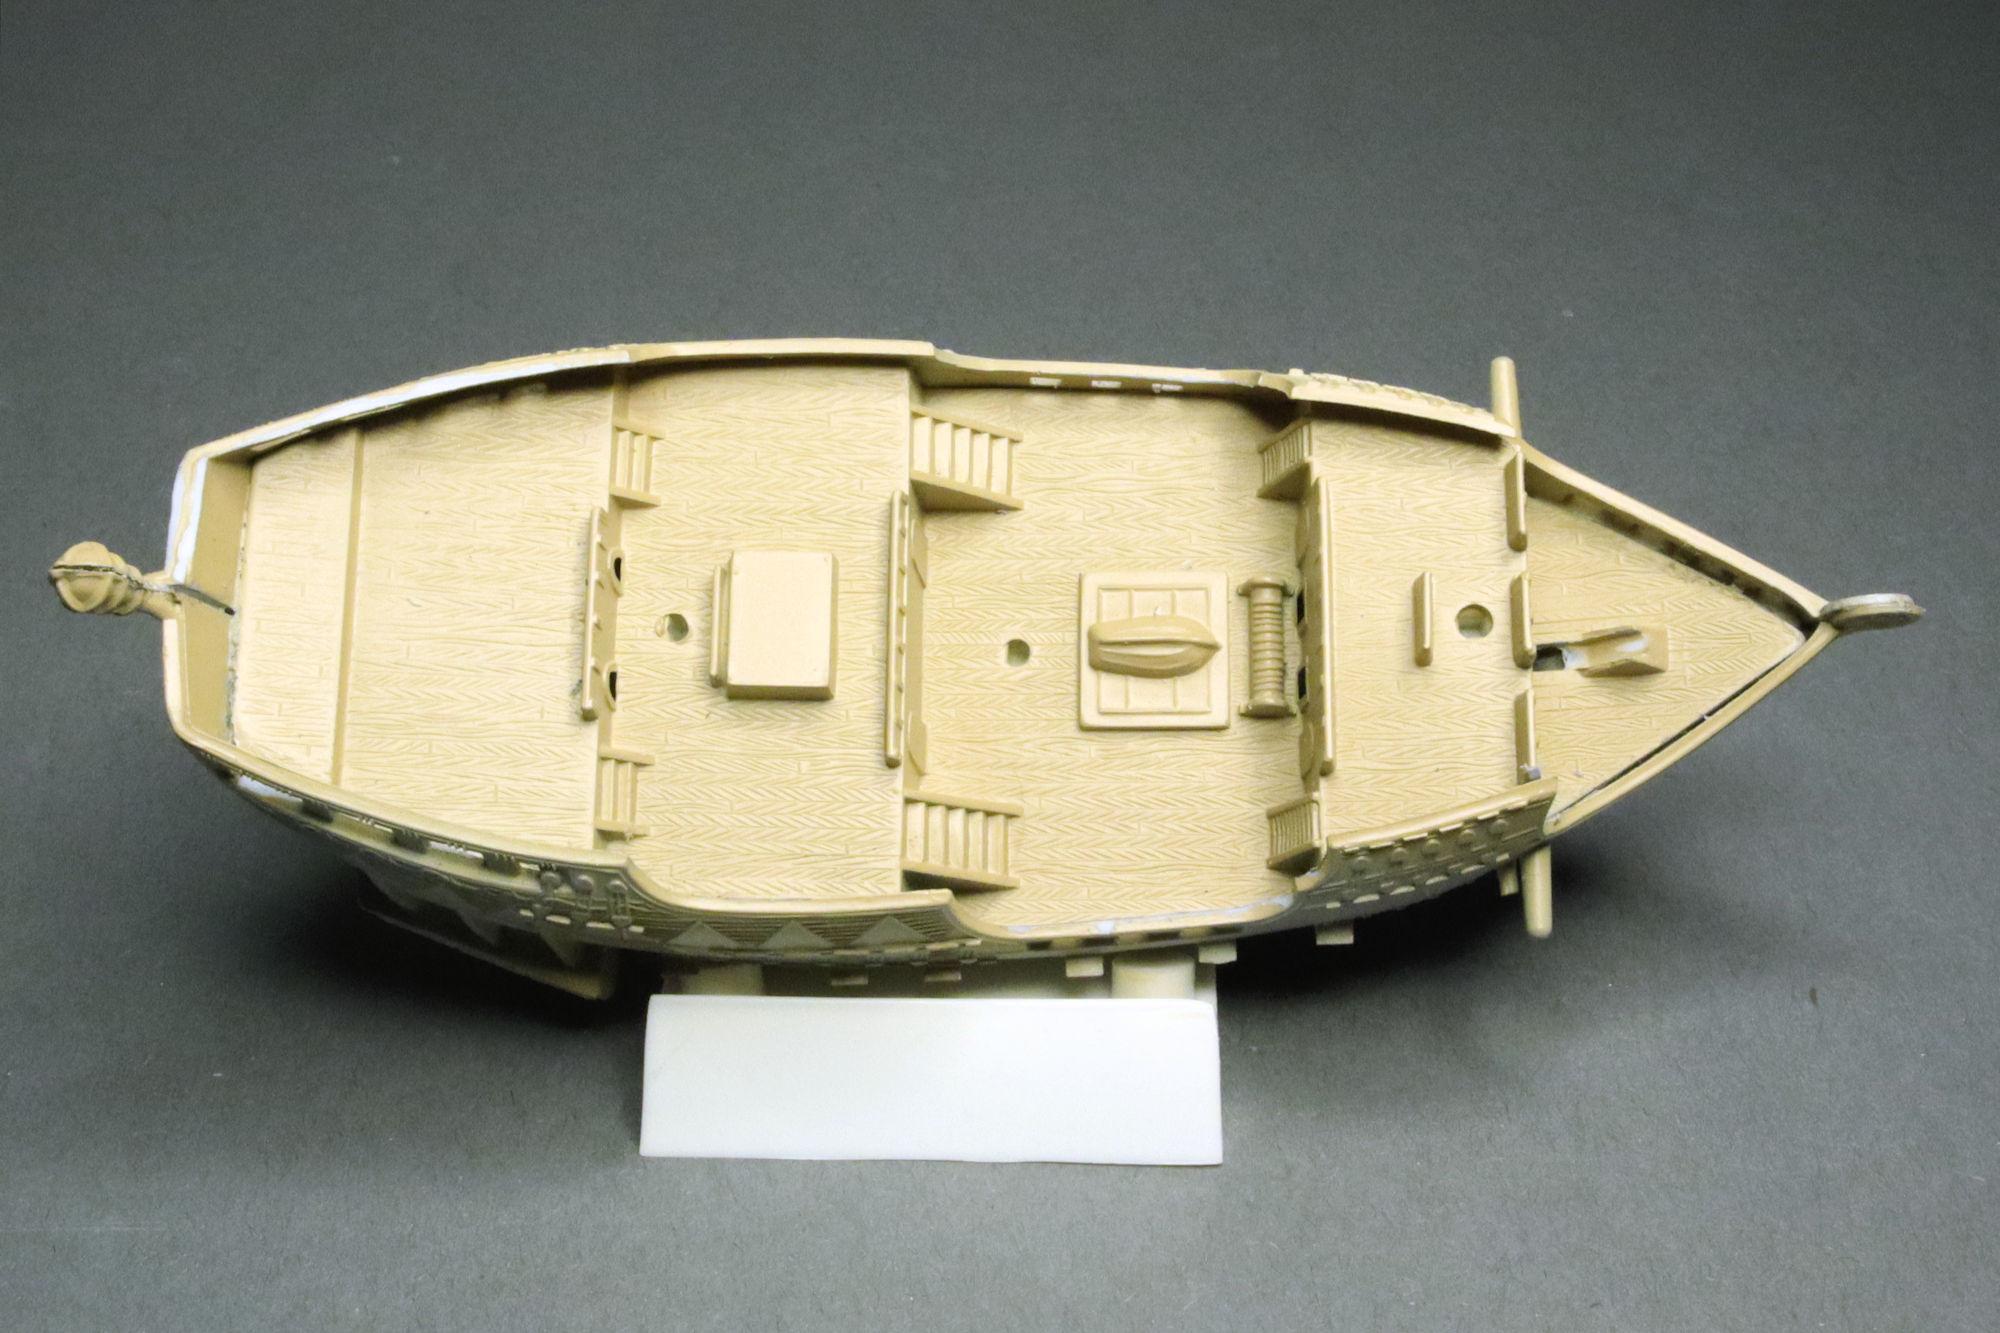
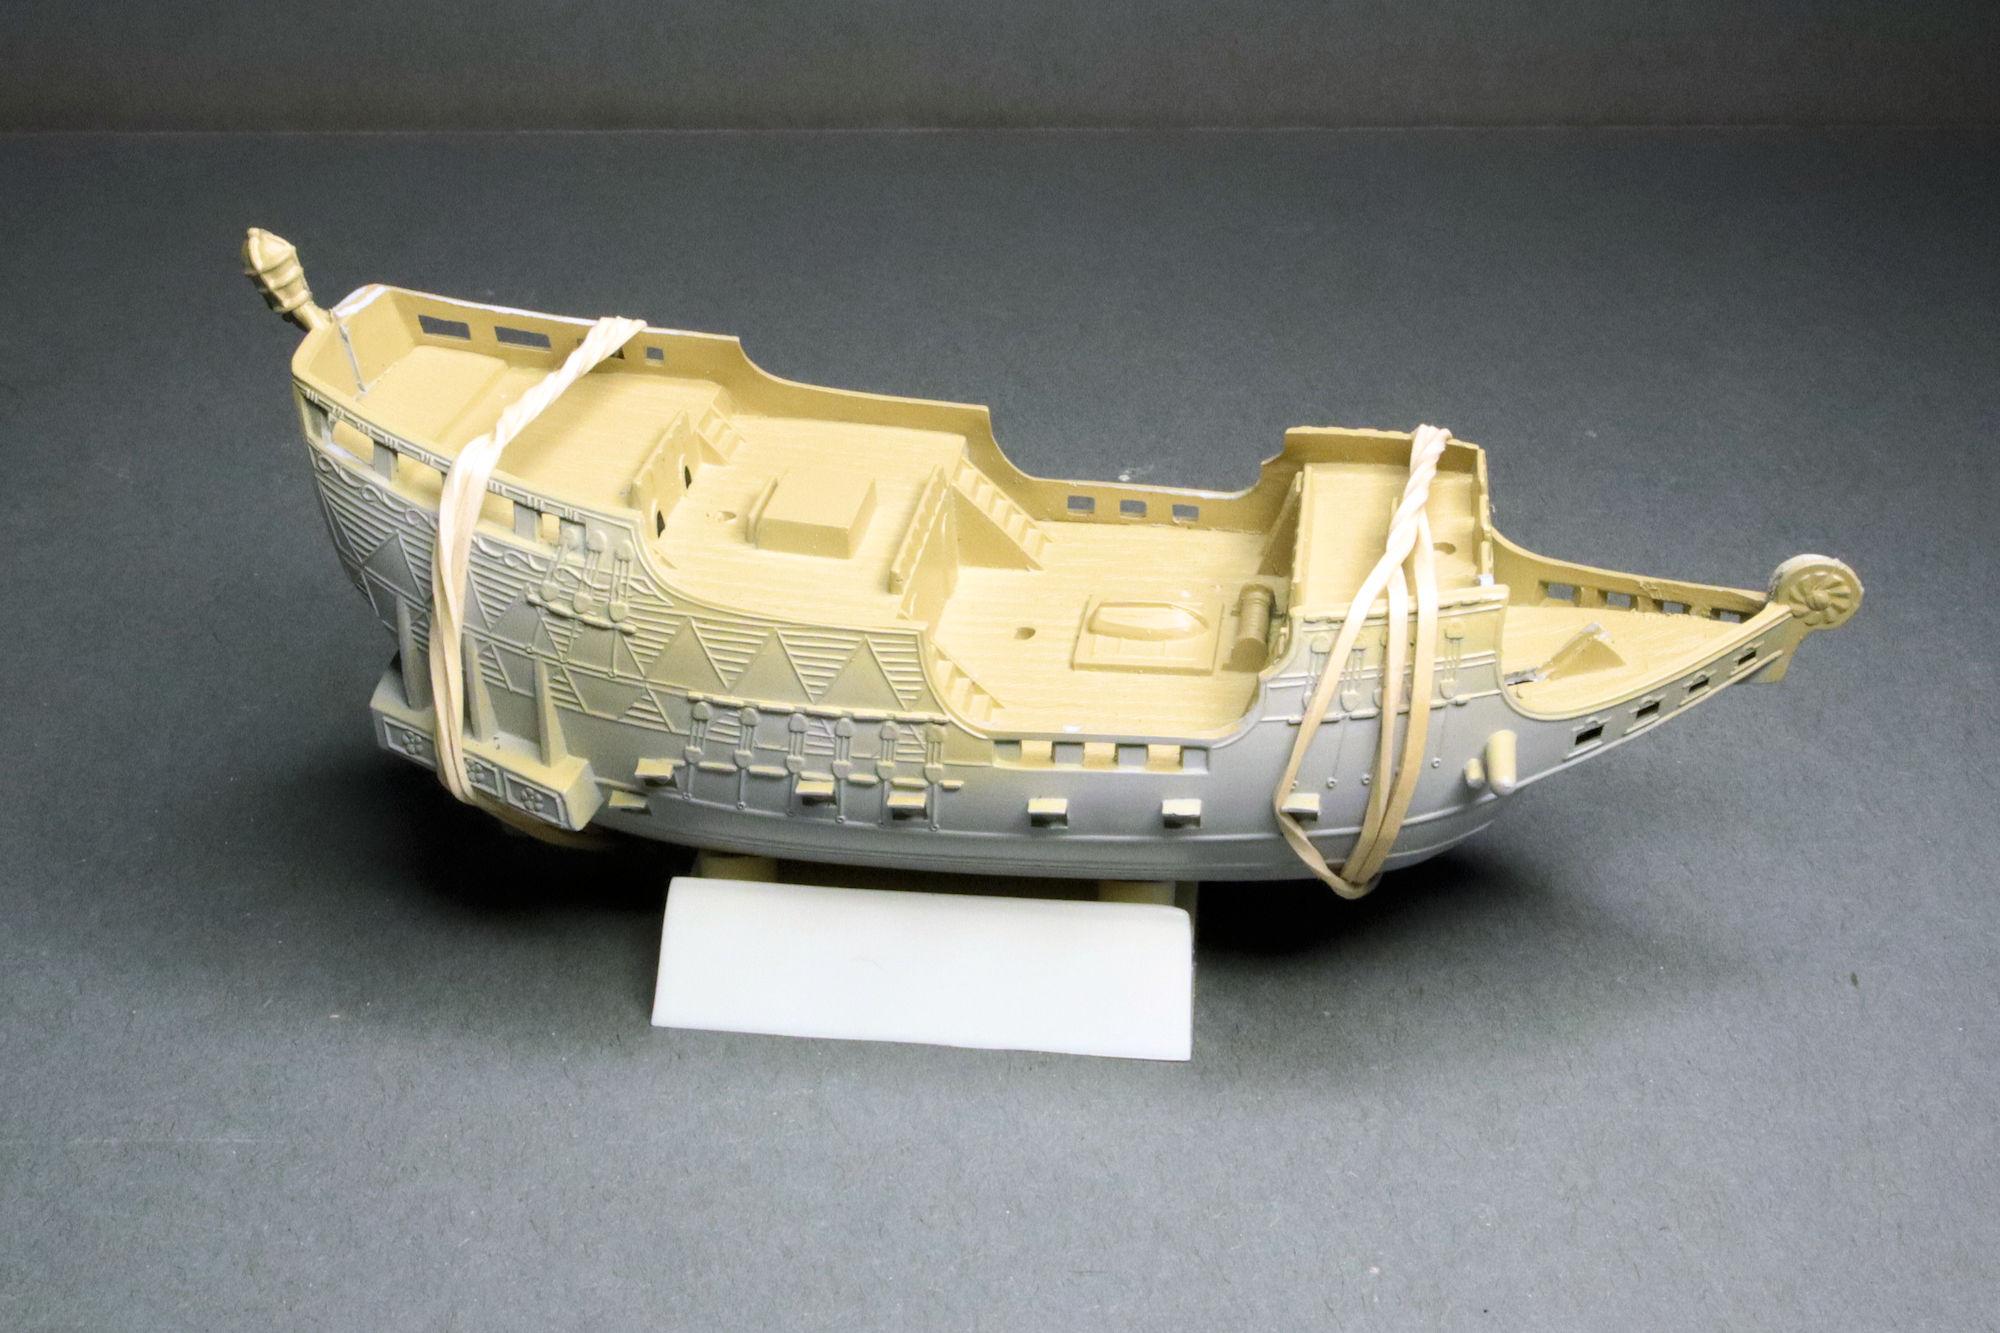
Hello Everybody! Work on the "Golden Hind" sailing ship progresses. Almost all of the most recent build session was spent getting the hull sections and deck as aligned as possible and glued together. Once the rubber bands came off, the bond was solid but there are issues I'll have to address. Aside from the obvious alignment problems, the textures on the two halves of the stern aren't even close to being similar! 😮 But at least most of the huge gaps between the deck and hull have been corrected... mostly. Maybe this kit wasn't the best choice for a first go at a sailing ship. Anyway, thanks for taking the time to look and please feel free to comment. David G.
-
Those look great Bob. It seems that having a 3D printer is the way to go these days. Maybe I'll look into getting one. David G.
-
Thank you sidcharles. It's nice to see that someone is paying attention, not everybody makes it to the signature line. Thank you Michael. I've always believed in sharing good ideas, sometimes even when people don't necessarily want me to Thanks Bob. So far it does seem to be one of Revell's better kits. I'll have to have a look for your WIP on it... maybe I can steal some ideas. Thank you David. It does seem like it'll be a fun build. Thank you kindly Greg. Thanks again to everybody who took the time to comment. David G.
-
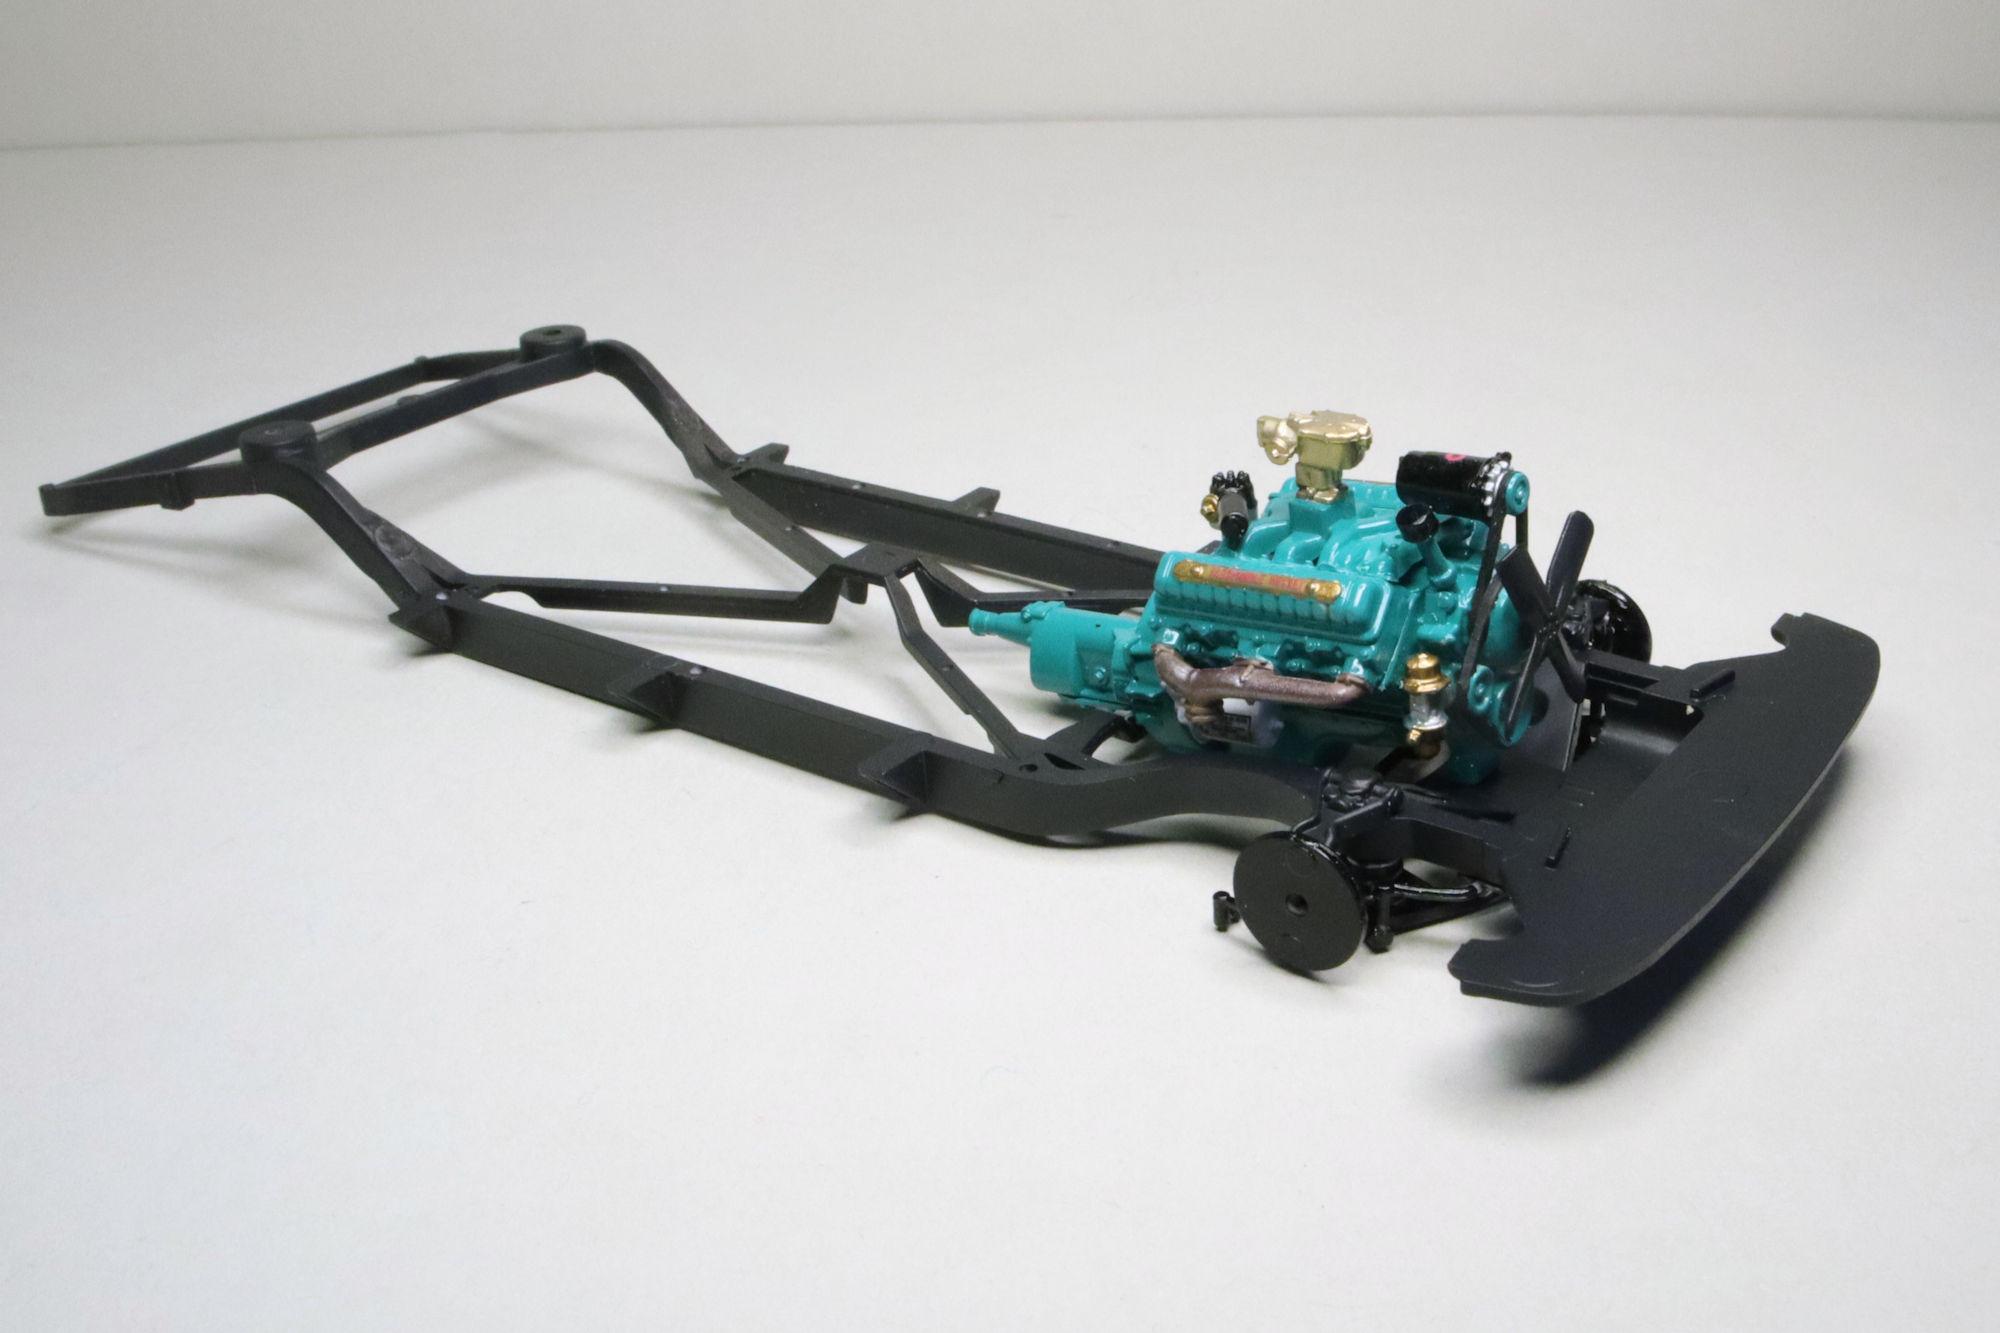
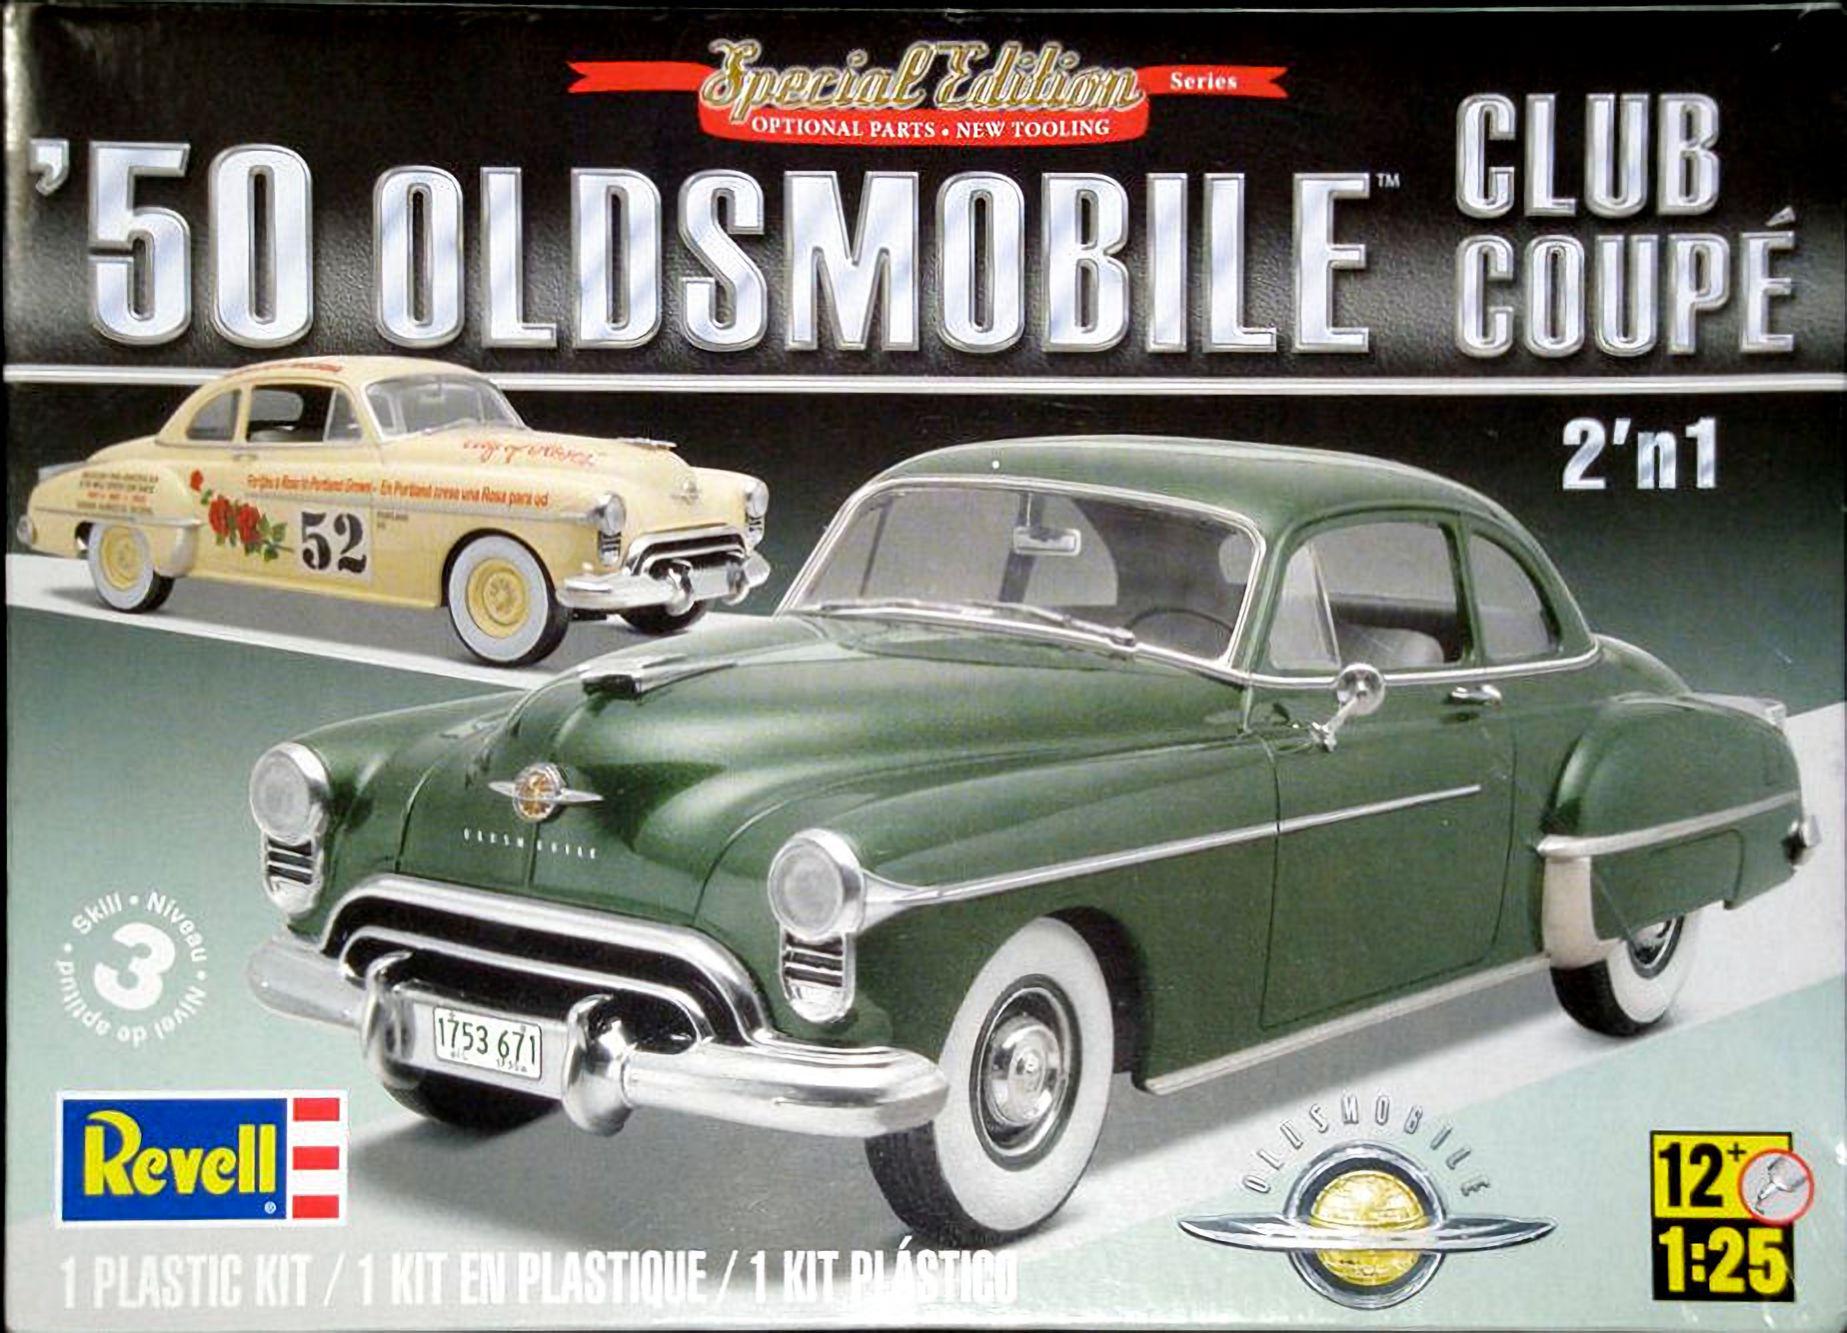
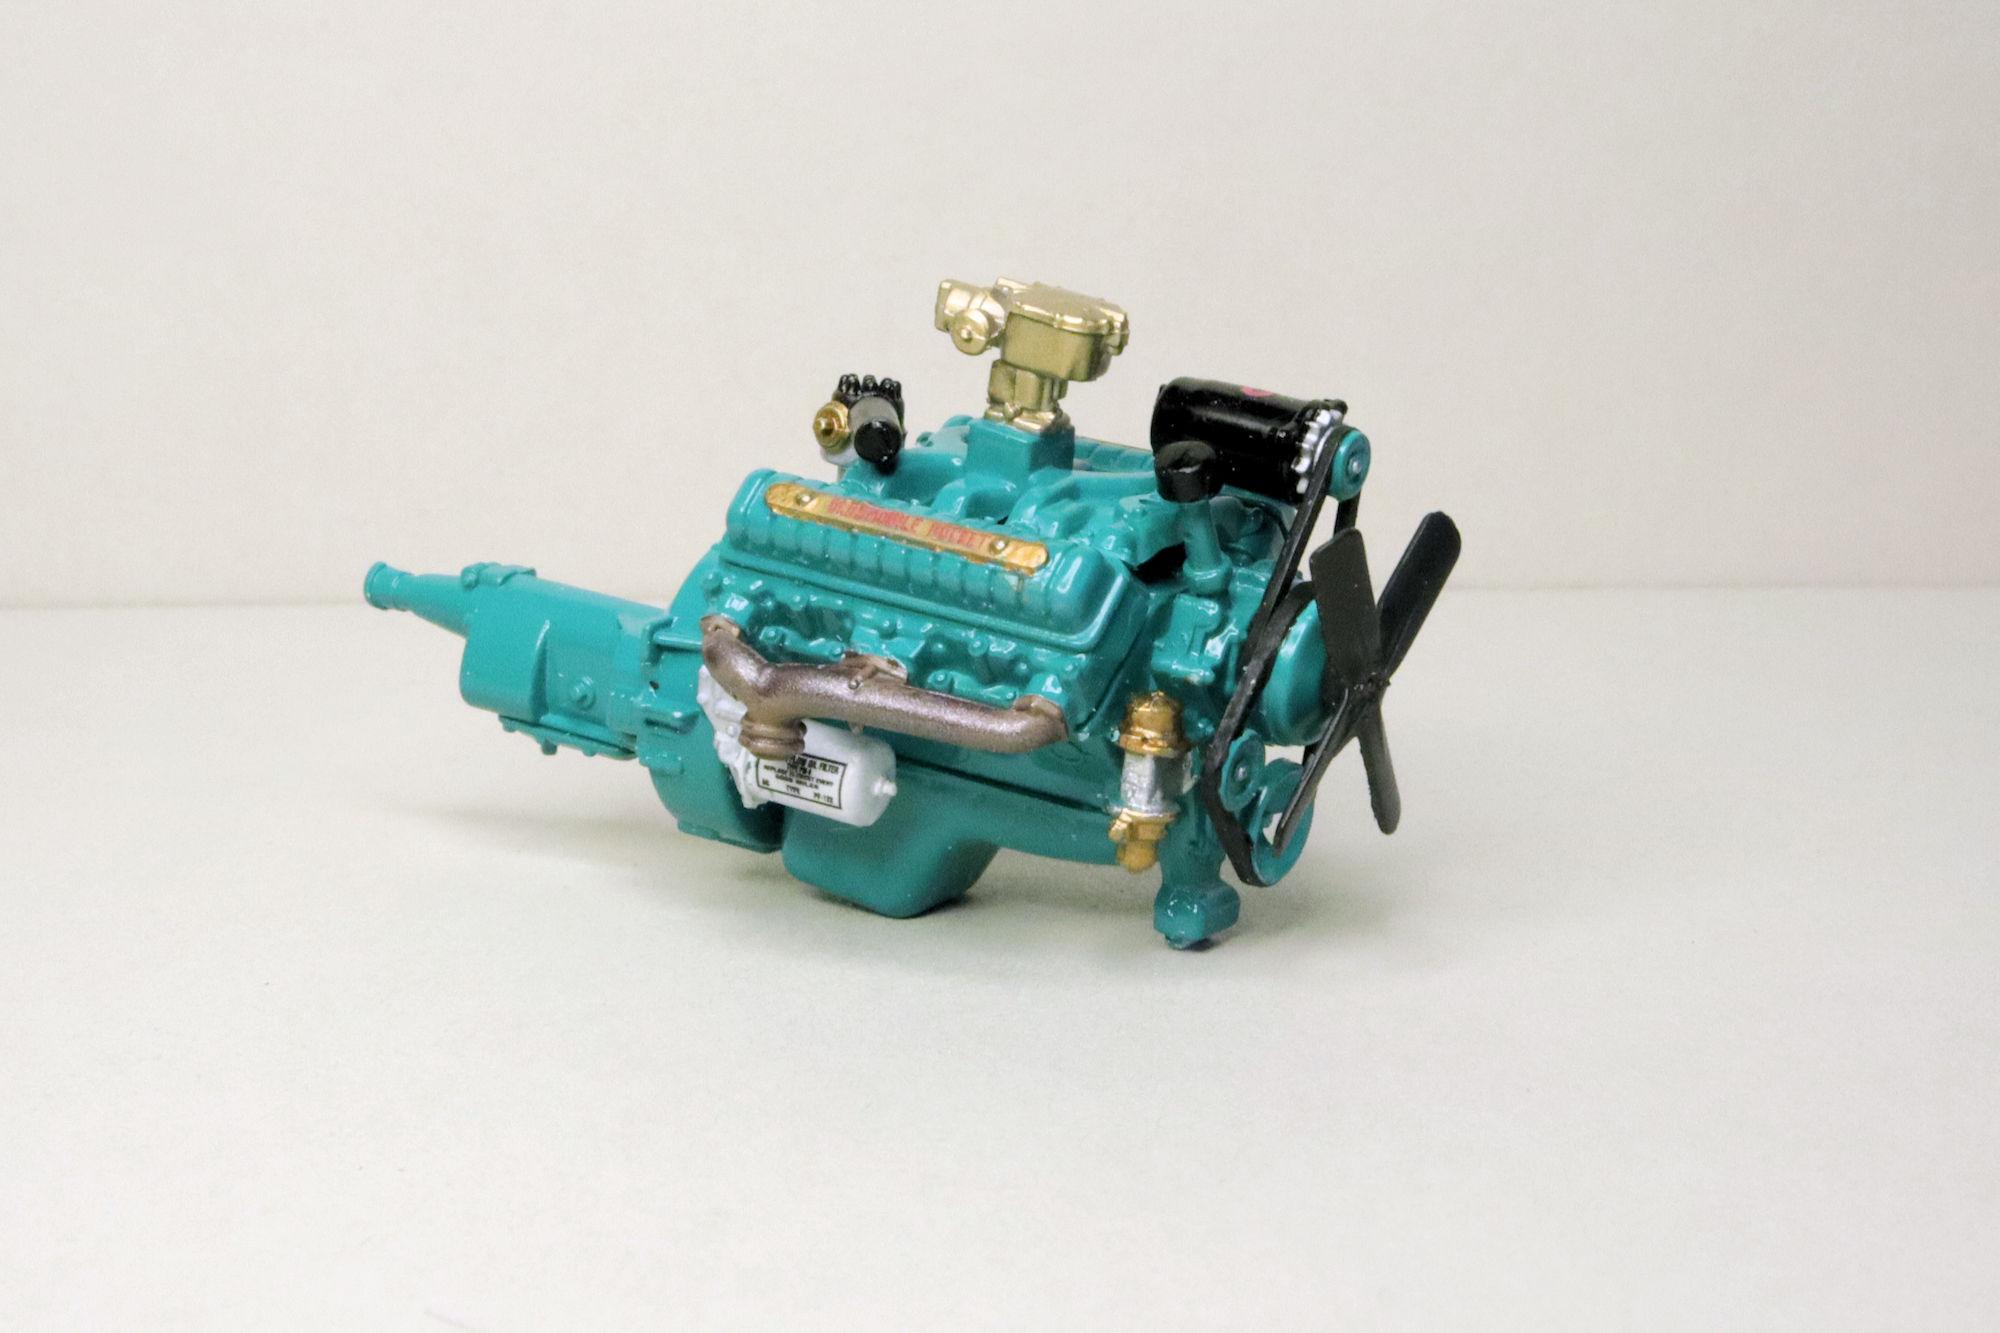
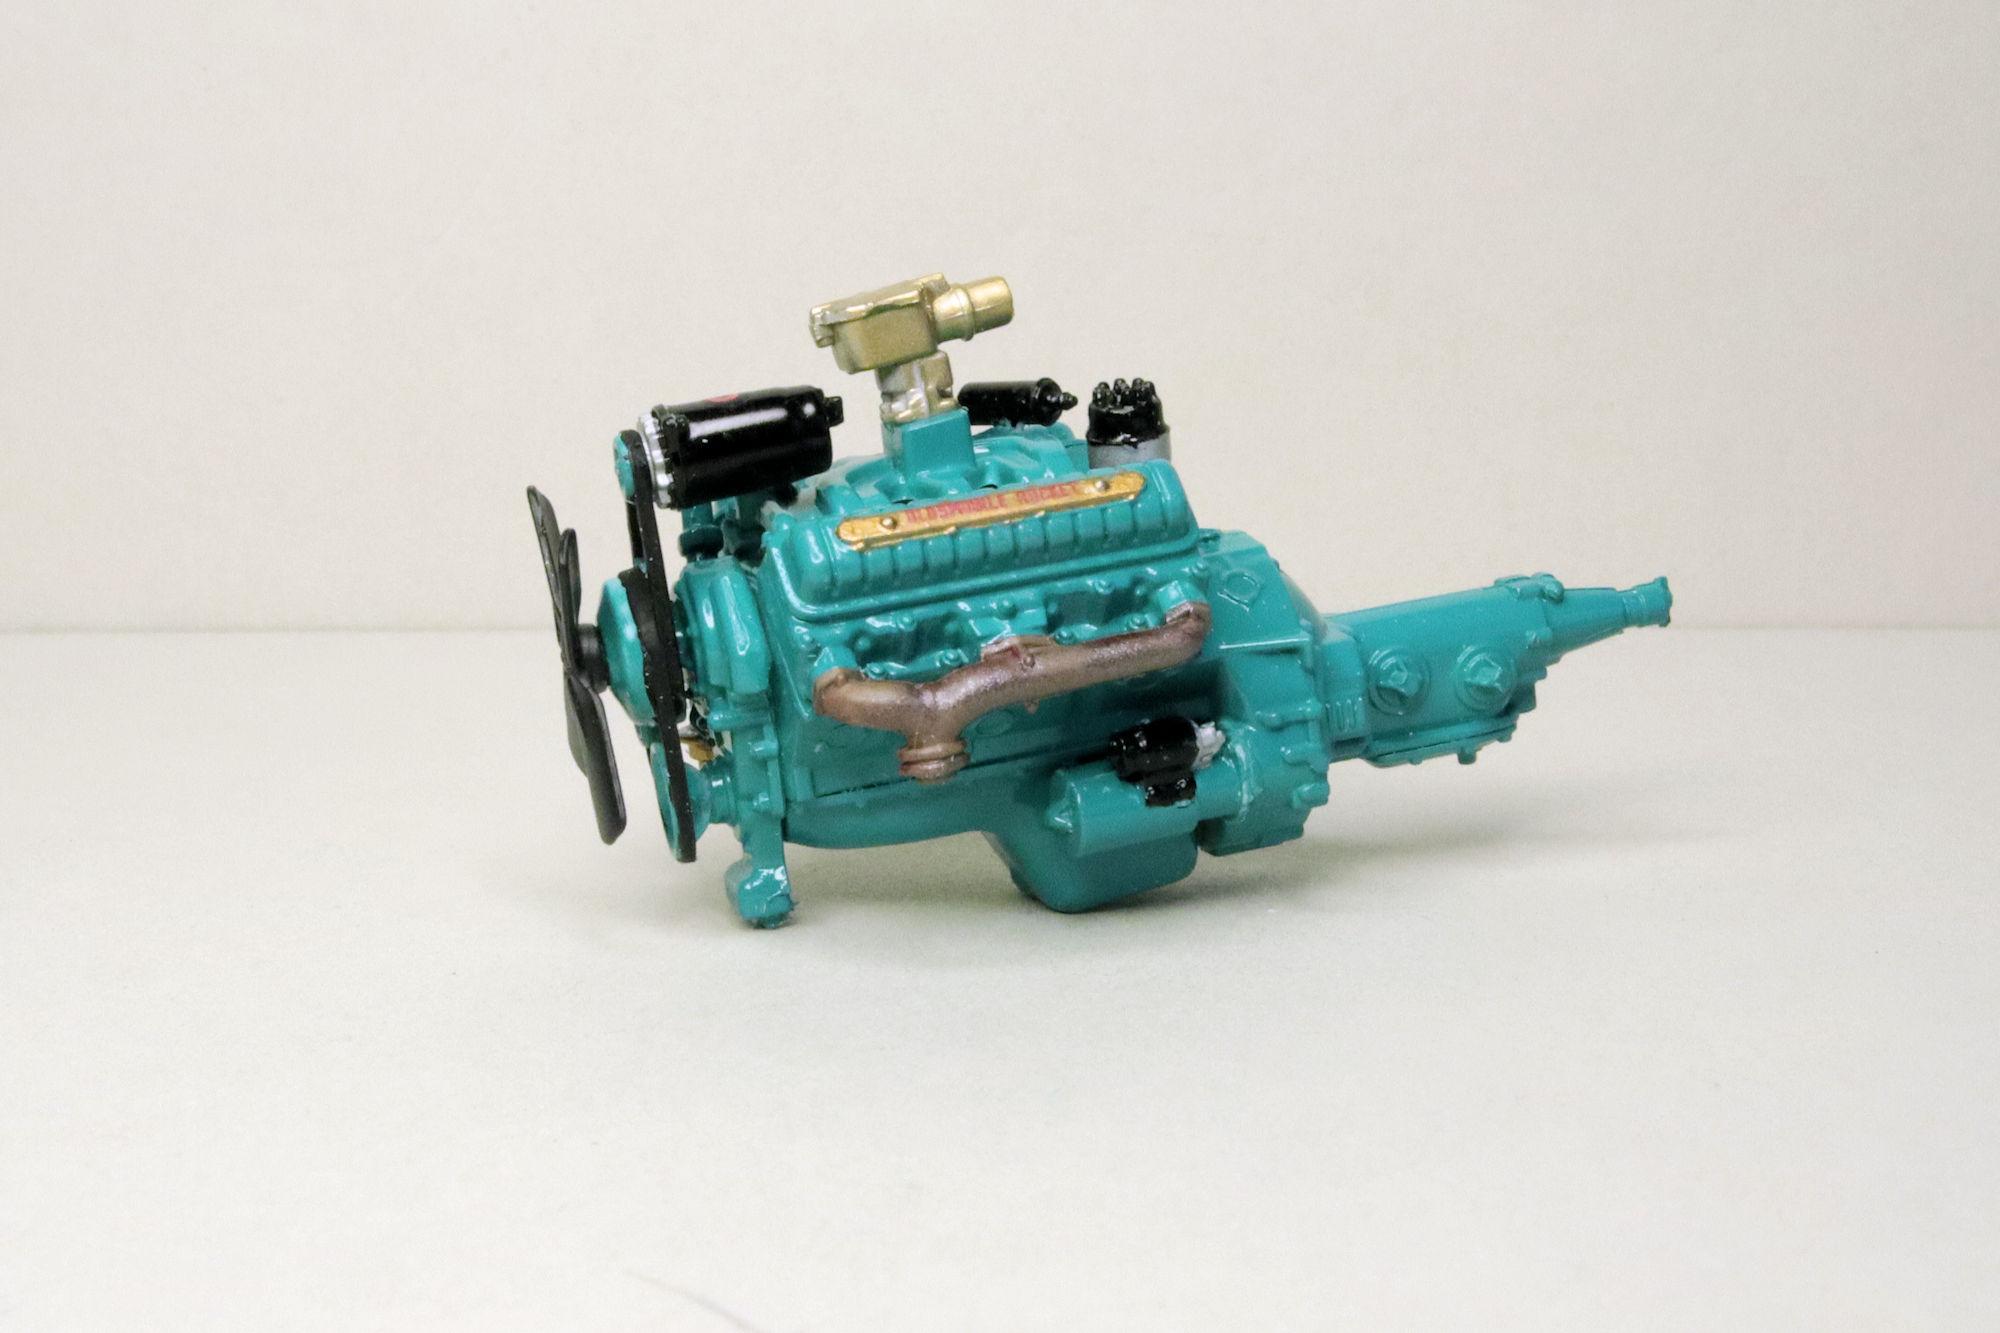
Hello Everybody! I've been working on this one for a couple of days and I felt that it's time to release it into the wild. This is Revell's 1950 Oldsmobile Club Coupe, it can be built one of three ways. First is stock, which would be my usual choice. Option two is a replica of the winner of the 1950 Pan American Road Race. I have to admit that did I seriously considered this building one. And finally, (not pictured on the box) there's a traditional Stock Car, pre-NASCAR. This goes back to the old ASCA (American Stock Car Association)- from the early days. Back when Stock Car racing used... stock cars. This is the version I chose. In just a couple of build sessions I have the engine completed. Revell provided decals for the generator, oil filter and valve covers. My research revealed that these two indentations on the frame should actually be holes. Now they are. There are other holes and pass-throughs in this area but they aren't really modeled well enough to work with. The assembled engine mounted to the frame with most of the front suspension in place. As always, thanks for taking the time to look and please feel free to post any comments, hints or suggestions you may have. David G.
- 9 replies
-
- 11
-

-

-
Wow Bob! That's more shiny than shiny should be allowed to be! Super looking paintjob. David G.
-
Revell's Peterbilt 359: WIP
David G. replied to David G.'s topic in WIP: Model Trucks: Big Rigs and Heavy Equipment
Thank you Dan. =D- -
Revell's Auto Transport Trailer: Finished
David G. replied to David G.'s topic in Model Trucks: Big Rigs and Heavy Equipment
Thank you kindly Dan. Thank you Brian, I appreciate that. =D- -
Revell's Peterbilt 359: Finished
David G. replied to David G.'s topic in Model Trucks: Big Rigs and Heavy Equipment
Thank you much Brian. Thanks Larry. =D- -
Revell's Peterbilt 359: WIP
David G. replied to David G.'s topic in WIP: Model Trucks: Big Rigs and Heavy Equipment
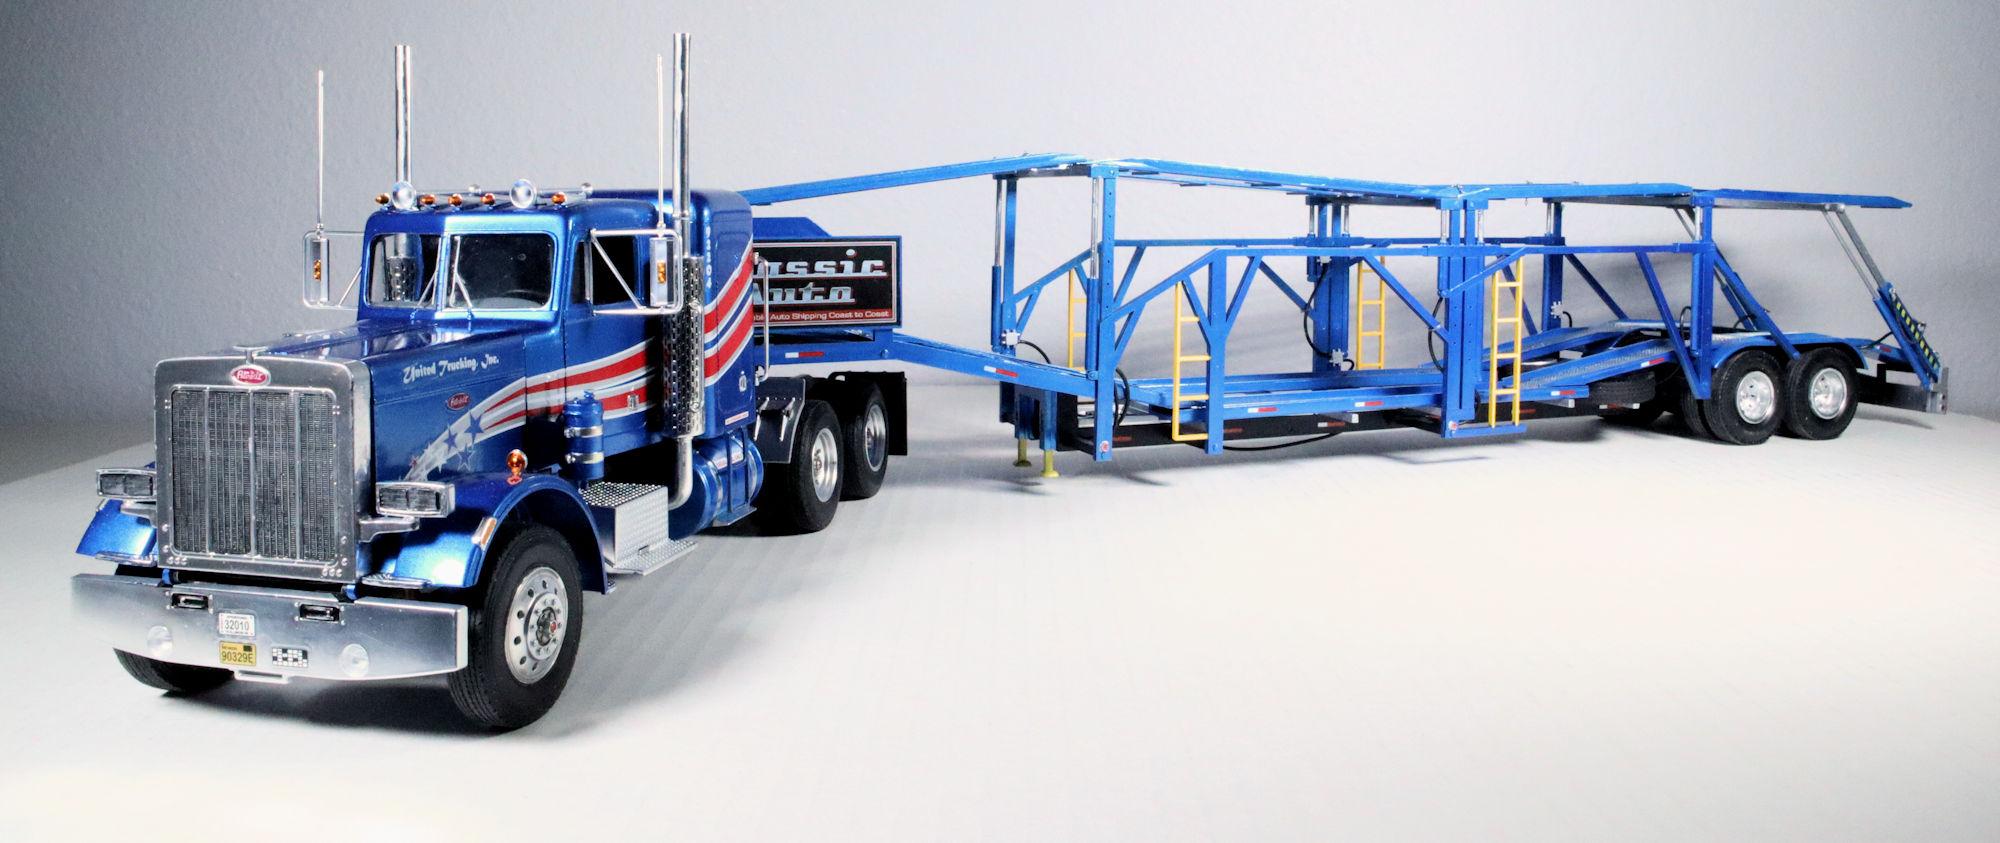
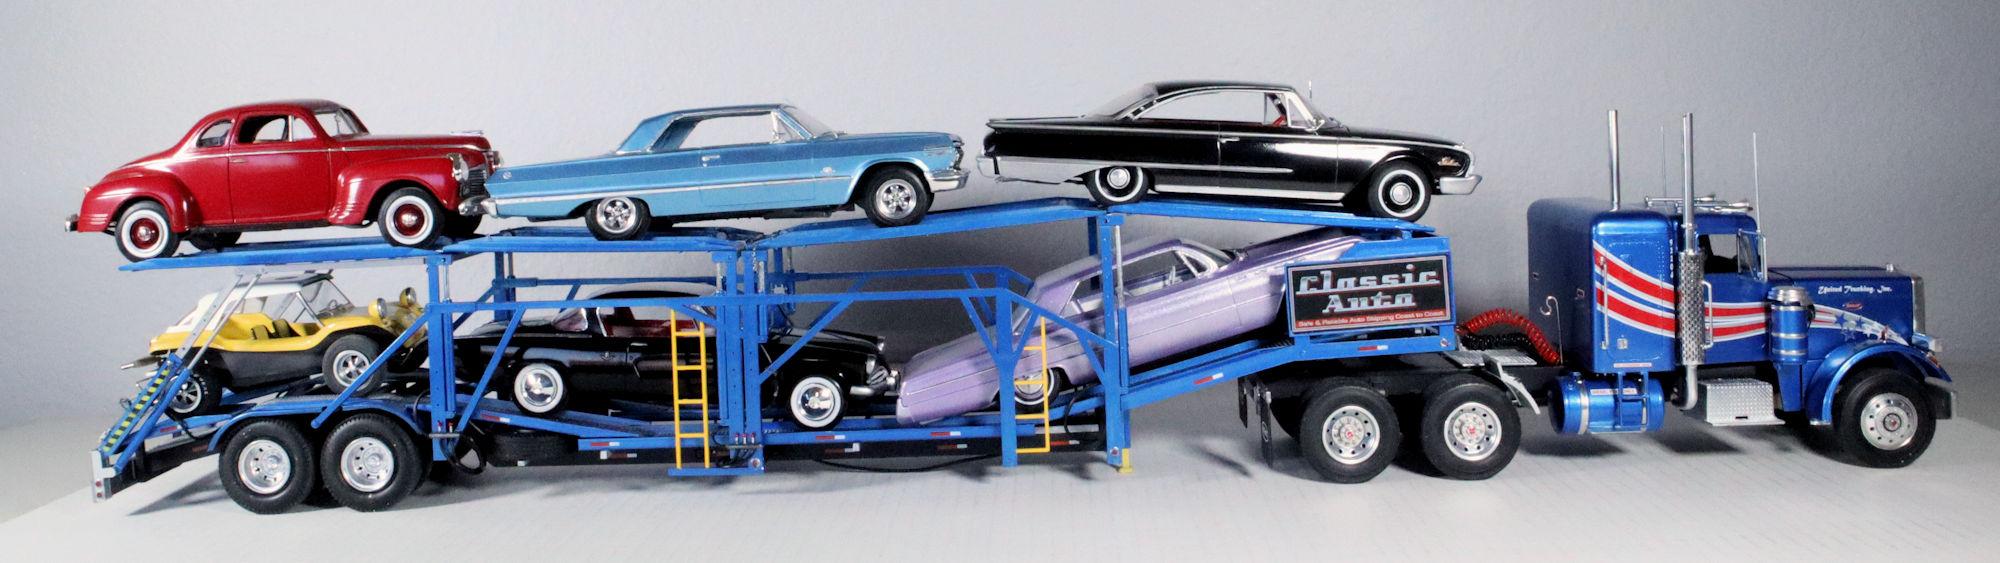
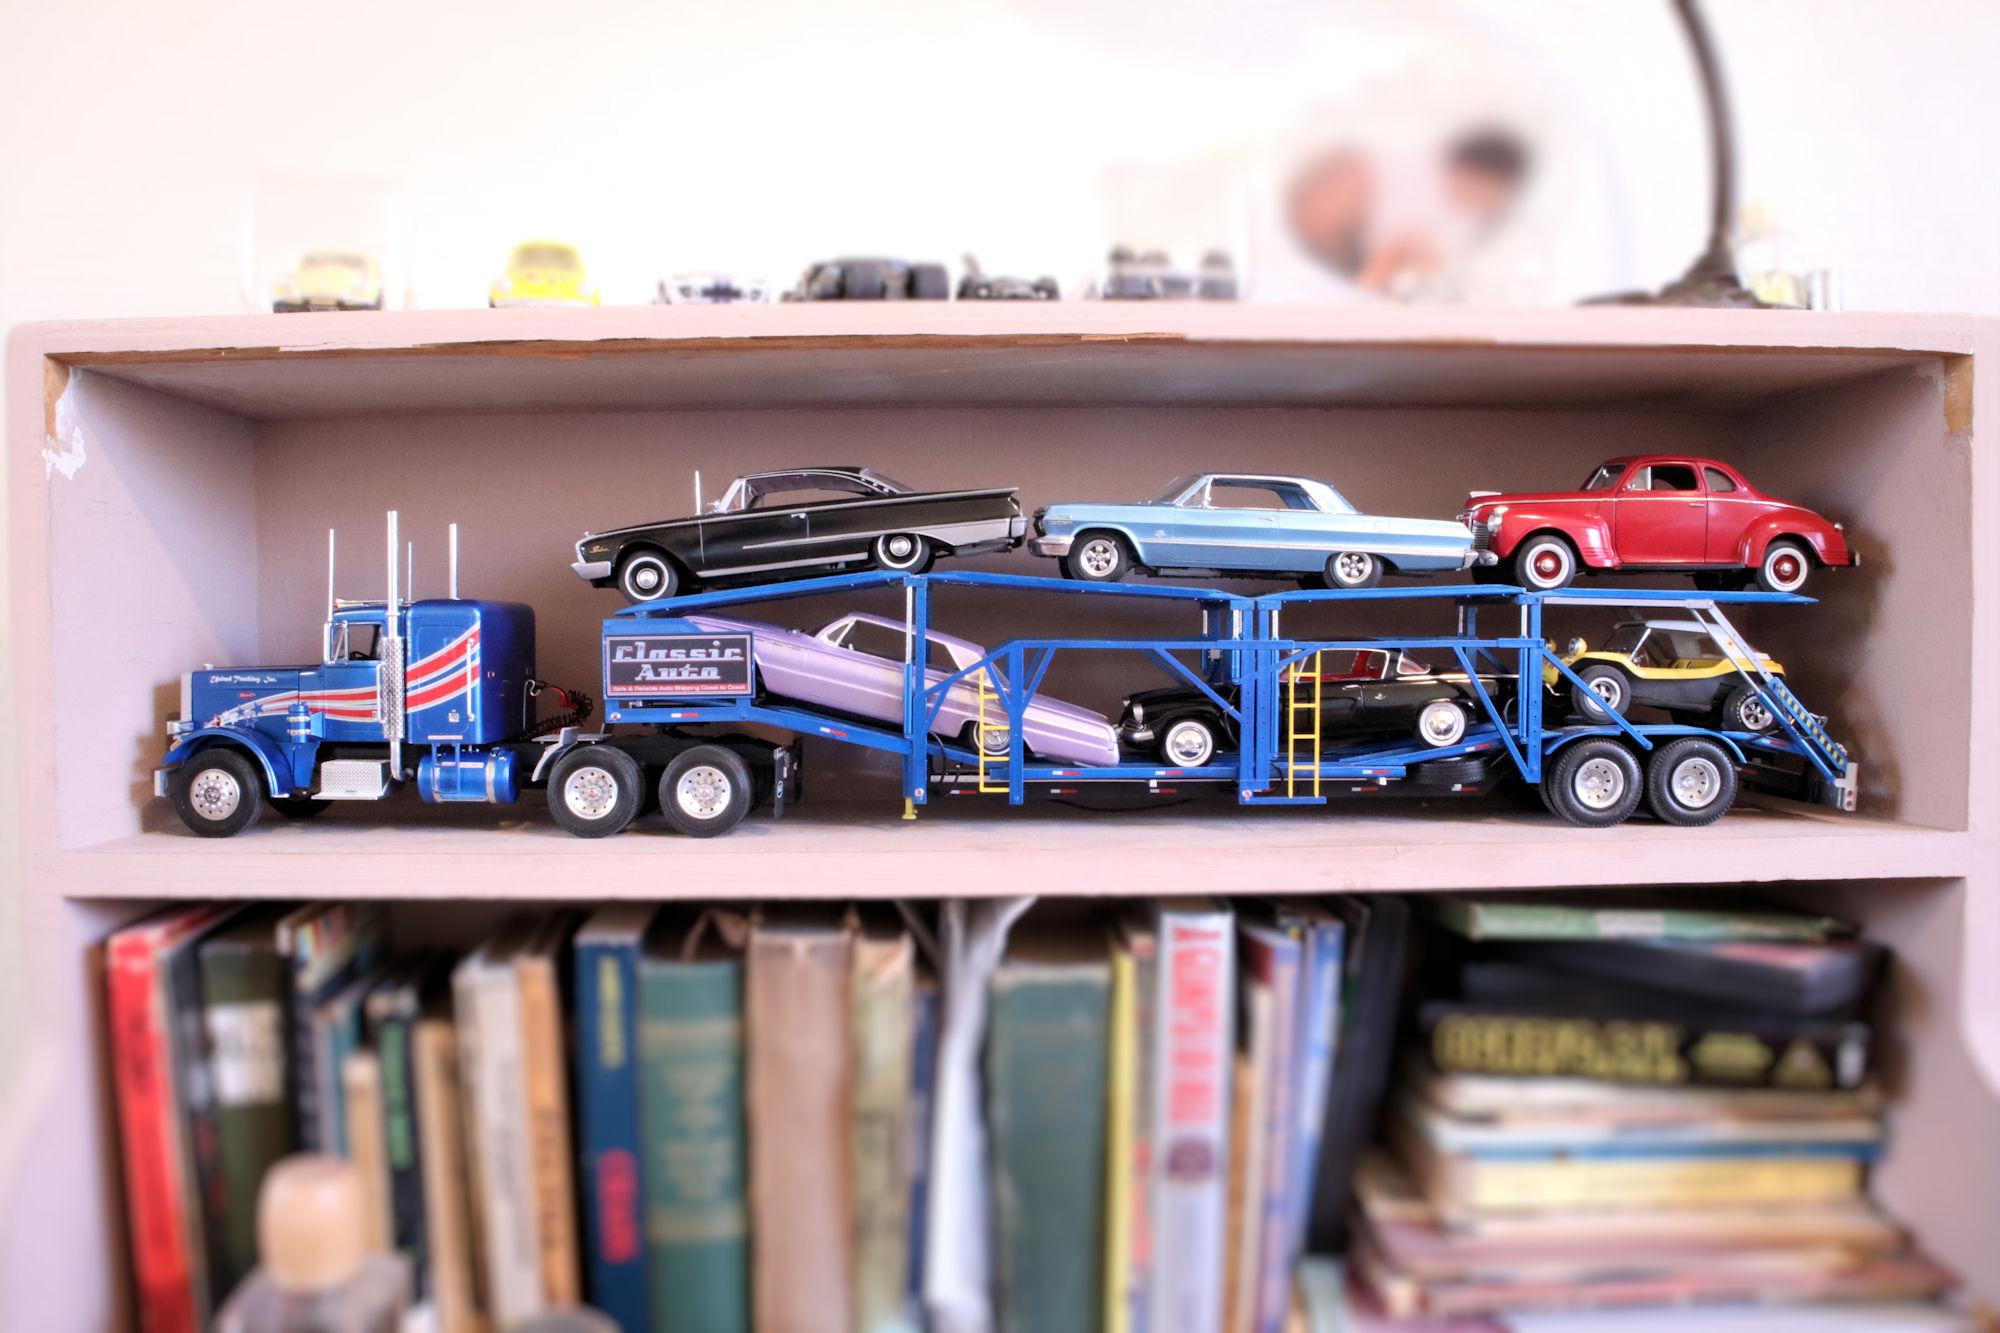
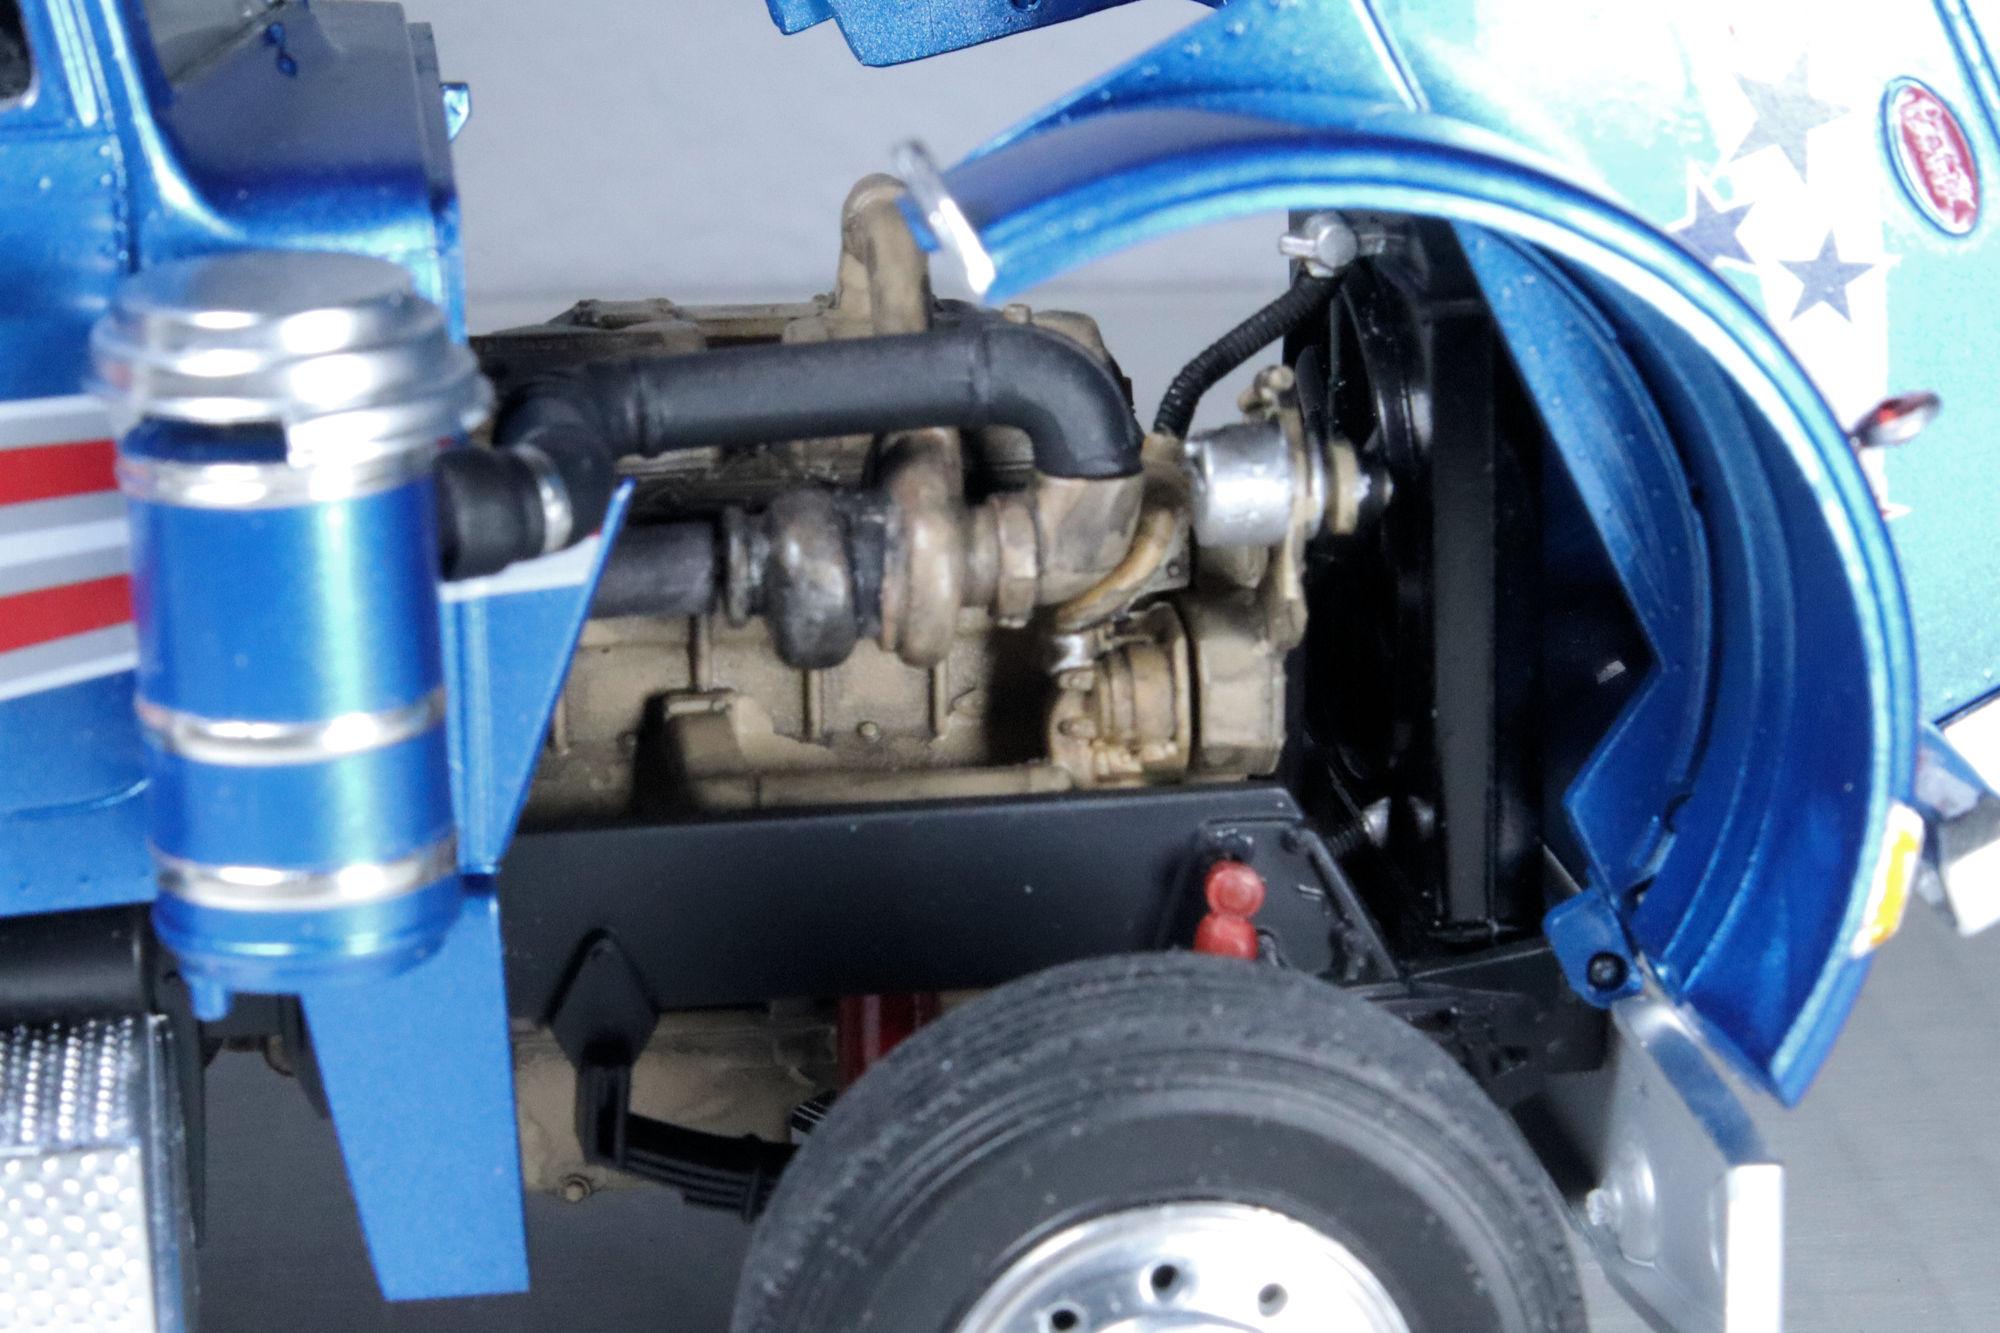
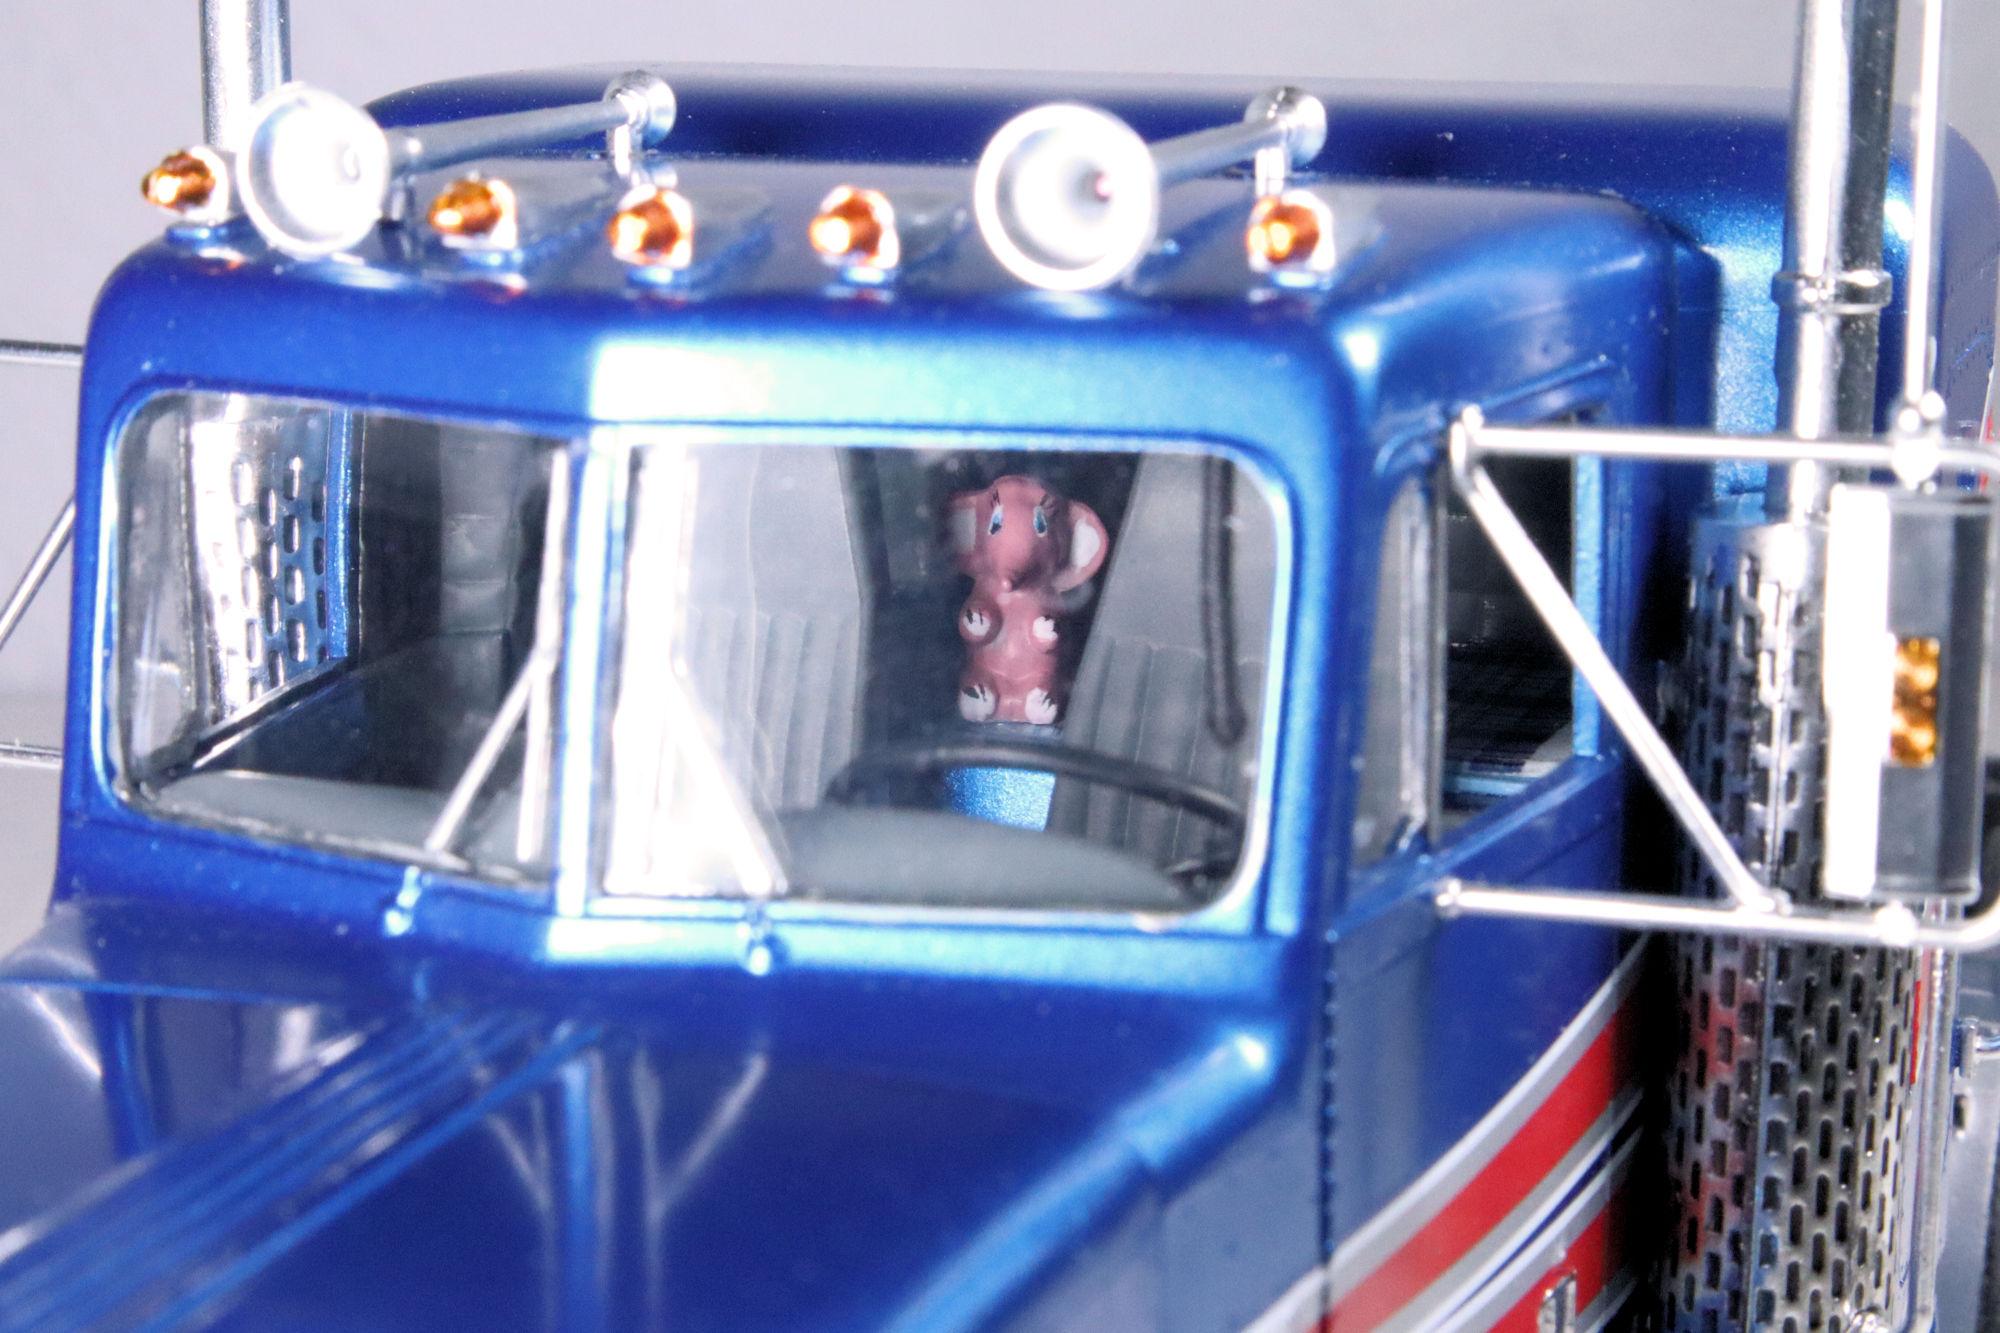
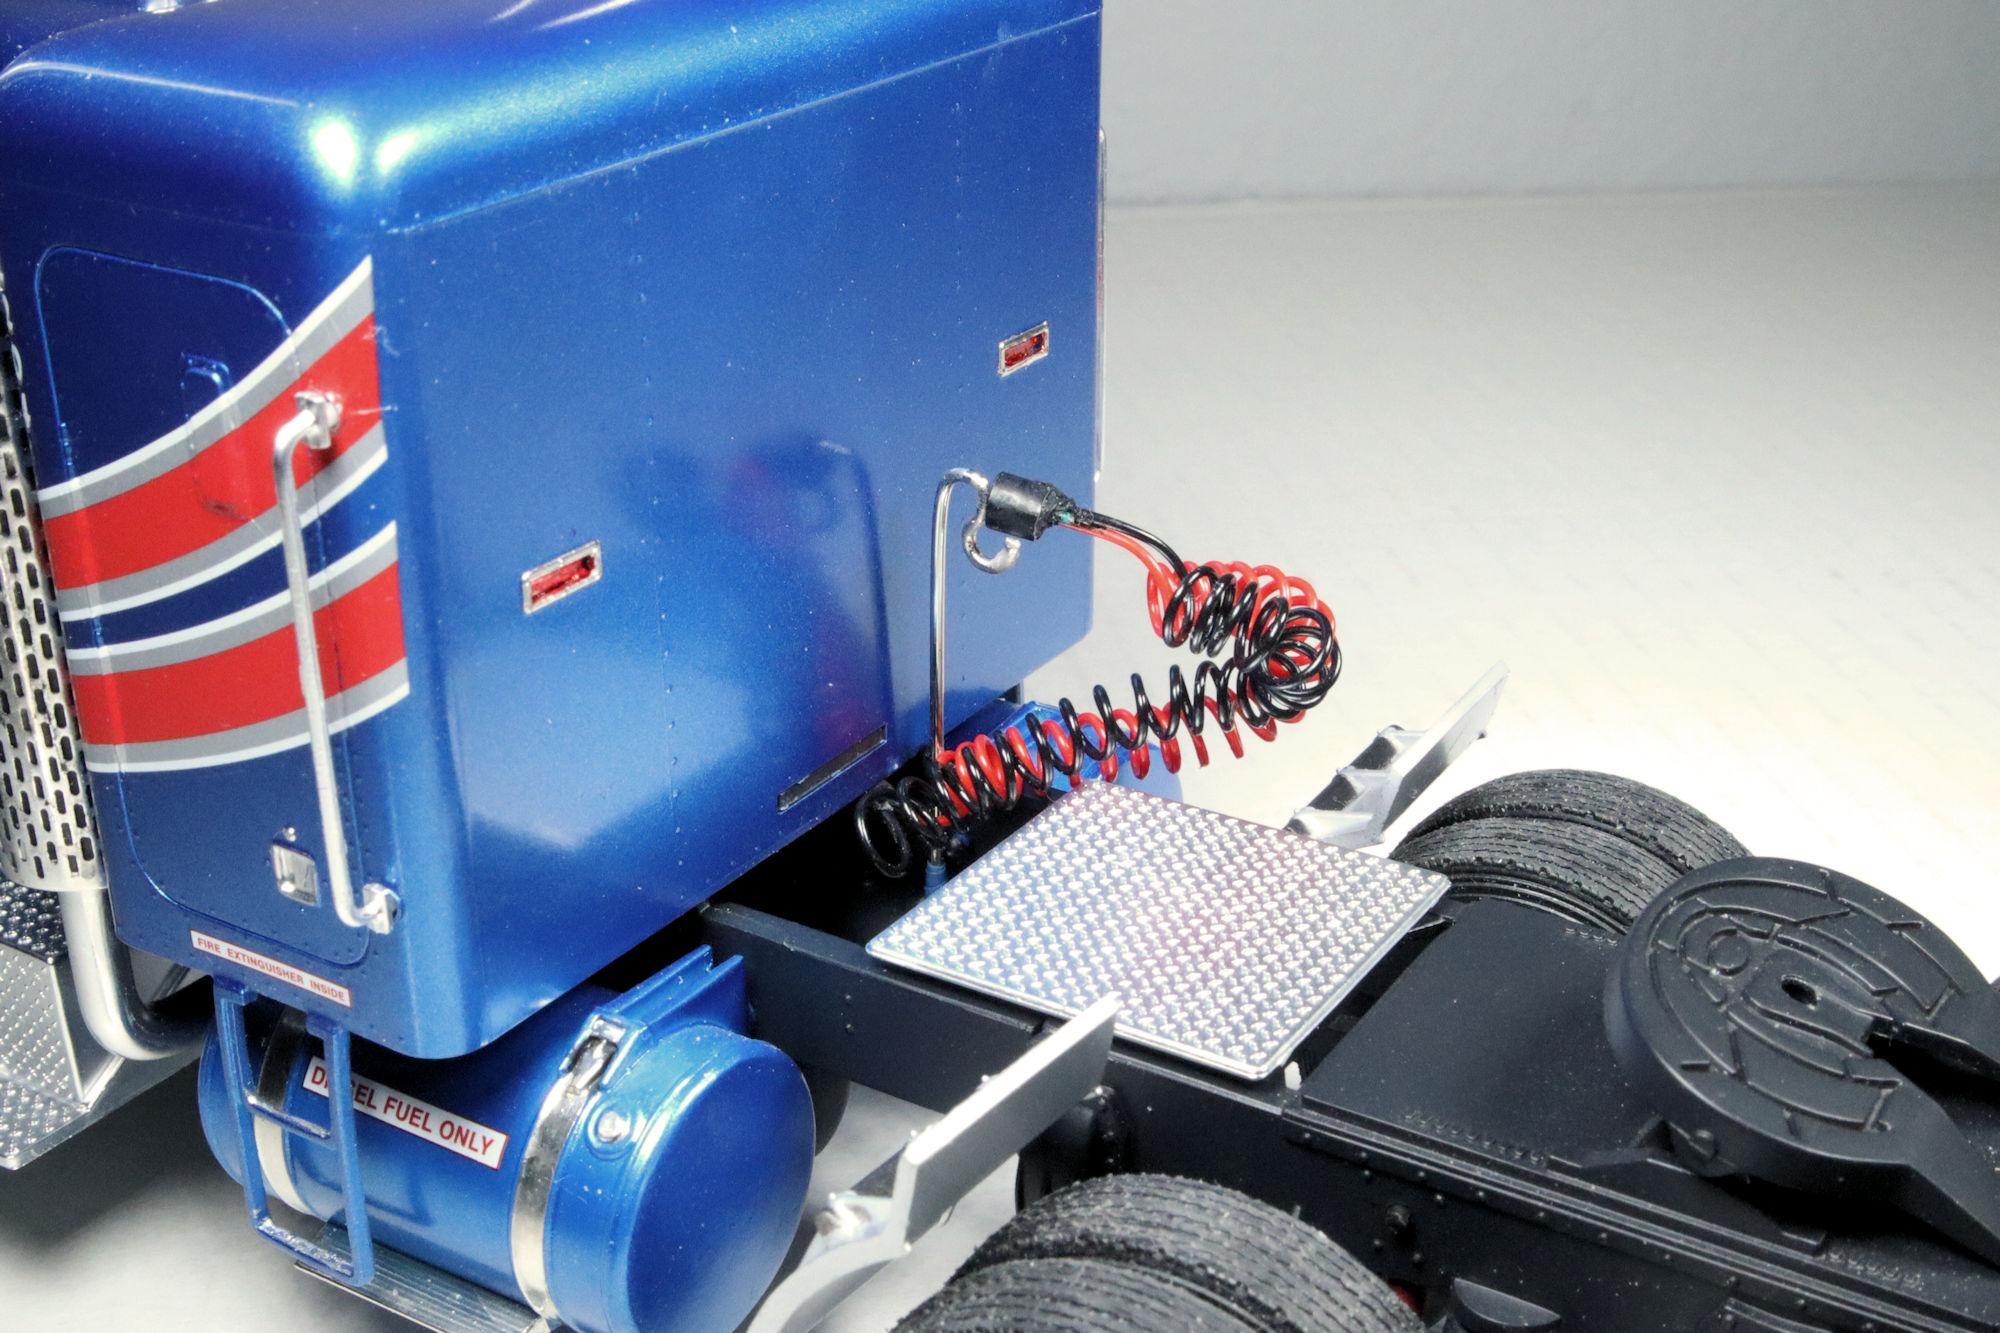
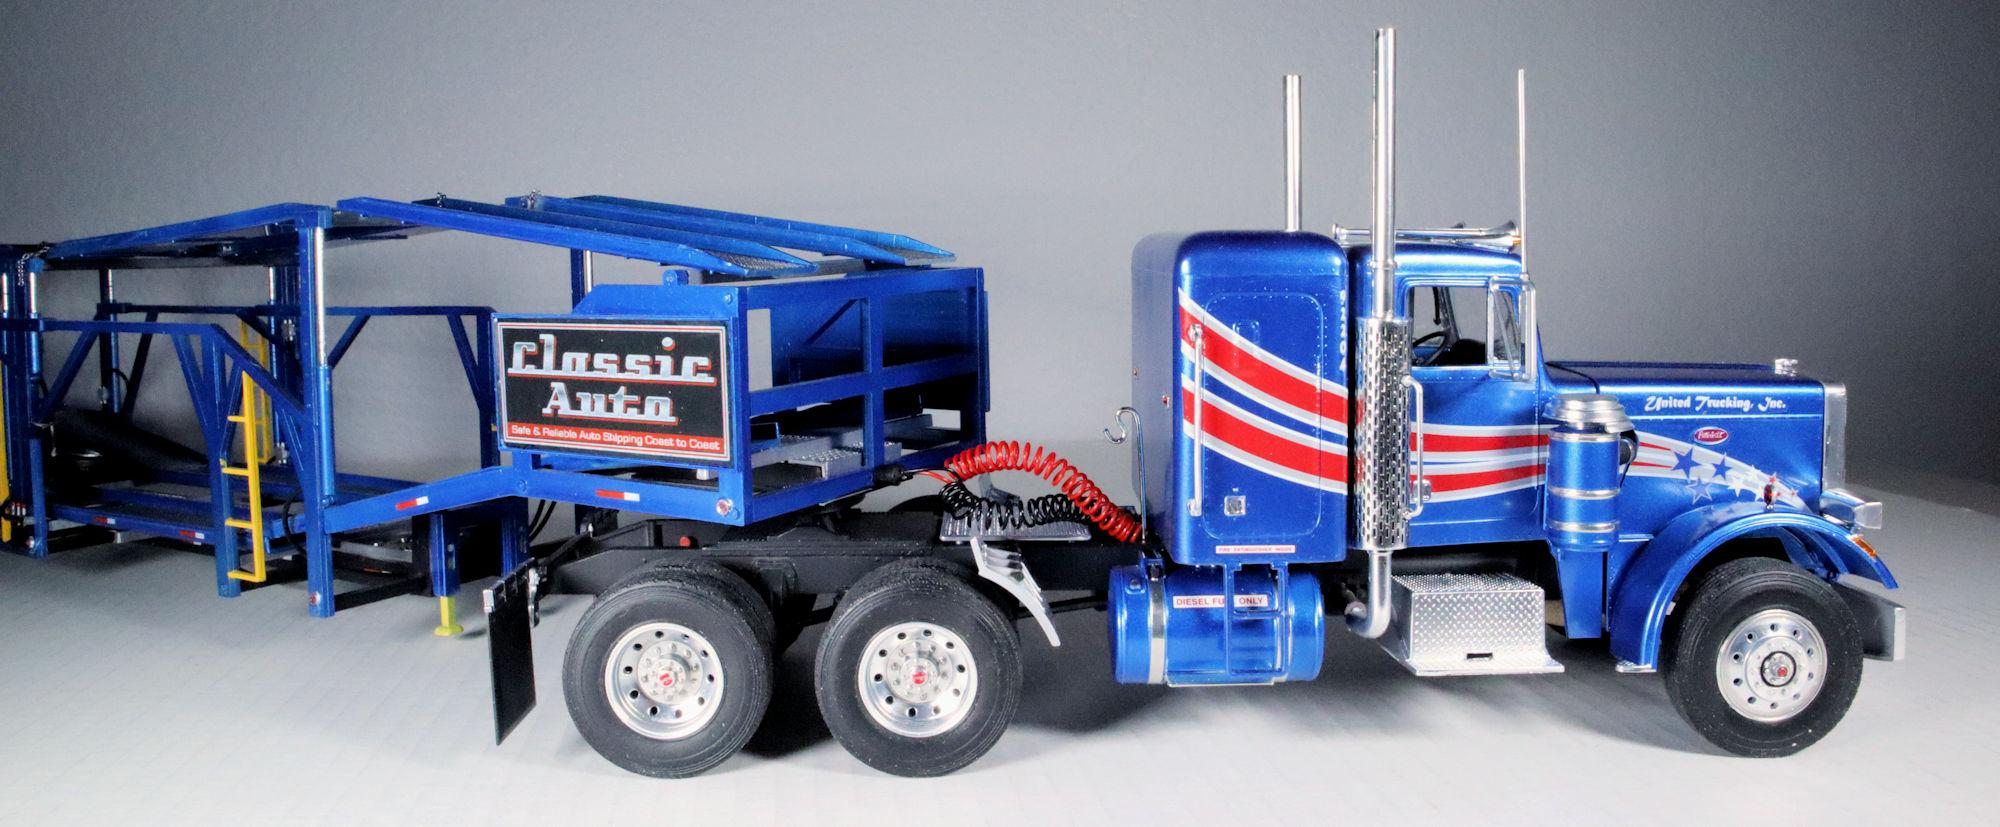
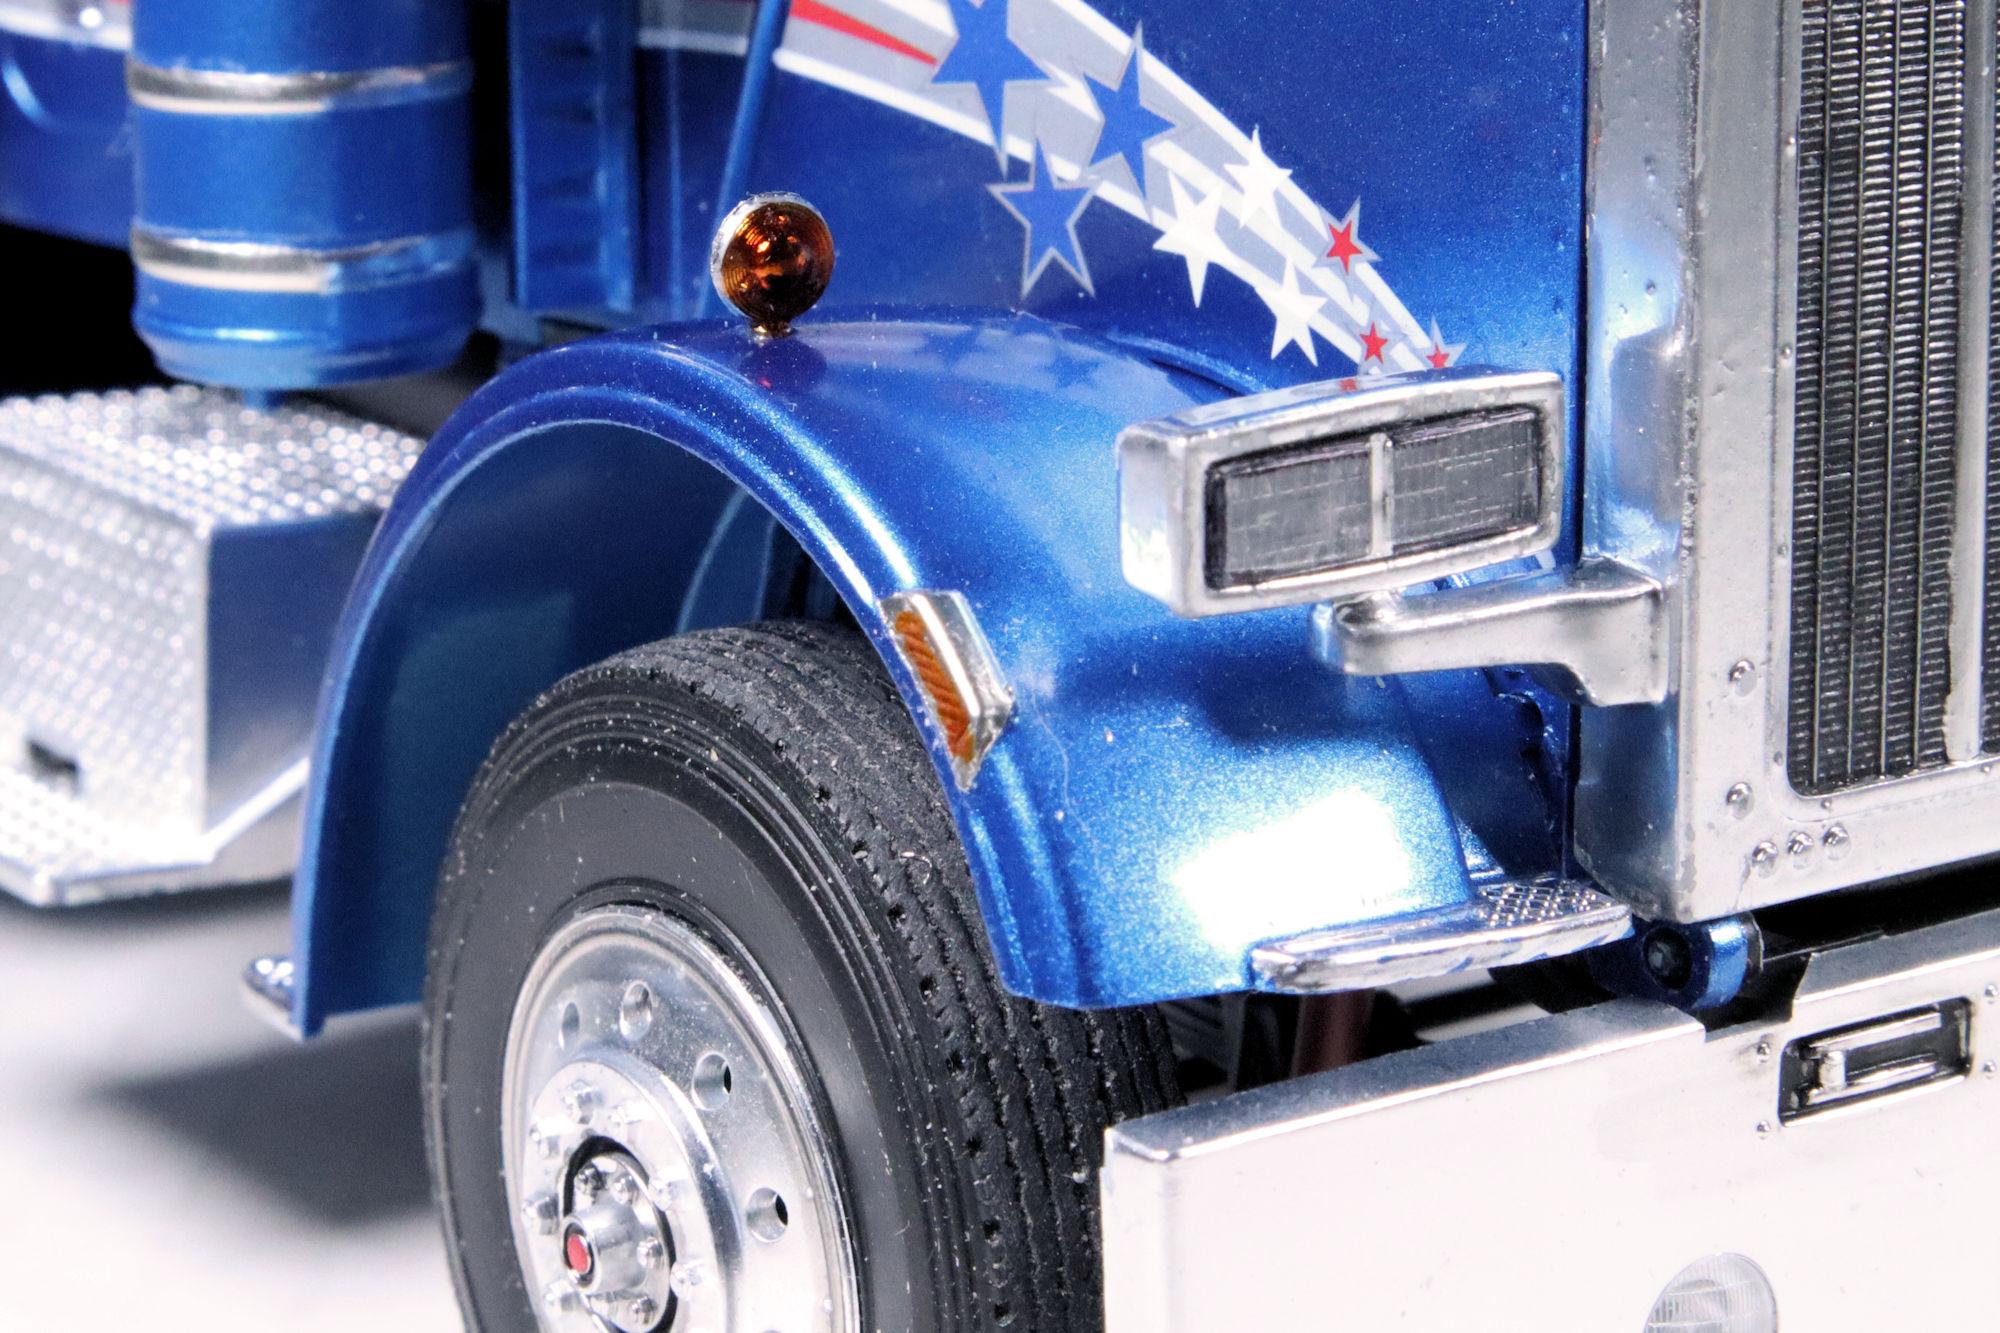
Hello Everybody! Here's the final photo set for the Peterbilt 359, thanks for your patience. I almost completely missed these little marker lights on the fenders! I discovered them while I was doing the final cleanup. I applied some BMF and a little transparent amber paint to give them a proper finish. This kit does have an engine... there it is. I decided to add a little travelling companion to the bunk area. Here's a more detailed shot of the connectors I added. The connector lines attach to the trailer with magnets. This is the full rig with Revell's Auto Transport Trailer as companion. And what's the reason that we want to build an auto transport trailer tractor-trailer rig? Why, to load it with model cars, of course! My traditional Display Case photo is actually a bookcase photo. This is the one place that I have to display this monster safely. I do have plans to dress things up a bit to make a more suitable display area. As always, thanks for taking the time to look and please feel free to share any comments you wish to post. David G.
-
Revell's Peterbilt 359: WIP
David G. replied to David G.'s topic in WIP: Model Trucks: Big Rigs and Heavy Equipment
Thank you very much Dan. David G. -
Great color Bob! If that doesn't cover that pesky red plastic, nothing will! David G.