David G.
-
Posts
11,310 -
Joined
-
Last visited
Content Type
Profiles
Forums
Events
Gallery
Everything posted by David G.
-

Revell VW Bus (Photos Restored)
David G. replied to David G.'s topic in Model Trucks: Pickups, Vans, SUVs, Light Commercial
Thanks for the positive comments. I've since painted the mirrors and added the custom vanity license plates. Because of the van's height, I had to buy a slightly larger than normal display case for it. The good news is that there's room for a small diorama! danke schoen, David G. -
A very striking build, the whole rig has a very solid look to it.
-
Revell VW Bus (Photos Restored)
David G. replied to David G.'s topic in Model Trucks: Pickups, Vans, SUVs, Light Commercial
Thanks for all the kind comments. I can't take total credit for the colors. I built this one for my wife, so, she's the one who picked them out. She had a 71 VW Bus that was just about the same two-tone color scheme and just loved it, but always wanted one of these. Thanks again, David G. -
Looks good. Makes me want to get started on the kit I have for the '70.
-
Very good work. There seem to be a lot of WV Type 2 models lately, maybe we should put shots of all the finished ones in a single gallery or something.
-
The paint looks great! If that's the dodgey paint, I'd love to see what the good stuff is like where you're at!
-
Friday Hassler chevelle Finished
David G. replied to rlz58's topic in WIP: Stock Cars (NASCAR, Super Stock, Late Model, etc.)
Wow, with the right backdrop, you could just about pass it off for the real thing! -
Excellent air-brush work, and the wheels just look right with that body style.
-
Most impressive! I'm sorry I missed this one.
-
I use anything and everything I can get my eyes, ears and hands on; I try to be open to everything. You never know where the next good idea will come from. If that fails, Google it!!!
-
Snake's 67 Dodge Car hauler
David G. replied to Len Woodruff's topic in WIP: Model Trucks: Big Rigs and Heavy Equipment
Wow, my neighbor actually had one of these; a 1:1 pickup just about that same shade of tan. I've never seen another one, especially as a model. I thought it was one of the coolest trucks I've ever seen, the headlight bezels are like pie-tins on those old Dodges! I'm sorry I don't have any help to offer you for the chassis selection, but I wish you luck, it already looks like you'll have fun! David G. -
It's done and has been updated in the "Under Glass" section!!! Thanks, Dave G.
-
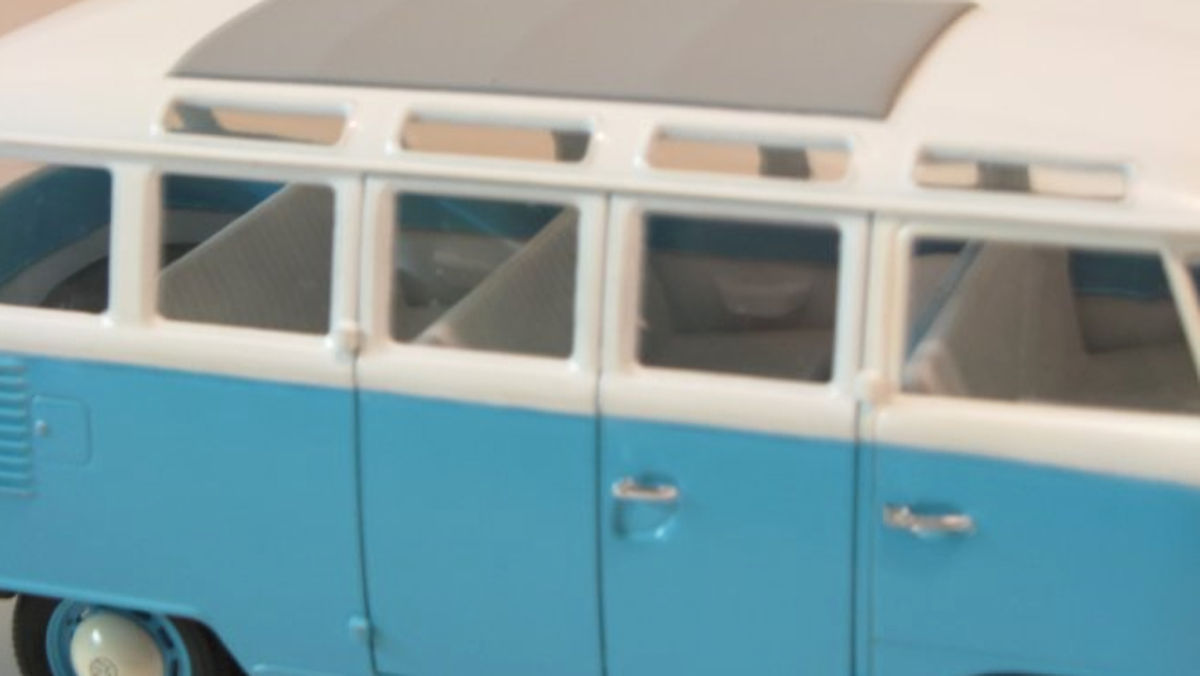
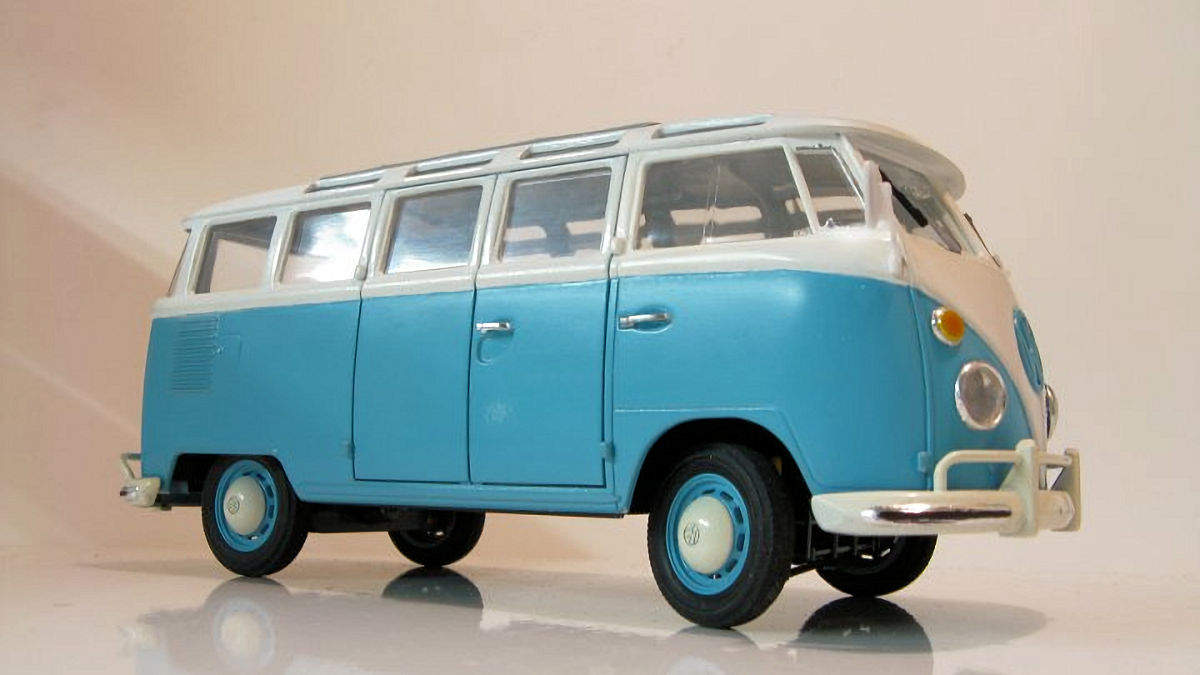
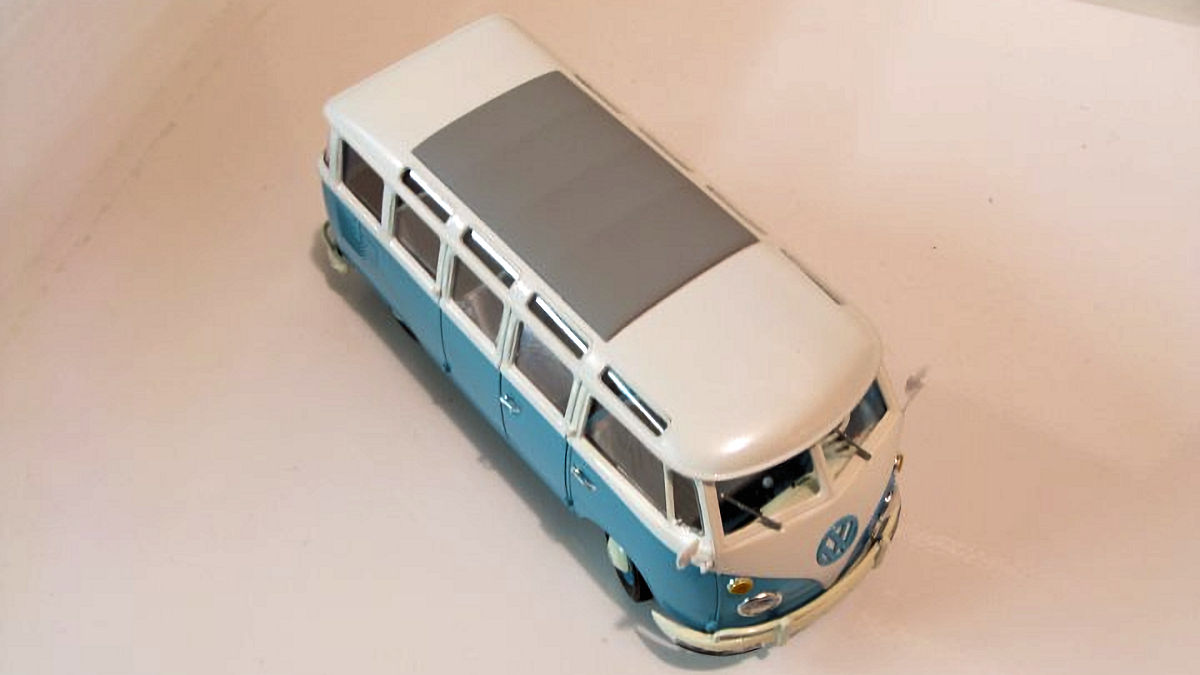
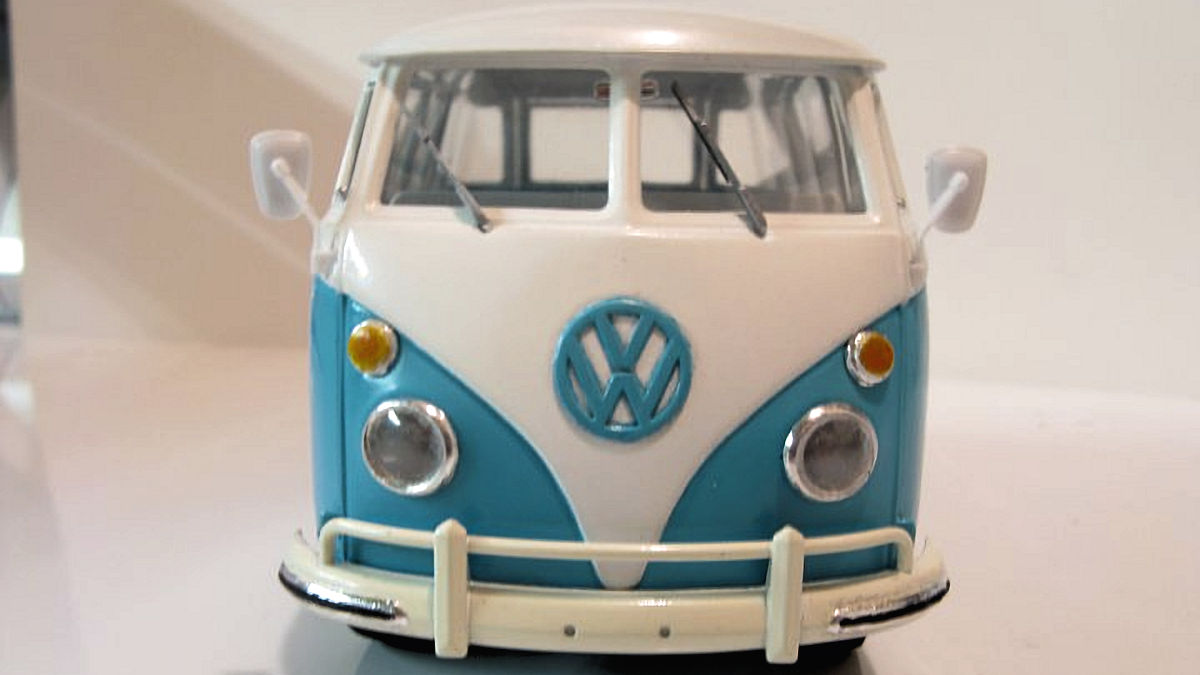
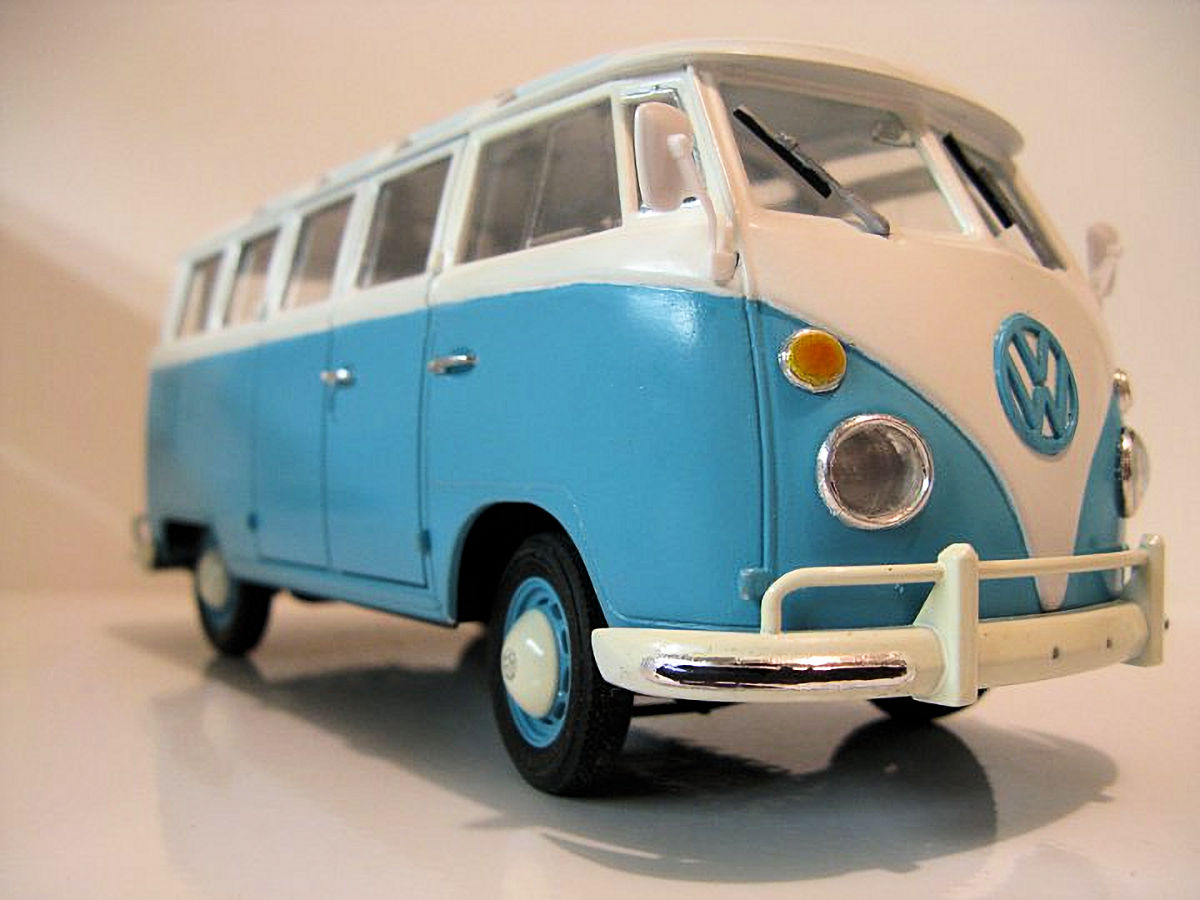
Some of you remember back at the beginning of February, I posted an entry in the "On the workbench" section about the VW Bus I was working on, well, it's done! Testors Classic White and Turquoise Blue enamel from spray cans. I was not extremely happy with the way the paint laid down. It required much more sanding, buffing and polishing than the Tamiya spray cans. I doubt I'll use the Testors for body paint again. Sun Roof! The emblem turned out as good as I could've expected. And I promise, I'll get the brush and some of that white paint and hit those mirrors! I thought I could get away with it, but the camera doesn't lie! Some of the kit's "chrome" plating in didn't cover as well as it should have, so I ended up stripping it off the headlight buckets and using foil. With no interior panels supplied with the kit. I had to make my own, and the armrests to go with them. They're a little hard to see but they're in there. Now that I have a much better camera, I think I may try get a better photo. Thanks for taking a look, and as always, any critiques, criticism or suggestions are always welcome. David G.

-
For the most part, you're right. Cars built in the US since the mid 60's will have back and side windows made of tempered glass. Because of this they will hold together to some extent, but not as well as a laminated windshield. If a back window on such a car were shot, say, with a handgun, most of it might remain in place, at least for a short time. Most of what remains could be reduced to little bits with a light tap from a hammer, or be shaken loose by driving over a rough stretch of road. Sometimes they will continue to break, sort of shattering in slow motion. Hours later one can sometimes still hear occasional creaking and grinding noises as this happens. Of course, it would be just as likely to completely shatter leaving a jagged fringe of cubed-up glass around the inside of the frame. ******** revshag, Given that, I'd say you could justify just about any effect you wanted to create! But, creating random damage is almost never the way to go in model building. Most of the weathering, distressing and damage effects you see others modeling on their projects are actually carefully planned and executed proceedures used to create apparently random results. I would do a Google Image search on "shattered broken car window" find an image or two you like and use some of the cutting and scratching techniques given above to replicate the the features that appeal to you. As always, practice new techniques on scrap stock! Hope that helps. David G.
-
3M Spray Adhesive! On the futon and the driver!
-
1960 Starliner Engine Color?
David G. replied to David G.'s topic in Model Building Questions and Answers
Wow, thanks Dave! Getting the wash and/or drybrush color right would've been one of my biggest concerns. I was thinking of a slightly lighter black or very dark gray for the wash or drybrush. Your suggestions for the gloss and satin finishes are a good idea too. I built an AMT Batmobile years ago and mixed about four subtle shades of black for it to represent the various materials it would have been built with. That worked rather well and I was thinking of doing something similar with this engine. The different shades of black weren't something that most non-modelers would have picked up on right away, but it made what I call one of those "invisible differences" that sometimes seems to make all the difference. Thanks again for the information, David G. -
1960 Starliner Engine Color?
David G. replied to David G.'s topic in Model Building Questions and Answers
Thanks for all the feedback. It sounds like the engine will be black with gold valve covers, like the build sheet says. There's also a T-Bird engine in the kit and they call that one out as black too. Since they were right on the stock one, they're probably correct on that one too. With almost everything under the hood being black, I'm afraid all the wonderful detail that's on the engine will just disappear. Does anyone have any washes or drybrush techniques they'd like to share? Thanks Again, David G. -
I got this kit last weekend and I've got to say it's one of the best I've seen in a while. I found at my LHS for $16.95 and it's got more going for it than many kits in the $25 to $30 range. What you've done so far looks great, It'll be cool to see what you do with it.
-
Hi Everybody, Over the weekend I Picked up the AMT re-release of the 1960 Ford Starliner. So far it looks like an excellent kit and I can't wait to get started on it. My question is should the engine be gloss black as the assembly instructions call for, or should it be Ford engine blue? Of course, I realize that I could paint it purple and white if I wanted to, but I want it to be mostly accurate. I'm hoping that blue is correct, as a lot of the detail will be lost in black on black on black. Thanks, David G.
-
Impressive and beautiful.
-
Maybe the seat is just a futon mat on the floor!
-
Maybe he should put wheelie bars on the front, too! Also, from what I understand about the VW Bus and Bug designs, he put the scoops on backwards. The vents on the Bug and Buss are actually chimneys. As the car is driven, air moves past the vents creating a suction that draws the heat out of the engine compartment. The scoops should face the other way to be effective. Facing the way they are, they just ram the hot air back into the engine compartment. A Wolfsburg-trained Volksie mechanic told me that a long time ago and it makes sense, especially on the Bug.
-
One of the strangest things I found in a junkyard was in the trunk of a 1980's Chrysler K-Car. A collection of various prosthetic limbs. There were about ten arms and legs of different amputation lengths and two feet. Great topic BTW!
-
Obviously a person who could not get his life together. It's strange how such a random collection of items can form such a strong sense of the personality behind them.
-
Mr. Obsessive did a window tutorial a while back that you may find usefull.