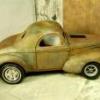
RyanSilva Posted July 31, 2010 Posted July 31, 2010 I'm not much of a sleeper fan, conventional or cab overs, so day cab it is! I taped a line 4.70mm from the body side door jam, sharpied a line to follow, then made the cut with a xacto saw. The cut came out a bit rough..but it worked. I'll use some baking soda and superglue to fill the gaps. I started getting the chassis finished. Not done painting the chassis, but it is coming together. Using a few shades of brown acrylics dry brushed in layers. I started on the fuel tank. At first I was gonna use the square ones, but said to hell with it and made a aluminum tank and added the C600/900 fuel tank sides to it. i'll end up casting the tank a long with theframe mount too.
Danno Posted July 31, 2010 Posted July 31, 2010 That looks like a very good start, Ryan. I did the same thing ... but stalled out while seeking the "right" wheels (not the ones in the pic). Finally located a set of the proper Budd 2-holers. I gotta get back to this one. I'll be following along with your build! Thanks in advance for the inspiration.
Bryan H Posted July 31, 2010 Posted July 31, 2010 Interesting. Thanks for the excellent photos that show how you're doing the modifications. Bryan
RyanSilva Posted July 31, 2010 Author Posted July 31, 2010 Dan, I'm still debating on using my 2 hole budds on the back as well, most likely will do the 5 spokes in the pic though!
RyanSilva Posted August 13, 2010 Author Posted August 13, 2010 (edited) I was given some Aluminum pipe used to make Bow Rails on boats, it's great stuff to machine, plus the heavy wall allowed me to turn it down a bunch. I redid the Air cleaner again, and turned down some resin for the ends. Not shooting for a Titan/Detroit prototype, just a simple can shape. The rear axle and much of the frame was done in many shades of brown, dabbed on by my trusty fat round bristle brush. I added the red after just to breakup the brown everywhere. I used a it of rubbing alcohol on it to pick away some of the red to get a chipped paint effect. It will get some axle grease afterwards. Edited August 13, 2010 by RyanSilva
Guest old man Posted August 13, 2010 Posted August 13, 2010 nice work can't wait to see you finish this
Kostas Parchas Posted August 14, 2010 Posted August 14, 2010 Hi Ryan, you are off to a good start, looks very good so far, Kostas.
Old Albion Posted August 17, 2010 Posted August 17, 2010 Ryan, I love the weathering detail, it looks real. Increadible skills and ability. Dave
The Modeling Hermit Posted August 17, 2010 Posted August 17, 2010 Ryan. Stop posting these pictures. Desires are rising in me to dig out another Titan/Astro kit and build along. LOL Seriously, your work as quite artistic and beautifully executed. I find it difficult to wait for the next installment.
Blake Rogers Posted August 17, 2010 Posted August 17, 2010 Ryan amazing work buddy please keep it up i might try that cab idea on the white freight liner kit
Recommended Posts
Create an account or sign in to comment
You need to be a member in order to leave a comment
Create an account
Sign up for a new account in our community. It's easy!
Register a new accountSign in
Already have an account? Sign in here.
Sign In Now