djsmadplastic Posted April 25, 2011 Posted April 25, 2011 A picture is worth 1000 words That is amazing. I love the scratchbuilding. You are doing a great job. STewart I agree with the scratchbuilding part. Are those 0090s or 80s? I'll be Honest you got me beat. So far......LOL D.J.
pharr7226 Posted April 25, 2011 Posted April 25, 2011 Outstanding work. The chassis and suspension look fantastic. I love the jig. I've never seen anyone use balsa wood for a jig... Great idea. How did you make the four link brackets and holes so symmetrical?
stump Posted April 26, 2011 Posted April 26, 2011 Thank you all for looking in on the build. Pick my brain WHAT BRAIN? No but the Mico-Ball comes from RC planes, thay can be used for front suspension. Like a ball jount for front strut. Hope this help. O yes love the 69 you'r building. Sweet, thanks Derrick. I thought they may have been for suspension, just wasn't sure. Cage and 4-link look superb too..... Keep'em coming mate, I'll be using this for inspiration on mine.
baddgass Posted April 27, 2011 Author Posted April 27, 2011 I agree with the scratchbuilding part. Are those 0090s or 80s? I'll be Honest you got me beat. So far......LOL D.J. I used 00-90 look to be the right size. A there's on beating in just building all in fun. :I may need you to build me a body. Outstanding work. The chassis and suspension look fantastic. I love the jig. I've never seen anyone use balsa wood for a jig... Great idea. How did you make the four link brackets and holes so symmetrical? To get the parts to look the same. I make a patterns that i like then cut it out. I cut 4 pices of plastruct and tape together, then i use washable glue stick and glue the patterns to the plastruct. Then drill out 2 holes and put the nut and boltin to hold the parts not to mover, cut out and drill and sand.
lenny920 Posted April 28, 2011 Posted April 28, 2011 Your Camaro is outstanding , is the rearend housing your using scatch or from another kit? Can't wait to see it finished ,your talents are inspiring. Keep up the fantastic work.
pharr7226 Posted April 28, 2011 Posted April 28, 2011 To get the parts to look the same. I make a patterns that i like then cut it out. I cut 4 pices of plastruct and tape together, then i use washable glue stick and glue the patterns to the plastruct. Then drill out 2 holes and put the nut and boltin to hold the parts not to mover, cut out and drill and sand. Great idea. Why didn't I think of that? I really like the use of the washable glue stick for the pattern.
djsmadplastic Posted April 29, 2011 Posted April 29, 2011 I used 00-90 look to be the right size. A there's on beating in just building all in fun. :I may need you to build me a body. Thanx that would ge cool. what kind of body r u thinkin? Send me a message. rts to look the same. I make a patterns that i like then cut it out. I cut 4 pices of plastruct and tape together, then i use washable glue stick and glue the patterns to the plastruct. Then drill out 2 holes and put the nut and boltin to hold the parts not to mover, cut out and drill and sand.
Mooneyzs Posted April 29, 2011 Posted April 29, 2011 (edited) Derrick, this thing is looking so good. You have made some progress since the last time I saw it. Love all of the drawings that you are doing to get what you want. The scratch building is looking amazing. The chassis is fantastic as well as all of the parts for the rear end. The Jig looks great. I am going to have to do a Jig for my funny car. Looking forward to more updates on this build. Keep up the great work. I also wanted to ask what kit are you using for the rear brake calipers? any way to have you post pic of them? I am still trying to figure out what I am going to do for calipers for my 1/16th Funny Car. Thanks Edited April 29, 2011 by Mooneyzs
Danno Posted April 29, 2011 Posted April 29, 2011 Derrick, WoW!! Love the chassis plate/frame jig ... what a great concept! I'll be stealing those ideas, for certain! Thanks for showing us how it's really done! Watching ...
baddgass Posted April 29, 2011 Author Posted April 29, 2011 Your Camaro is outstanding , is the rearend housing your using scatch or from another kit? Can't wait to see it finished ,your talents are inspiring. Keep up the fantastic work. The rear end and some other parts came from a model call TIME BOMB i get from a brother in my club. Get a little more work in on the frame, but a long way to go!
djway3474 Posted April 30, 2011 Posted April 30, 2011 Thank you for sharing all the progress pictures. I have always wondered what went into a build like this and you are providing a great deal of information that can be applied to other projects. Keep up the great work. DJ
semijoe Posted April 30, 2011 Posted April 30, 2011 the engineering skills behind these builds are incredible seriously ,hats off
stump Posted May 1, 2011 Posted May 1, 2011 Um, if I had ten thumbs Derrick, (sometimes feel as though I do.... ) YOU would be getting ten thumbs up from this 'ol geezer.... The chassis is really taking shape mate, looking fantastic and clean. (ps; got a Time Bomb bookmarked on you'know'where...)
baddgass Posted May 2, 2011 Author Posted May 2, 2011 Thank you for sharing all the progress pictures. I have always wondered what went into a build like this and you are providing a great deal of information that can be applied to other projects. Keep up the great work. DJ I try to show my work and mistakes, it help me and may help someone else. the engineering skills behind these builds are incredible seriously ,hats off Thanks Bro. but no more then others.
baddgass Posted May 2, 2011 Author Posted May 2, 2011 Um, if I had ten thumbs Derrick, (sometimes feel as though I do.... ) YOU would be getting ten thumbs up from this 'ol geezer.... The chassis is really taking shape mate, looking fantastic and clean. (ps; got a Time Bomb bookmarked on you'know'where...) I know the feeling (all thumbs and so times toes ) But we keep building, Thank for looking in.
baddgass Posted May 2, 2011 Author Posted May 2, 2011 Well just about finish the frame. Have to work on the front sup. and front and rear sping, then clean up all the joints.
comp1839 Posted May 2, 2011 Posted May 2, 2011 this is really looking good derrick. the chassis has turned out sweet.
Mooneyzs Posted May 3, 2011 Posted May 3, 2011 Derrick... That chassis is amazing and looks great man. You have done one heck of a job. 2 thumbs up! what glue you using for your styrene? where did you get the jack stands those are cool
baddgass Posted May 3, 2011 Author Posted May 3, 2011 this is really looking good derrick. the chassis has turned out sweet. Thank you Dave Derrick... That chassis is amazing and looks great man. You have done one heck of a job. 2 thumbs up! what glue you using for your styrene? where did you get the jack stands those are cool The glue is E-Z BOND Medium and the jack stand are out of a MOTORWORKS NASCAR pit wagon kit.
tyrone Posted May 3, 2011 Posted May 3, 2011 you are knocking this one "out tha park".... the cage looks awesome, and the jack stands are cool....
stump Posted May 8, 2011 Posted May 8, 2011 Looking most excellent Derrick. :lol: Quick question, and please don't take this as criticism.. Things may be a little different over there, compared to our cars down here.... I was going to install batteries in my builds, and my nephew (crews for a local racer) told me that blown motor cars don't need batteries....?? Hence the portable starter that they use.... Maybe Comp can clarify that for us. Keep her coming mate, all this is being stored for when I finally start mine.
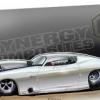
comp1839 Posted May 8, 2011 Posted May 8, 2011 (edited) i can only tell you what i know. if some one out there has an uncle bob and he owns something different, great. the blown pro mods that I AM aware of, do not self start. the rules don't require it and it's a ton of weight to penalize yourself with. they still carry a battery (although not a physically large one) to power all of the electronic gizmos and doo-flickers. i was taught a pic is worth a thousand words. here's my thousand words. will that help? EDIT: the car pictured is a ADRL PX car. i did some quick research and NHRA pro mods are required to be self starting. although they allow the use of remote battery packs for starting only. Edited May 8, 2011 by comp1839
baddgass Posted May 8, 2011 Author Posted May 8, 2011 (edited) Thanks Brother for the info. All to me is help fo. Edited May 8, 2011 by baddgass
baddgass Posted May 8, 2011 Author Posted May 8, 2011 Looking most excellent Derrick. B) Quick question, and please don't take this as criticism.. Things may be a little different over there, compared to our cars down here.... I was going to install batteries in my builds, and my nephew (crews for a local racer) told me that blown motor cars don't need batteries....?? Hence the portable starter that they use.... Maybe Comp can clarify that for us. Keep her coming mate, all this is being stored for when I finally start mine.
Recommended Posts
Create an account or sign in to comment
You need to be a member in order to leave a comment
Create an account
Sign up for a new account in our community. It's easy!
Register a new accountSign in
Already have an account? Sign in here.
Sign In Now