Dr. Cranky Posted September 4, 2011 Posted September 4, 2011 Interesting. You can have a multitude of options for doing panels . . .
Mark Crowel Posted September 4, 2011 Author Posted September 4, 2011 Thank you, Mike, for displaying the photo.
Bernard Kron Posted September 4, 2011 Posted September 4, 2011 Carboard modeling is always so fascinating since it offers so many options as to the approach the modeler takes. I'm really digging how your choice is to embrace the 2-dimensional character of the cardboard surfaces and focus on the colors and details of the subject. Wonderful work!
Guest Johnny Posted September 4, 2011 Posted September 4, 2011 I have always been amazed at the guys who have the patience to do these and the paper models! All I would end up is frustration and my fingers all taped up! Can't wait to see the finished model!
Mark Crowel Posted September 12, 2011 Author Posted September 12, 2011 Instead of using the corrugated slabs (above posts)for seat cushions, I made the cushions and seat backs as strip-and-panel boxes. If I had used the corrugated pieces, I would have had to paper the fluted edges, and I still would have had to clad them with cardboard strips and panels. The front seat is done, and is dry test-fitted into the interior. It seems to take as long to do an interior as it does to do an entire exterior.
Mark Crowel Posted September 12, 2011 Author Posted September 12, 2011 I hope I did the backside of the front seat correctly. I was working from photos downloaded from the internet, plus factory photos from a book.
Mark Crowel Posted September 25, 2011 Author Posted September 25, 2011 Dash, steering wheel, and rear seat. -------------------------------------------------------------------------------- I'm now convinced that I spend more time building the interior of a model car, than I spend building the body. In paper modeling, we have to make the parts first, before we can glue them in place. The steering wheel is a 1/16th inch wide strip of cardboard, covered in colored paper and coiled into a loop. Likewise the horn ring. Circular pieces (steering wheel center and dash guages) were made by a quarter inch punch and an eighth inch punch. The stalk for the pushbutton automatic transmission control box is made from layered 1/16th inch wide strips, covered in colored paper. These strips were shaped to form the sides of the little transmission control box. The face of the box is a sheet of silver coated cardboard; the backside is regular cardboard covered with colored paper. The unit is oversized, and on my model you wouldn't be able to open that glovebox door with that control box in the way. but there's no way I'm doing THAT job over! Attached Thumbnails
Mark Crowel Posted September 25, 2011 Author Posted September 25, 2011 I'm basing this interior on photos of the Caribbean convertible. I'm hoping that the seat brackets and seat features are the same for the hardtop. I discovered that I needed two more brackets for the front seat "hardware". I also realize that the padding on the back of the front seat is much too thick, but I just don't have the heart to tear it off and do it over.
Mark Crowel Posted September 25, 2011 Author Posted September 25, 2011 Hello Paul, As you come this way from AZ on your way to Dayton, OH, pass through South Bend, IN, and see the new Studebaker National Museum (they have a web site: http://studebakermuseum.org/ Both of these companies contributed much to this country's auto industry.
Chuck Most Posted September 26, 2011 Posted September 26, 2011 Very interesting project, Mark. Like how it is turning out.
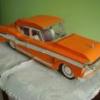
Mark Crowel Posted September 26, 2011 Author Posted September 26, 2011 Installed clear plastic (from transparency covers) for the windshield and rear window. I cut it in one piece, then glued in the cardboard headliner to hold the "bridge" of the plastic in place. Applied colored paper over the center body strip. For the hood scoop sculptures, I glued two cardboard strips to the hood prior to putting the colored paper down, and with a short ruler and a popsicle stick, worked the paper around the strips for a sculptured look.
Mark Crowel Posted October 3, 2011 Author Posted October 3, 2011 A side pontoon under construction. Edge to edge gluing of the cardboard.
Mark Crowel Posted October 3, 2011 Author Posted October 3, 2011 Chrome trim (silver coated cardboard) around the windows.
Mark Crowel Posted October 3, 2011 Author Posted October 3, 2011 The completed pontoon, with its color added (no chrome yet), dry test fitted to the center body section.
Recommended Posts
Create an account or sign in to comment
You need to be a member in order to leave a comment
Create an account
Sign up for a new account in our community. It's easy!
Register a new accountSign in
Already have an account? Sign in here.
Sign In Now