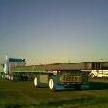
SpreadAxle Posted April 29, 2007 Posted April 29, 2007 the cab is just here for show, but I thought i would share today's progress before I went to bed. I had some interruptions, but I got some stuff done. The frame weathered with a light coat of dust. The engine is installed, and is under going its last few small details and lines. this is a good feeling, to see real progress on this truck. I still have another coat to go then I can start with the decals and installation. Enjoy. ...and another one.... and here's one more for you...
Old Albion Posted April 29, 2007 Posted April 29, 2007 Ray, This is starting to look very impressive. The Autocar looks quite a big truck, very robust and well made. Well suited to pulling the pair of dump trailers. Great Work!
SpreadAxle Posted April 29, 2007 Author Posted April 29, 2007 Thanks Dave. The part that is fighting me now is the exhaust pipe. It's not from the original kit. It was the Diamond Reo exhaust pipe modified to fit, as it is meant for the turbocharged version I went with. however, looking at it 10 years later, I know I can do a better pipe. One that actually fits properly. I'm working on it now, but I thought I would yake a breather for a moment to see if any new models showed up.
Old Albion Posted April 29, 2007 Posted April 29, 2007 Ray, Exhaust Pipes and Air Intake pipes from the kits never fit properly without some adjustments. I use as much of the pipe as possible. But to get the right bend angles so the pipes run in the right direction I first take a piece of round plastic tube the right diameter. Then I cut lots of little pieces all at varying angles. Once this is done I glue the different angled pieces together to make the desired bend. Finally when the glue has set I use some filler and then sand it so the bend looks smooth. Tedious but it works for me. Good Luck with the project. I like how its developing. By the way how is the KW?
SpreadAxle Posted April 29, 2007 Author Posted April 29, 2007 Well, it seems someone upstairs likes me Dave. I have probably the most honest mechanic I ever met working my engine. I'm here a few more days because of him, but he saved me nightmares. One of the intake valves on #2 piston, which was the piston where everything related to it was rebuilt in January, has beaten its way thru the vlave seat in the head. It was literally burrowing its way into the head. When My valve cam went out, that caused this. My warranty is being much more cooperative than last time. In fact, my cylinder head is at Cummins right now. I'm waiting for it to return, so that Scotty, the mechanic, can complete the job. He said it would've ran, but he knew it would'nt be long before I was in this situation again. The MHC Corp, which owns this dealership, will get a nice letter praising his efforts on my behalf. He takes pride in his work. I highly respect that. The other thing about this place, they only let certain people work on ISX powered trucks. I like that. You can tell this man knows what he is doing. Thanks for asking. 8) I will post more progress tonight. Before I forget, I like the exhaust pipe idea. I will try that on some future projects. I think I have a solution worked out for this one.
SpreadAxle Posted April 30, 2007 Author Posted April 30, 2007 Today's work centered around the exhaust pipe and some more engine details. I had to craft the exhaust pipe using sections from the Diamond Reo kit pipe, the A64B pipe, and the section under the cab is K and S metal tube. I just have to rust the pipe a little now. I also scratchbuilt a crude copy of the exhaust support bracket from the A64B kit. I have to do the same with the upper exhaust bracket that mounts to the cab. I have an A64B that I bought on ebay that was going to be just for parts because when it arrived, it had no cab. It did contain 2 complete sets of the chrome trees, and several other parts trees were in duplicate, including two additional complete engine trees. The guy felt bad, so he threw in a whole bunch of extras. Thankfully he did, because some of this truck's original chrome is missing. However, there were only one of some parts, like the frame parts, and I did find a cab, so there will be an A64B built of that kit. Anyway, I digress. Some minor engine details were added as well. As soon as the cab is done, I can really go after the engine compartment with some more lines, as well as the radiator braces and heater hoses. Almost there, almost there.
Casey429 Posted April 30, 2007 Posted April 30, 2007 I really like the exhaust and chassis weathering. The chassis is not overdone, it looks like the trucks we have at work. It's dirty, but nothing the pressure washer won't take care of.
Turbo590 Posted April 30, 2007 Posted April 30, 2007 Ray, Looking good so far. I "hate" the dreaded exhaust pipe(s) as well. Like Dave mentioned..they never go right...without some major engineering... Keep us posted with pictures...always like to see your progress. Kurt McLucas
SpreadAxle Posted May 1, 2007 Author Posted May 1, 2007 I did some minor body work so far today. the decal you see on the fuel tank is the center portion of the bumper decal. You can see where I cut it from the sheet. I have 3 of these sheets, so I thought I would add some extra graphics. The painjob is not complete. I forgot about Duplicolor automotive being a laquer, and you don't spray that over testors enamel primer. :oops: The hood top has cracks in the paint, but it's shiny. The sides have that textured, not shiny look. Silly me, huh. I have spare Autocar hoods, so I will try it again. I can't believe I did that. Oh well. I guess I got too excited and grabbed the wrong primer. :roll: The hood seems to be the only part giving me trouble on this paintjob. At least we can see what it will look like. When finished.
Jim B Posted May 1, 2007 Posted May 1, 2007 Looking good! Always liked Autocars for rugged stuff like dumpers, concrete & construction trucks.
SpreadAxle Posted May 2, 2007 Author Posted May 2, 2007 Thanks Jim. I've always loved the look of an Autocar.
SpreadAxle Posted May 2, 2007 Author Posted May 2, 2007 I've installed the fenders and the bumper. The radiator cap I added is a spare Autocar fuel tank cap. I'm excited to see that it's come this far. I'm happy with how it's turning out. I don't forsee mounting the cab and hood tonight. However, I can work on some more lines now. Although it may be a bit troublesome with the fenders in place, I won't have to worry about not being able to place them due to details that have been added. Thanks to all of you for all the encouragement. That, and the model itself has kept me going these last two weeks thru my ordeal with my KW. I should have the cylinder head back anytime now. Then I can go back to work.
SpreadAxle Posted May 2, 2007 Author Posted May 2, 2007 Due to the silly mistake I made when painting the cab, hood and fenders, I will be stripping and repainting the body parts. Even the parts that look ok might show cracking later, as I've been informed, so I'm redoing it. I will be going with a striping pattern that is the same color as the frame. It was one of the 2 ideas I had for a paintjob on this rebuild. I want to do it right, and at least I didn't go too far, but better safe than sorry. Thanks 4 the encouragement and kind words everyone.
Recommended Posts
Create an account or sign in to comment
You need to be a member in order to leave a comment
Create an account
Sign up for a new account in our community. It's easy!
Register a new accountSign in
Already have an account? Sign in here.
Sign In Now