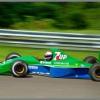
Harry_Palmer Posted March 12, 2012 Posted March 12, 2012 (edited) I recently bought my first model since I was a kid... an F1 car from one of the 1st seasons I, just about, remember watching - a Jordan 191 (one of the best looking F1 cars of the era ) Always been a huge F1 fan and this was the 1st car of my favourite driver, Schumacher, so it seemed an appropriate place to start... I've picked up some tools, paints, primer etc and looking forward to it but seems there's alot to learn! Before I start I've washed the sprues and let them dry, so before I remove any parts from them should I apply a coat of primer to the whole lot? I see folks talking about priming when they're painting the bodywork and exterior parts but is it advisable to coat the rest too before gluing/painting anything? Any other tips about how to approach the build would be appreciated as I'm basically starting from scratch here Edited March 12, 2012 by Harry_Palmer
Big Daddy Posted March 12, 2012 Posted March 12, 2012 I too have only been back in the hobby for a few months,, I think you will get a lot of different answers to this but myself i leave all the small parts on the sprue then prime and paint, then take them off the sprue to clean up the spots where it was attached then i just dab paint on the parts were it was attached, all the larger parts, body,hood,frame, seat pan and so on i prime those off the sprue
Harry_Palmer Posted March 12, 2012 Author Posted March 12, 2012 Thanks Daryl... I'll give that a whirl
Mike Kucaba Posted March 12, 2012 Posted March 12, 2012 I've never understood leaving parts on the sprues and painting. There's bound to be a mold line or some schmutz that needs to be massaged before any paint or primer. I can only think that the chrome tree would be the exception.
brad4321 Posted March 12, 2012 Posted March 12, 2012 That's one of the prettiest F1 cars ever. I built that cars years ago. It's an easy kit ... for F1. I remember the stripe on the front edge of the front wing is impossible to do with the decal given. For me anyway. It's easy though to mask it and paint it. I promise masking and painting is simpler than trying to get the decal to conform to the complex curve. Also, I painted the blue areas instead of using decals. As far as primer, I only prime body parts for the most parts. Most smaller pieces in the engine and suspension don't absolutely require primer in my opinion. If you don't prime the body parts though the black from underneath will ruin the look of the green on the outside. Have fun, good luck.
Big Daddy Posted March 12, 2012 Posted March 12, 2012 Thanks Daryl... I'll give that a whirl like i said every one here will have there on opinions and there own practices on doing this, this is my way, i've never had a problem doing it this way
kitbash1 Posted March 12, 2012 Posted March 12, 2012 I've never understood leaving parts on the sprues and painting. There's bound to be a mold line or some schmutz that needs to be massaged before any paint or primer. I can only think that the chrome tree would be the exception. The idea is to see any and all mould lines. This is why I prime parts on the sprues, so I can see them better. I would not paint parts on the sprues though.
Harry_Palmer Posted March 12, 2012 Author Posted March 12, 2012 Well. I guess there's more than one way to do everything... I think maybe I'll try priming the body/external parts on the sprues and then removing them and the interior parts to paint. Thanks for the advice on the decals Brad.... I'll try to post some updates as I go!
Big Daddy Posted March 13, 2012 Posted March 13, 2012 Trial and error, after a few builds you'll figure out which way best suits yourself i'm sure you'll do great
jeffs396 Posted March 13, 2012 Posted March 13, 2012 Welcome Ross!!! Big F1 fan here also! Are you ready for the first race this coming weekend?
Harry_Palmer Posted March 13, 2012 Author Posted March 13, 2012 Yeah, Jeff I'll be up at 5AM (GMT) to watch the race... been following testing and it looks like being a much closer year., fingers crossed Hopefully Mclaren or Mercedes can catch the Bulls (Ferrari look in a bit of trouble so far, but you never know!)
brad4321 Posted March 13, 2012 Posted March 13, 2012 I have to get up at 2am to watch this weekend. But I watch every race live regardless of what time it starts. Can't wait. But I hope the Bulls aren't so dominating this year. We were getting spoiled there with great WDC battles. Ready for another one this year.
Cato Posted March 13, 2012 Posted March 13, 2012 Any other tips about how to approach the build would be appreciated as I'm basically starting from scratch here If you're fussy about fit and finish I suggest you remove all parts from trees first. Leave the prime / paint until after a thorough manicure of parts and how they fit together. You get better panel fits that way and can easily remove mold lines and ejector marks. You can test assemble with white glue and easily 'un-glue' for finish and final assembly. After the first prime session, I like to reassemble to see if paint build-up has changed any fit issue. Always go as thin as you can -with coverage-on the paint applications. Too many guys rush to a perfect paint job only to have the finished product have hoods not close or panels rubbing on other panels and that detracts from realism. Welcome to the forum.
Harry_Palmer Posted March 14, 2012 Author Posted March 14, 2012 (edited) I tried painting a couple of the smaller engine parts tonight which went fine... I then applied some primer to part of the bodywork. Most of it looked fine but there are a couple of little lumpy bits and I'm not sure how to get them out, panicked a bit and tried to brush them out but that just made it worse, would a little light sanding work once it's dry? Edited March 14, 2012 by Harry_Palmer
Cato Posted March 14, 2012 Posted March 14, 2012 So you're apparently not interested in fit -only finish...
Harry_Palmer Posted March 14, 2012 Author Posted March 14, 2012 The two engine parts won't be affected in their fit with any other parts by the application of paint and I only primed one small piece of bodywork to test it out... This is my first build for years so I wasn't sure about removing all the parts before I start in case I got them mixed up, though I suppose that shouldn't be too much of an issue once I get started. I'll have a go at removing the parts and tidying up the edges tonight and see how they fit before painting any others. I did manage to get rid of the small bumps with an emery board...
Bill Eh? Posted March 14, 2012 Posted March 14, 2012 Ross, great to see you reentering the hobby. One other piece of advice which might help. I would have some decal softener on hand. Micro Set (milder) or Micro Sol (more aggresive). If this kit has decals made by Tamiya, then they have the flexability of a 3/4" thick sheet of plywood. You will need the softener to get decals to conform around curved surfaces. A beautiful car for sure. Have fun and enjoy the building journey!
Harry_Palmer Posted March 14, 2012 Author Posted March 14, 2012 (edited) Thanks Bill, I searched online for this model and it came up on the Oxfam website for £10 so I had to get it before someone else! I had looked on a few other sites in the UK but none stocked it, so was really pleased someone had donated it to charity, most importantly of all - unopened! The decals are made by Tamiya - I think there are alternative sets available but I was just going to use the ones provided this time. I'll have a look in my local model shop to get hold of some Micro Set/Sol when I get to that stage and I'll check on here to find out how to use it properly! Edited March 14, 2012 by Harry_Palmer
Bill Eh? Posted March 14, 2012 Posted March 14, 2012 Quote "came up on the Oxfam website for £10" and "most importantly of all - unopened! " Supporting a good charitable organization and getting a great score! Double plus situation.
deja-view Posted March 15, 2012 Posted March 15, 2012 (edited) I like to work with loose parts and pizza boxes. The exception is when the parts are black and need to be semi or flat black...not much contrast there. And, painting aluminum engine parts when they are already the kit "aluminum" color since they won't be external or polished. The pizza box is for pinning and holding parts while spraying. A 12 to 18 box is perfect because you can either reverse tape or "pin" parts to the top, then you have enough strength in the box to turn or hold it any way you need. I use a turntable (one of those excercise kind with the bearings on the inside so it can be turned any way) to rest the box on so I stand in one place and turn it to all sides. When I use a painting box/filter I can often put the smaller pizza box inside it (keeps parts off the bottom and sides). I'd never be without several Domino's boxes on my shelf. Edited March 15, 2012 by deja-view
Harry_Palmer Posted March 15, 2012 Author Posted March 15, 2012 (edited) I like to work with loose parts and pizza boxes. The exception is when the parts are black and need to be semi or flat black...not much contrast there. And, painting aluminum engine parts when they are already the kit "aluminum" color since they won't be external or polished. The pizza box is for pinning and holding parts while spraying. A 12 to 18 box is perfect because you can either reverse tape or "pin" parts to the top, then you have enough strength in the box to turn or hold it any way you need. I use a turntable (one of those excercise kind with the bearings on the inside so it can be turned any way) to rest the box on so I stand in one place and turn it to all sides. When I use a painting box/filter I can often put the smaller pizza box inside it (keeps parts off the bottom and sides). I'd never be without several Domino's boxes on my shelf. Well, that sorts out dinner for tomorrow! All the parts removed tonight and tidied up the edges ready to check the fit and see which of the holes should be filled prior to priming/painting etc... Oh and FP1 for the Australian GP in less than 24 hours... so looking forward to this season, Go Schumi! Edited March 15, 2012 by Harry_Palmer
Harry_Palmer Posted March 20, 2012 Author Posted March 20, 2012 Having a lot of fun with this now... I've put together the engine and rear suspension etc and I'm enjoying the process of seeing it come together slowly from a jumble of tiny plastic parts to look like the pictures I have of the car. I had to trim one of the parts to make it fit properly and painted the tops of the valves with the end of a pin last night! It's remarkable just how precise and downright fiddly some of the construction/painting can be but it's great when you see the end result...
Bill Eh? Posted March 20, 2012 Posted March 20, 2012 The painting call outs are quite remarkable. This is especially true when a single part can involve multiple paint colours to achieve the best authenticity.
Harry_Palmer Posted March 21, 2012 Author Posted March 21, 2012 (edited) The painting call outs are quite remarkable. This is especially true when a single part can involve multiple paint colours to achieve the best authenticity. Yeah, they look so dull and lifeless on the sprues then a few brushstrokes and bam you can almost smell the petrol (or that may be just the paint!) At first I wasn't sure if I'd enjoy the time consuming, fiddly parts but they're worth the effort! How about some pictures Harry Palmer? I'll get on that when I get home this evening - took a couple last night but didn't get round to posting them, started on the cockpit and got distracted! Edited March 21, 2012 by Harry_Palmer
Recommended Posts
Create an account or sign in to comment
You need to be a member in order to leave a comment
Create an account
Sign up for a new account in our community. It's easy!
Register a new accountSign in
Already have an account? Sign in here.
Sign In Now