aksarben Posted May 4, 2012 Posted May 4, 2012 (edited) Dug this out of the basement after sitting disassembled for years, collecting dust. Originally built in the mid 90s, had some notion that having all of the trim the body color was cool, I guess it was cool for the era, but not for a long time since. It took a dive many years ago and was busted up pretty good. I've wanted to redo it for some time but wanted modern wheels, and have not found anything until recently. This was the state of everything as I layed it out to plan the project Here is what I'm going for.. Thanks for looking in. Steve Edited May 7, 2012 by aksarben
aksarben Posted May 4, 2012 Author Posted May 4, 2012 (edited) I found a large toy at wally world that is pretty cheezy with all of the Dub sounds and ###### but thought that the wheels would be nice for this project. All four wheels and tires were the same size and I wanted bigs n littles so I cut the centers out of two of them, trimmed down the spokes, made some new smaller sleeves out of a thick vitamin pill bottle, glued the spokes to the new outer rims then cut away strips and sections of the rubber to get them to fit the smaller sleeves. All of the lug nuts were out of scale and tiny so I drilled them out and added new ones made from hex rod. After stripping all of the chrome, adding valve stems and painting them here are the results. Edited May 7, 2012 by aksarben
shucky Posted May 4, 2012 Posted May 4, 2012 Very nice. Wheels look awesome. Cant wait to see more progress.
aksarben Posted May 5, 2012 Author Posted May 5, 2012 Thanks guys. Here is some progress. Cutting out the rear section of the chassis to make room for the huge new tires.
aksarben Posted May 5, 2012 Author Posted May 5, 2012 Scratch building a new sub frame that will still fit the original gas tank. I'll be using the kit axle but making my own four link, thinking about having air bags for all of the suspension, not sure where I'll source the bags but sure I can come up with something. here is the new frame attached..
brodie_83 Posted May 6, 2012 Posted May 6, 2012 Wow...very interested in this! I saw your gallery and you do superb work!
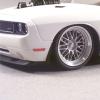
aksarben Posted May 7, 2012 Author Posted May 7, 2012 Thanks Brodie! I have the four link suspension started, just some blocks in place where the bags will go, just to get the ride height. Will add the bags and scratch build some shocks out of alluminum. Here is a "stance" mockup, this thing is too big for my photo booth..
pharr7226 Posted May 7, 2012 Posted May 7, 2012 I just spent over an hour looking at your gallery. You, Sir, are a very talented builder. I'm very impressed with your scratch building and the variety of your subjects. The heavy Chevy is just one example of your superb skills. Thanks for sharing.
brodie_83 Posted May 7, 2012 Posted May 7, 2012 Wow Steve, that stance is killer! Perfect height IMO.
Mooneyzs Posted May 18, 2012 Posted May 18, 2012 ah man this is just killer.... I really like the look you are going for. those wheels are a perfect fit!! Any Updates??
aksarben Posted May 19, 2012 Author Posted May 19, 2012 I do have a small update, thanks for your interest guys. I finished the lower arms for the four link, and also have the bags finished. Made from cut up ink pen parts.. Here is a test fit of the rear suspension.. And finally, I am far from being able to work on the interior but wanted to test my colors for it. So I painted the front seat flat black, then shot it with a light coat of clear gloss for the "semi-gloss" sheen, then brush painted the tan and red trim with craft acrylic colors.. Steve
brodie_83 Posted May 19, 2012 Posted May 19, 2012 Incredible! Do you have that steady of a hand that you brush painted that red on the seat, or did you mask it and then brush paint it? Either way, it looks fantastic! This will be a truly awesome car when you're finished! Speaking of that, I need to get back to my 1/12 Shelby GT500...it's been a week since I've touched it. LoL! Keep on keepin' on good buddy!
aksarben Posted May 22, 2012 Author Posted May 22, 2012 I just spent over an hour looking at your gallery. You, Sir, are a very talented builder. I'm very impressed with your scratch building and the variety of your subjects. The heavy Chevy is just one example of your superb skills. Thanks for sharing. Wow, thanks for the compliments Rick! Incredible! Do you have that steady of a hand that you brush painted that red on the seat, or did you mask it and then brush paint it? I did brush paint the red stripes free hand but had to go back with the tan and the black and touch up areas that got out of line. Steve
aksarben Posted May 22, 2012 Author Posted May 22, 2012 Another update, been working on the driveshaft. The one from the kit was long lost so I had to scratch one. Starting with some plastic tubing for the u-joints... The completed u-joints Finally the whole assembly with aluminum tube.. Steve
brodie_83 Posted May 23, 2012 Posted May 23, 2012 Wow Steve, you are really good at scratch-building stuff! Keep it comin'...it's looking great!
futurattraction Posted May 23, 2012 Posted May 23, 2012 Those u-joints are pretty impressive. They look really great! Keep up the great work...
Trucker_tim Posted May 23, 2012 Posted May 23, 2012 Do you have any pics of your air bags in progress or can you give a discription of how you made them. Thanks.
aksarben Posted May 24, 2012 Author Posted May 24, 2012 Thanks for the great feedback guys! Tim, I do have a couple of in progress photos but not of the entire process. I started with an inkpen that I chopped up and used the outer tubing from it, cut off the size of the bag... I mounted the piece on a grinding tip so I could sand and round off the upper and lower edges... then I cut a groove in the center of it with the back of an exacto blade... Finally, I don't have photos of this but I found another pen that fit inside the piece/bag I made, then cut a piece the right length, painted it silver. Then just painted the bag flat black. I also made a cap to go on top of the whole assembly. There you have it, old pens do have some use after all. Steve
aksarben Posted May 24, 2012 Author Posted May 24, 2012 And here is a close up of the completed bags... Steve
Trucker_tim Posted May 24, 2012 Posted May 24, 2012 Hey thanks I wanted to get some ideas on how to make them working on a project where I will be using them. Thanks for the ideas. How do you feel do you want the car to sit in the bags deflated or filled look. Tryin to figure mine out thought about trying to make some adjustable ones. Any Thoughts, your scratch building is pretty good to it still amazes me what we can do with a little plastic and glue. (null)
shucky Posted May 24, 2012 Posted May 24, 2012 Steve, keep up the great work. I'll be tuned in for more progress. Awesome job so far.
Recommended Posts
Create an account or sign in to comment
You need to be a member in order to leave a comment
Create an account
Sign up for a new account in our community. It's easy!
Register a new accountSign in
Already have an account? Sign in here.
Sign In Now