Nicolas Posted May 25, 2012 Share Posted May 25, 2012 i will keep an eye on this build! i really love where it is going to! Quote Link to comment Share on other sites More sharing options...
GrandpaMcGurk Posted May 25, 2012 Share Posted May 25, 2012 Beautiful build Steve, I was wondering how those wheels were going to work out for you....they look great on the Chevy. I'm almost done with the goofy DUB body you sent me, many thanks, it's working out perfectly for what I'm using it for. Quote Link to comment Share on other sites More sharing options...
aksarben Posted May 26, 2012 Author Share Posted May 26, 2012 Hey thanks I wanted to get some ideas on how to make them working on a project where I will be using them. Thanks for the ideas. How do you feel do you want the car to sit in the bags deflated or filled look. Tryin to figure mine out thought about trying to make some adjustable ones. Any Thoughts, your scratch building is pretty good to it still amazes me what we can do with a little plastic and glue. (null) I hadn't really given it much thought about whether or not these bags would be represented as filled or deflated. I guess since the car sits so low it would have to be deflated, or partially inflated. For making adjustable ones, maybe instead of the tall center piece running through the bag you could have an upper and a lower piece that slide independently through the bag so the ride hieght could be adjusted. Just the first thing that ran through my mind.. Steve Quote Link to comment Share on other sites More sharing options...
aksarben Posted May 26, 2012 Author Share Posted May 26, 2012 Beautiful build Steve, I was wondering how those wheels were going to work out for you....they look great on the Chevy. I'm almost done with the goofy DUB body you sent me, many thanks, it's working out perfectly for what I'm using it for. Hey thanks Don, this sure is a fun build so far. And thanks for the Dart, I'm looking forward to that project it looks like a great kit. I havn't seen a build thread on the "DUB" body, have you started one and I just missed it? I'm very curious to see what you are doing to it. Let me know or do we just have to wait and see what you whip up with it? Steve Quote Link to comment Share on other sites More sharing options...
aksarben Posted June 5, 2012 Author Share Posted June 5, 2012 An update, I have the chassis painted and the rear air lines in place, as well as the gas tank and fuel lines. The rear axle and four link peices are painted and ready for assembly, just wanted to get these lines out of the way first. Next I've started on the engine. I made a scratch built intake from sheet stryene.. here is the completed intake in place on the engine, which has been painted as well. Steve Quote Link to comment Share on other sites More sharing options...
Prostreet Posted June 5, 2012 Share Posted June 5, 2012 (edited) Very nice clean work, Your lines look great and that intake turned out sweet. Edited June 5, 2012 by Prostreet Quote Link to comment Share on other sites More sharing options...
brodie_83 Posted June 5, 2012 Share Posted June 5, 2012 Dang Steve...amazing work! Quote Link to comment Share on other sites More sharing options...
aksarben Posted June 26, 2012 Author Share Posted June 26, 2012 Thought I would post what I have done lately. Been working on the interior, I scratchbuilt these belts from craft ribbon and sheet plastic. The Sparco decals are homemade as well... Here is the dash complete. The stereo was scratch built many years ago when this model was first built, I just freshened it up a bit. The keys were cut from pop can aluminum. Pedals are .032 aluminum sheet, drilled and polished. The guage faces were drawn out in Photoshop and printed on glossy photo paper. The lens covers were cut from clear sheet plastic. The guage needles were fun, very thin wire painted and glued to stretched sprue.. One last shot, the gear shift from alumium tubing... Thanks for looking. Steve Quote Link to comment Share on other sites More sharing options...
futurattraction Posted June 26, 2012 Share Posted June 26, 2012 What ribbon, specifically, did you use for the belts? I was looking at various ribbon at Hobby Lobby the other day. Some look more convincing than others and am just curious. Your '57 looks absolutely fantastic so far. Your scratch-building skills are out of this world! Keep up the wonderful work! Quote Link to comment Share on other sites More sharing options...
aksarben Posted June 26, 2012 Author Share Posted June 26, 2012 What ribbon, specifically, did you use for the belts? Thanks Scott. This is what I used, found at Hobby Lobby. I had to cut it to the width I needed as it is around 3/8 " wide. I also had to glue it to some paper first to keep it from fraying as it did without the paper. It has just the right scale texture I think for this scale though and is pretty convincing. Steve Quote Link to comment Share on other sites More sharing options...
futurattraction Posted June 26, 2012 Share Posted June 26, 2012 (edited) Thanks Steve. Is the Paper Studio the brand of it? It looks very convincing! Amazing work... Just thought of a question. What is the product number, or SKU on your ribbon package? Edited June 26, 2012 by futurattraction Quote Link to comment Share on other sites More sharing options...
aksarben Posted June 27, 2012 Author Share Posted June 27, 2012 Scott, not sure if "the paper studio" is the brand name, on the back of the package is also "Crafts ETCI". So that may be it. The item number is #821462. The SKU # is 0972011052. Hope this helps. Steve Quote Link to comment Share on other sites More sharing options...
GrandpaMcGurk Posted June 27, 2012 Share Posted June 27, 2012 Hey thanks Don, this sure is a fun build so far. And thanks for the Dart, I'm looking forward to that project it looks like a great kit. I havn't seen a build thread on the "DUB" body, have you started one and I just missed it? I'm very curious to see what you are doing to it. Let me know or do we just have to wait and see what you whip up with it? Steve Steve, when I get the modified DUB body in primer I'll post some pics...it'll be called Wiley E. Coyotes Revenge. I love they way you've handled the interior on the '57.....sweet! Quote Link to comment Share on other sites More sharing options...
Galant409VR4 Posted July 1, 2012 Share Posted July 1, 2012 WoW Quote Link to comment Share on other sites More sharing options...
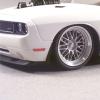
baddgass Posted July 3, 2012 Share Posted July 3, 2012 Thanks Brodie! I have the four link suspension started, just some blocks in place where the bags will go, just to get the ride height. Will add the bags and scratch build some shocks out of alluminum. Here is a "stance" mockup, this thing is too big for my photo booth.. "O" so cool! Quote Link to comment Share on other sites More sharing options...
aksarben Posted July 3, 2012 Author Share Posted July 3, 2012 Acouple of shots of the engine, scratch built elec. water pump, alternator, power steering pump, pulleys, brackets and intake manifold. Feedback welcome. Steve Quote Link to comment Share on other sites More sharing options...
hacked Posted July 3, 2012 Share Posted July 3, 2012 ''very nice'' Quote Link to comment Share on other sites More sharing options...
GrandpaMcGurk Posted July 4, 2012 Share Posted July 4, 2012 Beautiful.........don't forget the dip stick Steve . Quote Link to comment Share on other sites More sharing options...
aksarben Posted July 6, 2012 Author Share Posted July 6, 2012 Thanks Don, the dipstick is there, just a bad angle for it in those previous shots. I can't wait to see "Coyotes Revenge"! Steve Quote Link to comment Share on other sites More sharing options...
cobraman Posted July 6, 2012 Share Posted July 6, 2012 That bad boy is looking great ! Quote Link to comment Share on other sites More sharing options...
pbcanney Posted July 6, 2012 Share Posted July 6, 2012 killer build so far Quote Link to comment Share on other sites More sharing options...
futurattraction Posted July 6, 2012 Share Posted July 6, 2012 It's looking super, Steve! Excellent job on the water pump and injection... Quote Link to comment Share on other sites More sharing options...
Jim3 Posted July 6, 2012 Share Posted July 6, 2012 Lookin Awesome.. That engine looks sweet..... Quote Link to comment Share on other sites More sharing options...
GrandpaMcGurk Posted July 15, 2012 Share Posted July 15, 2012 Oh my yes, tidy little mouse motor you have goin' there Jim. The nuts for the power steering lines are cool beans. After all....the devil is in the detail, right? Quote Link to comment Share on other sites More sharing options...
Brudda Posted September 7, 2012 Share Posted September 7, 2012 This is total talent!!! All I can say is that this is really cool. Steve you seem to have some 1:1 automotive background,because everything is so perfect. I love this build !!! GREAT JOB, Cannot wait to see it done.Well done!!!! Quote Link to comment Share on other sites More sharing options...
Recommended Posts
Join the conversation
You can post now and register later. If you have an account, sign in now to post with your account.
Note: Your post will require moderator approval before it will be visible.