Agnaldo Posted May 6, 2012 Posted May 6, 2012 Sorry, I'm using Google translator. Good afternoon everyone. After a long time just to participate in the forum, commenting and always admiring the work here, but always wanting to get a kit, and with the minimum of time involved, my first post here in progress, and hope you enjoy. Anderiormente many years got a Mustang Shelby GT-350H, but the windshield broke early on and discouraged. Ai years were buying equipment and keeping everything so that one day I had time to start another. I then began a Supra in 2008, but since I left not really into the Japanese, like the muscles and classics. I chose the 1964 Ford Fairlane, because I think a very nice car, straight lines and elegant. My initial idea is to make it slightly lowered, with wheels of the Shelby Mustang that I have mentioned, and put some pictures to see what you want. Very low... I think that it is so low, is that the wheels are really small in diameter. Already got the cuts on the front suspension and rear, although some doubts can not take a great picture, because my camera was stolen at a time and took my mother, but she gives good definition pictures in close proximity. Hugs.
Agnaldo Posted May 6, 2012 Author Posted May 6, 2012 In this photo until the service started, but stopped because he was not aligned. The idea would be to cut the red line and make a wedge between the red and black lines, to raise the pin wheel and lowering springs. On this photo the idea is to cut the red lines and make a wedge between the black lines and then replace the pins in place. Sure, one side at a time to ensure alignment. What do you think is best? Is there another possibility than I thought? This is incorrect as I'm doing? I decided to do the rear recess, and according to some comment, follow the photos as I did, because I feel okay to post this piece, I learn that in addition to other newbies like me can use these forms. At the front, just changed the pin wheel place, putting further upward, right into the chassis. Do not know if I did right, but I adapted the idea of a Mercury 49 I had. So I increased in a pin to fit better on the wheel. What do you think? Cut back in the area indicated in red and blue, and there I put a shim to raise in 4 mm and then paste again. Redid the drive shaft tunnel, because the lower the cardan shaft was hitting him. He took some work to understand how I do it right, oh I did in three parts, and it worked for my first # assembly is good I think. He is now with the mass to level things and hide the seams. Also redid the chassis a little part that hides a range of interior and chassis. Here is the modified rear springs for lowering the car. In just put the front wheel axles higher. I also did a wash on the front grille and on the back too, but only photographed the front. Hugs.
Agnaldo Posted May 6, 2012 Author Posted May 6, 2012 Body painted red flash, unpolished and without varnish. I'll send varnish today. Notice that I removed the windbreak, so I thought was cool. Chassis in the body color. Part of the front suspension that is in the body (think balance) will paint in the color of the suspension parts. Parts of the front suspension and rear painted gun metal. Radiator in body color, but I'm hoping for dry Marcari and gun metal paint on the radiator. Motor blue. I know that is not the blue ford engine, but that's what I had here (miro blue). Here are photos of the engine, but I warn you, as the first model had problems, such as using long cables (it was ugly), a few smudges etal, something still lack of skill, but I promise more careful in the '53 Ford Victoria that I am starting. Wish I could have replaced some hoses braided cable that I have here, the problem was the connections that were not ta, lamb appropriate, but I bought some for the next. Another engine, as the mole who forgot to put the starter.
Agnaldo Posted May 6, 2012 Author Posted May 6, 2012 (edited) Chassis. I made a drybrush not know if you can see straight. I have yet to better the next. Radiator. I did a dry brush to make it look better. It was good?? Suspension with dry brush wear Suspension with some of the interior. I tried a chalk banks, but ended up fouling a lot. The panel was bad cavies, I'll enhance the next. Inside tried to do with carpet dust suede, but spun in the middle flakes need a sieve over thin, but I'm redoing Sunday and post new photos. Here the tips from a friend fixed his interior, despite some mistakes, was satisfactory for a first work of these. Photos of the interior before assembly to show how the crpete was corrected with the tips of the Master Daniel Moraes. The carpet was really groovy, but very gentle. I think it would be nice to have after one or two days a drying liquid sprayed unto glue diluted with water on top, to secure better. Is that works?? I'll try next. Edited May 6, 2012 by Agnaldo
Agnaldo Posted May 6, 2012 Author Posted May 6, 2012 And now he mounted. I tried dry-brushed in the front seat to make an aging, but I messed up ... remember seeing some banks as aging, but do not think the photos and do not even remember which wire model. Now photos of the chassis to see it mounted. Put a ferrule sleeve fishing in the exhaust outlet, but did not give a nice finished, there was even half good.
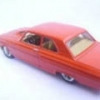
Agnaldo Posted May 6, 2012 Author Posted May 6, 2012 And here some pictures of him with the wheels. They are not glued, but only to see the time he got the ground very, very low, that I downloaded only 4 mm. Next I want to download 5 mm, taking the appropriate measures "to not drag the ground.
Agnaldo Posted May 6, 2012 Author Posted May 6, 2012 Personal finally finished. Actually done about 3 months ago, but with the lack of time I could not post, but now with a vacation of 15 days, I have this availability. I know that just by taking part here is that with the little time I end up participating more forums in Brazil, which do not have to be translating my words. I was very happy with this little mouse, despite some mistakes, he gave me a lot of work, but gave me much happiness in the building, gave me moments of anger, frustration, but mostly joy, what gives me motivation to continue. I want to thank all the strength that accompanied and encouraged me to continue and with the tips they gave me was very important. In construction: - Painting in royal red. - Loading screen in the hood vents. - Exchange of wheels by wheels Mustang Shelby GT-350 H Revell. - Lowering the suspension in 4 mm. - Sahara Beige interior. - Withdrawal of the column break wind. Enough talk, and follow the pictures of the car.
Agnaldo Posted May 6, 2012 Author Posted May 6, 2012 Here a mistake, I was a lousy place an ornament on the hood, and was not good, i pulled and pulled the paint, I have to agree. In addition to the upper side of the fender that my finger had removed the glue and paint, but nothing that makes me upset, because my first finalized and I think that was cool. Guys, comment, criticize, because it is very important for my growth. Sorry, I use the Google translator. Hugs.
Custom Mike Posted May 6, 2012 Posted May 6, 2012 Excellent work for a first time build, the paint is beautifully smooth, and you'll learn how not to make the mistakes you have on the hood and fender as you build more. Your attention to detail is outstanding, and the weathering on the chassis is excellent. The interior looks great, and the driver's seat being slightly forward of the passenger seat is a great touch! Once you learn how to do Bare Metal Foil, you'll be a force to be reckoned with, your skills are phenomenal for a beginner! A tip for you on the engine wiring, I always drill my holes in the engine all the way through, so I can push any excess wire into the cavity (hollow part) in the assembled engine, hiding the excess easily.
Raul_Perez Posted May 6, 2012 Posted May 6, 2012 Nice job lowering the car. The reworked stance looks pretty good! Keep building!!
pharr7226 Posted May 6, 2012 Posted May 6, 2012 Nice job lowering the ride height and weathering the chassis. The second attempt at flocking the interior looks much better and the paint looks very glossy and smooth. Did you use primer before spraying the color coats of paint? If not, you might consider using it in the future to help avoid paint lifting. There are a lot very talented builders on this forum who are very supportive and willing to answer any questions that you might have. Keep building.
Draggon Posted May 6, 2012 Posted May 6, 2012 So far so good! Anything as low as this rates way high on the cool scale!
Bartster Posted May 7, 2012 Posted May 7, 2012 l think you did a fine job. very nice detailing & color choices.
Agnaldo Posted May 7, 2012 Author Posted May 7, 2012 Mike, Thanks for visiting, glad you enjoyed the work I did. The color was really great, I liked the result, and now I have to take care of mistakes yes. The bank did not even realize he was ahead, I look at it. At that time it had the bare metal, but now I have, I'll see if concert the column of the window. I have not so much skill, is more insistence and perseverance and the will to see itfinished as I imagined. Thanks for the tip of the engine, I will consider it next. This alias is already finished,finalized, there's a look. Raul, Thanks, I also liked the resutado to lower the car, it was how I wanted it. He's alreadyfinished, go there. Darkside, Thanks for visiting my topic friend, I am glad that my work has pleased you. Pharr7226, Thank you for your consideration, I'm glad you enjoyed my work gave me this Fairlanehappy to build. The color was lisinha yes, I liked it a lot, but unfortunately made mistakes. As for primer,used but in all parts without exception, because I know that improves the adhesion of the paint. The guys here in Brazil is very good at it and already gave hints to the progress of the painting, but whenever I have questions I will use the forum but friends. Draggon, I agree friend, So far so good! , Was very low and very stylish. Glad you liked this resultalso. From a look at the ends. Bartster, Thank you for the compliments, are attitudes like these that encourage me to near. I wasalso pleased with the outcome. Visit and see how it was. Thanks to everyone who commented, I'm glad you enjoyed it. I already have two more in progress, and post here to enjoy and comment. Hugs to all.
Chuck Most Posted May 7, 2012 Posted May 7, 2012 Turned out very well- especially the stance. The weathering on the chassis also looks very realistic. I love seeing these built- the '64 Fairlane is one of my favorite cars.
Agnaldo Posted May 8, 2012 Author Posted May 8, 2012 Chuck, Thanks for stopping by and cheers buddy. How was my first kit, was better than I expected, I was very happy with the result. The Fairlane is a great car, undoubtedly, square and with fine lines. Hugs.
Recommended Posts
Create an account or sign in to comment
You need to be a member in order to leave a comment
Create an account
Sign up for a new account in our community. It's easy!
Register a new accountSign in
Already have an account? Sign in here.
Sign In Now