silo1483 Posted March 1, 2013 Posted March 1, 2013 Yeah I saw a few on there but I think I will just wait till they bring it back
gautreau Posted March 2, 2013 Author Posted March 2, 2013 Round 2 would be crazy not to reissue this kit.If they do I am going to by everyone that I find.
silo1483 Posted March 2, 2013 Posted March 2, 2013 You and me both I am really surprised they discontinued it since its a really popular in the truck scene right now
gautreau Posted March 2, 2013 Author Posted March 2, 2013 They discontinued this kit quite a few years ago.This was way before the squarebody become majorly popular.
gautreau Posted March 25, 2013 Author Posted March 25, 2013 Finally got to work on this build again. I got the interior floor and center console flocked. I also flocked the lower section of the doors. I foiled the taillight housings. Thanx for lookin' Jeremy
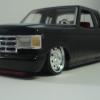
gautreau Posted March 31, 2013 Author Posted March 31, 2013 Few more progress pics. Thanx for lookin' Jeremy
knarf Posted March 31, 2013 Posted March 31, 2013 The dash is almost done.I just need to add the photo-reduced head unit. Toxic steering wheel. Thanx for lookin' Jeremy love this steering wheel! gotta put one of these in a build
knarf Posted March 31, 2013 Posted March 31, 2013 oh really? i honestly thought it was scratchbuilt as i was planning to do. thanks for the tip
gautreau Posted March 31, 2013 Author Posted March 31, 2013 Yeah Detail Master has some great photo-etched steering wheels.
gautreau Posted April 1, 2013 Author Posted April 1, 2013 Tried my first time polishing a build on Deadman. Not quite sure how I did.Looks really good to me. Let me know how I did. Thanx for lookin' Jeremy
Duntov Posted April 1, 2013 Posted April 1, 2013 (edited) Hi there: "I got the engine almost done.Just need to plumb the rad hoses.Has anyone plumbed this engine before?" I am in the middle of building this same truck as a mild custom.... Here is the link to current progress; http://www.modelcarsmag.com/forums/index.php?showtopic=72635 As for plumbing the engine I use Pony Bead Tube.... from the bead section at Hobby Lobby. It is .080 outside diameter and .040 inside diameter... I drill a .033 hole in the front of the intake and one in outlet at the bottom of the water pump....then ACC .033 brass pins in place... Slip the tube over the pins and cut to length... I also use the same pin set up on the radiator... once you have the tube cut to length you can use a dot of ACC on both ends to secure it. This is really good material for radiator hoses since it is so soft it really resists kinking even going around tight bends..... See the photo below.... not mounted in the frame yet but that is next... Hope this helps... Bill Edited April 1, 2013 by Duntov
gautreau Posted April 2, 2013 Author Posted April 2, 2013 Thanx Bill. I appreciate the tip very much.
JasonFL Posted April 2, 2013 Posted April 2, 2013 Real nice work on the truck Jeremy. I love all the details your putting into it, frame, skull switch box, the B.A.D steering wheel that looks identical to the real thing and the paint/polishing came out great. Keep it up, your almost there.
gautreau Posted April 3, 2013 Author Posted April 3, 2013 Thanx I appreciate that. I had a slight set back with the polishing of the bed of the truck. For some odd reason the paint started to lift while I was polishing it.So long story short it is in the pond.
gautreau Posted April 3, 2013 Author Posted April 3, 2013 Thanx I appreciate that. Yeah the paint issue is a complete mystery. But, it will not keep me from finishing this build.
JasonFL Posted April 4, 2013 Posted April 4, 2013 Thanx I appreciate that. I had a slight set back with the polishing of the bed of the truck. For some odd reason the paint started to lift while I was polishing it.So long story short it is in the pond. Ahh that sucks. Have you asked anyone on the forum what might have happened? I'm curious to know what it could of been. Maybe some grease/dirt or possibly could of been the weather you painted in? Could be a number of things.
gautreau Posted April 4, 2013 Author Posted April 4, 2013 No idea what went wrong.I think the paint might not have been 100% cured when I started to polish it. Small update the cab is all polished. Just waiting for the bed to finish up in the pond then its round 2 on the bed. Thanx for lookin' Jeremy
gautreau Posted April 12, 2013 Author Posted April 12, 2013 Took the bed out of the pond today. Luckily so far all I see that I have to repair is re-attaching a wheel tub. It should be back in primer tomorrow. Thanx for lookin' Jeremy
Recommended Posts
Create an account or sign in to comment
You need to be a member in order to leave a comment
Create an account
Sign up for a new account in our community. It's easy!
Register a new accountSign in
Already have an account? Sign in here.
Sign In Now