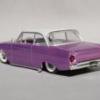
Steve H. Posted July 11, 2007 Posted July 11, 2007 Finally got some paint on it last night... then sanded most of it off! Thanks to James Warkenton for the inspiration, I've wanted to try this since seeing his bare metal junker at GSL. I covered the body with BMF and painted over that. after sanding it left me with a raw steel body effect. The interior tub was painted basic Testors flat red and dirtied up with some black weathering powder. I've removed about 1/4" from the parts box Duvall windshield frame to make it fit the cowl. The frame, wheels and running gear are from the Revell Modified racer and trailer kit. Added some KDog graphics to the trunk... it'll have a number on the door and maybe some subtle pinstriping. Thanks for looking... Comments always welcome.
Gray Smith Posted July 11, 2007 Posted July 11, 2007 Oh I like it! great finish with the bmf under black. Look forward to seeing more. Thanks Gray
Steve H. Posted July 11, 2007 Author Posted July 11, 2007 Steve that is way cool! I'm NOT going to ask how much BMF it took, or how frustrating it was to foil the entire body! :shock: It's looking great so far! 8) Its a pretty small body, so it didn't take much at all... maybe 6" x 4" worth of BMF. Its done in 5 peices... cowl, firewall, body sides and trunk. The hardest parts were the complex curves behind the bucket leading to the trunk and getting the cowl to body side cut cleanly. A bigger problem was having the edges curl up when I was sanding it. Next time I'll leave more wrapped around the edges. I lost a few small chunks of BMF, but just brush painted those areas and blended them back in during sanding. Its a pretty forgiving finish, so most of the goofs (wrinkles, tears, etc...) are hidden.
James W Posted July 12, 2007 Posted July 12, 2007 Nice Rod! You made my day! There are so many possibilities with weathering. I had not thought of painting over the BMF to that extent. It looks great. You must have trimmed the quarter panels at the top seams. BMF does not like complex curves. It has been so cool going to GSL, the exchange of ideas is fantastic, and meeting new people. I'm glad you liked the Pontiac. There are some pictures of it on the forum. Search under 'Spy Shots' last Feb.
Modelmartin Posted July 12, 2007 Posted July 12, 2007 That looks great. You definitely have your own style of building which is unique and the results are beautiful. You can do nice paint and bad paint! On purpose!
ratrodder Posted July 12, 2007 Posted July 12, 2007 really looking good. It's really going to be different.
Steve H. Posted July 12, 2007 Author Posted July 12, 2007 Hey Steve ,I was just wondering if this effect can be done by spraying the body with say some Rust-o-leum silver and let it gas out and then spray on the flat black and let it gas out and then sand.Seems it might take less time than using BMF,I like to have yours or anybody's opinion on this.What grit of sand paper did you use also,or steps you took when sanding.I like how it turned out,just thought I could save some time and not have to worry about the complex curves. The reason I decided to BMF the project was so I had a tough base to sand against. You have to sand pretty hard to cut thru BMF. A silver basecoat would probably sand away with the topcoat. An added bonus is that BMF, after sanding, really takes on a raw steel look. James, the body side is one peice, trimmed at the trunk/quarter seam. I was able to get the BMF to cover the complex curves, by carefully working the BMF up and over the rolled edges. Thats what model building is all about... learning from others and trying new stuff.
Matt T. Posted July 12, 2007 Posted July 12, 2007 I love the look of this one, Steve! The modified parts make a great foundation for a hot rod. Keep us posted. Glad to see you back at the bench!
Jairus Posted July 12, 2007 Posted July 12, 2007 I think you probably COULD use metalizer paints if you first waxed portions of the body prior to adding the final coat of paint. Then the use of a piece of masking tape is used to pull and flake off the paint in the areas that received the wax. This is just another effect you understand.....one of weathering rather than sanding. Could even add two coats of paint and wax inbetween them for a REALLY different look....
Recommended Posts
Create an account or sign in to comment
You need to be a member in order to leave a comment
Create an account
Sign up for a new account in our community. It's easy!
Register a new accountSign in
Already have an account? Sign in here.
Sign In Now