Blackwolf Posted April 25, 2013 Posted April 25, 2013 Totally awesome I see that I have a lot to learn on the about the scratch building and so on.
ewaskew Posted April 25, 2013 Posted April 25, 2013 Totally awesome I see that I have a lot to learn on the about the scratch building and so on. Its not to bad at all once you start. Here's a big money saving tip. Buy some poster board for patterns,that way if it want fit,you'll know and not lose a lot until you get it right. And there's a lot of scratch builder's on here myself included that will give you tips anytime so feel free to ask. I've been looking in on this build and its looking very cool.
Kenny B Posted April 27, 2013 Author Posted April 27, 2013 (edited) On 25/04/2013 at 3:47 PM, ewaskew said: Its not to bad at all once you start. Here's a big money saving tip. Buy some poster board for patterns,that way if it want fit,you'll know and not lose a lot until you get it right. And there's a lot of scratch builder's on here myself included that will give you tips anytime so feel free to ask. I've been looking in on this build and its looking very cool. Thanks for the ideas Earl. Thin cardboard works as well or you will be spending alot of money on sheets of plastic. I remember my first scratch build back a few many many years ago. I took an International and used the Mack Convoy truck and some plastic from a window blind to build my first place winner at the age of 16. After all these years I managed to still hang on to one of the first trucks that I built as a kid. Buy the time that I started to get into doing another scratch build I was getting alot better. I then chopped up a 1/16 scale KW and first time with a cheep airbrush, built in the mid eighties. So my big Pete is only my third big scratch build that I have done.I am learning as I go along with the help from reading other forums. Nothing is impossible take your time and make sure that your body work is really smooth or the final result will look like a hack job. Thanks for all your comments and any helpful advise is also welcome. Thanks, Kenny B Edited February 4, 2018 by Kenny B
Rob McKee Posted May 28, 2013 Posted May 28, 2013 Your truck is coming along very nicely Kenny. Looking forward to seeing more.
superfan76 Posted October 27, 2013 Posted October 27, 2013 hi ken that is one awesome job your doing there bud, if you don't mind i copy all your pictures from here and saved them for future refference im planning on building a 1/16 scale supermodified show hauler, i have a question, what size plastic did you use 040, 060, or 080 thicknes? if you can just email me at (normsracingart@yahoo.com thanks kenny......stormin norman
olsbooks Posted October 28, 2013 Posted October 28, 2013 Absolutely insane! I think you are very modest. Heck, if I can come out as good as some of prior works, I will be elated!
Bennyg Posted October 28, 2013 Posted October 28, 2013 Good work on the international and 1/16 kenworth. I learn something on every build as well. The peterbilt is shaping up well. Ben
Kenny B Posted October 31, 2013 Author Posted October 31, 2013 hi ken that is one awesome job your doing there bud, if you don't mind i copy all your pictures from here and saved them for future refference im planning on building a 1/16 scale supermodified show hauler, i have a question, what size plastic did you use 040, 060, or 080 thicknes? if you can just email me at (normsracingart@yahoo.com thanks kenny......stormin norman Norman, sorry for the slow reply. I think ideal thickness is .050 if you can find it. My hobby shop seems to be out of stock on it. Kenny B.
Kenny B Posted October 31, 2013 Author Posted October 31, 2013 (edited) Thanks for the comments. I'm getting real close on ordering the rivets, I figure I will have about 1500 holes to drill. I need to measure the size of the rivets on a 1:1 Pete just to make sure that they are the right size. Anyone out there drive a Pete 379 let me know if you could tell me what the OD head size is in MM. Also is the head size rivets on the sleeper and cab the same size? Thanks everyone. Kenny B. Edited October 31, 2013 by Kenny B
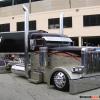
Kenny B Posted January 25, 2014 Author Posted January 25, 2014 (edited) A few more updates. I wasn't happy with the hood the sides needed to be dropped down to match the bottom of the fenders. I wasn't happy with the lower sides when I extended the hood and didn't like the notch that Peterbilt puts in the bottom of the 379 hood so it will clear the cab when you open and close the hood. I decided to redo the sides to look better. Because I dropped the sides down the 379 style wasn't working for me so went with the new 389 hood look. I added new door trim and added corners to the sleeper. What a pain to work with 0.13 mm sheet of plastic. You use a little to much glue you will melt through it and have to redo it as I learned quickly. I ended up ordering the rivets on line and they just showed up the other day all 1600 of them. I'm not a rivet counter but I guess on this one you can call me one. The fun now begins now what have I got myself into. 1600 holes to drill out. Will post more as they come along. Kenny B. Edited February 4, 2018 by Kenny B
Old Buckaroo Posted January 25, 2014 Posted January 25, 2014 1600 holes to go 1599 holes to go Kenny this is the most amazing rebuild.. I had always thought there was a 1/16 Pete. A friend of mine dropped a whopping $80.00 for one back in '81.. But you rarely see this kit. This is some Top Notch work I eagerly look forward to seeing updates on. That KW you painted with the airbrush has to be the Sharpest looking and realist model I have ever laid eyes on. Different background and I would swear it was off the pages of Owner Operator.
Newbs99 Posted January 25, 2014 Posted January 25, 2014 I can't even control my excitement. It is outstanding....so much custom work... -Newbs99
kilrathy10 Posted January 25, 2014 Posted January 25, 2014 (edited) This is one awesome, if not time consuming, project....Excellent work, Man.....I do not have the patience for all that....Amazing.....I guess that's what separates us regular guys and guys like you ....Beautiful..... And where did you get that pin vice.... Edited January 25, 2014 by kilrathy10
Kenny B Posted January 25, 2014 Author Posted January 25, 2014 This is one awesome, if not time consuming, project....Excellent work, Man.....I do not have the patience for all that....Amazing.....I guess that's what separates us regular guys and guys like you ....Beautiful..... And where did you get that pin vice.... JT. I'm not the quickest builder out there I like to take my time and do it right. The pin vice was bought at my local hobby shop you can get it on line as well. It sure comes in handy. Ken.
redneckrodder Posted January 25, 2014 Posted January 25, 2014 testors has one at hobby lobby for around $ 15.00
Custom Hearse Posted January 27, 2014 Posted January 27, 2014 This is turning out wicked cool!!! That's the nice thing about models... You can customize them any way you want! Looking forward to seeing more of this build.
Tony-442 Posted January 27, 2014 Posted January 27, 2014 This is so cool... Have you decided on a color? Lots of time to think about color while drilling 1600 holes... Wow!
williamchevelleman1972 Posted January 27, 2014 Posted January 27, 2014 I cant wait to see how the rivets turn out. this is a very interesting build and very very amazing. all the custom work youve done is outstanding. Keep up the amazing work and I cant wait to see the finished project. Also have you decided a paint scheme for it yet?
Kenny B Posted January 31, 2014 Author Posted January 31, 2014 Thanks everyone for all the wonderful coments. Everyone want's to know what colours? Silverish gray and dark plumish candy burgendy with black arcs across (if those are real colours). Look at my members photo.That's what i'm thinkin. Kenny B
Kenny B Posted February 2, 2014 Author Posted February 2, 2014 Okay WoW, I've started putting the rivets in. It has taken me 2hrs and 45 min. to drill out and install (are you ready for this) 35 of them. I have mesured like 10 times to make sure my lines are straight. It doesn't help that they are so small that I can't see them. I guess about in 6 months I should be finished puttng them in. Kenny B
Recommended Posts
Create an account or sign in to comment
You need to be a member in order to leave a comment
Create an account
Sign up for a new account in our community. It's easy!
Register a new accountSign in
Already have an account? Sign in here.
Sign In Now