Red rocket 10 Posted April 1, 2013 Posted April 1, 2013 (edited) Tyrone I'm glad the surery went well , I wish you a speedy recovery ,the car is looking great . Leonard Leonard Edited April 1, 2013 by Red rocket 10
Mister Twister Posted April 1, 2013 Posted April 1, 2013 Engine work looks great as usual T....Good stuff!
vintagedragfan Posted April 1, 2013 Posted April 1, 2013 beautiful work as all ways man! glad you can still build while you recover from the knee surgery, good luck with that bro!!
Prostreet Posted April 2, 2013 Posted April 2, 2013 Nice work Tyrone, Love the Carb's, Glad to here the surgery went well, make sure you do the therapy. I had an ACL done and therapy was the key.
GoatGuy Posted April 2, 2013 Posted April 2, 2013 Detail looks great Mr. Price. Will you be bringing it up to NJ for the NNL ? Glad you're healing up.
pharr7226 Posted April 4, 2013 Posted April 4, 2013 The plumbing is crisp and clean... maybe your best yet. Awesome work T.
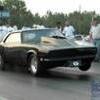
tyrone Posted April 4, 2013 Author Posted April 4, 2013 (edited) Thanks alot fellas for the nice comments fellas... I really appreciate it.. Well I had a physical therapy appt. this morning and that was alot of fun...lol... They said everything is going good, and I was very happy to hear that... Since I still havent been cleared to go back to work I spent a good part of the day at the bench.. I got the electronics made up and installed, and installed the chute cables. I also added a remote oil filter housing to the engine, it's a resin piece from off the ross gibson engines, I added an oil filter and some plumbing also.. still have a few more hoses to make up...I also added the nitrous lines from the nos solenoids to the firewall.. I also decided to go with the BIG slicks from pegasus.. I've decaled the slicks and added some detail to the rear wheels... I strecthced the rear wheel wells and little and added a piece of styrene to the lower rocker panels to try and keep that low stance... here's a few progress pics... thanks for looking and comments welcome... Edited April 4, 2013 by tyrone
nhra1625 Posted April 4, 2013 Posted April 4, 2013 Is there any way you could shave some of the circumference off the rear slicks to make them look a tad bit more accurate? Right now they look like they are a hair too tall and throw off the front wheels with the size. That's just my thought though. Looks great everywhere else! Keep it up! Pete
John Teresi Posted April 4, 2013 Posted April 4, 2013 Tyrone.......love watching you build.........great stuff.
tyrone Posted April 8, 2013 Author Posted April 8, 2013 Thanks John and Bill I apppreciate you guys checking in on it.... I get a lot of motivation and encouragement from all of you guys and I really appreciate it... Well I've been making some progress on this one... I made a fire tank, by one of the tanks from the Chi-Town hustler kit.. it took a lot of grinding with the dremel tool and some sanding but I got it to work... I've also got the fuel cell painted I still need to plumb it and mount the fuel pump.. I've got the seat painted and covered, I still need to do the harness. I got the coil and wire installed, and I played around with the headers with some more shades of alclad to get a little closer to the ref pics.. the I sharpened the tip of a toothpick and painted on the weld beads... I decided to cut the front end off after all my plan is to now glue the hood on and make it a one piece... thanks for looking and comments are welcome...
John Teresi Posted April 8, 2013 Posted April 8, 2013 Tyrone.......man,those headers look GREAT!!!.......dang the whole build looks GREAT!!!!!.......can`t wait for the next up-date.
tyrone Posted April 8, 2013 Author Posted April 8, 2013 I really need some help guys... IF there is anyone that can make a few decals for me......OR knows someone that can make them I would certainly appreciate it... here's a pic of the ones I would need.. If trades or cash is needed it's no problem... Thanks in advance... here's a pic of the ones needed.....
GoatGuy Posted April 8, 2013 Posted April 8, 2013 Tyrone - excellent job and I really like the color scheme.
vintagedragfan Posted April 8, 2013 Posted April 8, 2013 great choice on the colors Tyrone! that will be killer like the rest of this build!
gasser59 Posted April 8, 2013 Posted April 8, 2013 That color scheme will be off the hook. I may be able to help you out with drawing up the decals but I'll need to find better reference. Let me see what I can do. Some one on here surely has an ALPS printer. Anyone?
tyrone Posted April 8, 2013 Author Posted April 8, 2013 (edited) Thanks Dave... I've always liked this paint scheme the best of the two... glad you like it.. Bill.... thanks bro.. I appreciate you checking in on it.. Brad... thanks alot man for your help... I remember you and Dave (comp1839) coming to the rescue on the El General pro mod build also.. thanks again....if there's anything I can do for you just yell..... Edited April 8, 2013 by tyrone
Mooneyzs Posted April 8, 2013 Posted April 8, 2013 Tyrone... this build is killer and I love that paint scheme you are gonna do. I cant wait to see paint on this now. Keep up the great work.
tyrone Posted April 10, 2013 Author Posted April 10, 2013 Thanks Chris.. I appreciate it bro... Alright they say all good things come to an end.. and unfortunately my time off from work has come to an end.. it's back to work tomorrow..smh... well on the 55 I got the the transmission and the shifter detailed and put in the car.. I also made some brackets, and added dzus fasteners to them below the headers to for the front end, I also added some to the trunk area and to the cowl area for the front end.. I got the battery and cables installed, and I added the anchor for the rear chutes.... the front end is also a one piece now.. thanks for looking and comments welcome...
John Teresi Posted April 10, 2013 Posted April 10, 2013 Tyrone......looks FANTASTIC!!!!........it might be a good thing to go back to work.........so when you do get back to your build it will be more exciting.
Red rocket 10 Posted April 10, 2013 Posted April 10, 2013 Tyrone what a beautiful build , simply out of sight . Leonard
Recommended Posts
Create an account or sign in to comment
You need to be a member in order to leave a comment
Create an account
Sign up for a new account in our community. It's easy!
Register a new accountSign in
Already have an account? Sign in here.
Sign In Now