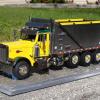
Turbo590 Posted September 13, 2007 Posted September 13, 2007 9-12-07 Guy's... It's been awhile for any updates on this build...Due to some "major" set backs, and work. The truck is on track for completion sometime soon. Lots of fine details to do yet. Here is a "tad" mockup...of a rolling chassis. Tons of modified and scratch built components were done. Chassis is gloss black, Alclad II (chrome/polished aluminum) used. Actual Peterbilt colors used for the cab and hood assembly..Mocha Effect and Coral Effect (Dupont ChromaBase paint...nice, but expensive for a pint) She's starting to take shape...fighting me all of the way....More pictures to come. All comments and feedback are welcomed. Thanks...Happy building to all. Kurt McLucas
docf225 Posted September 13, 2007 Posted September 13, 2007 "She's starting to take shape...fighting me all of the way...." Looks great! Besides, if it was easy, anybody could do it...
Jim B Posted September 13, 2007 Posted September 13, 2007 That big Cat under the hood looks fantastic! How did you make the Cat decals for the filters & other labels?
Turbo590 Posted September 13, 2007 Author Posted September 13, 2007 The decals were taken using my digital camera, from "real" CAT engines. Then using HP Photo and Imaging software (cropping and editing) then cut/paste into MS Word..and then printed to my HP OfficeJet 6110 printer using the Bare Metal Foil, decal paper..which is excellent to use... If you have any more questions (anyone) please feel free to ask. Thanks... Kurt McLucas
rottin1 Posted September 13, 2007 Posted September 13, 2007 Sharp looking frame and motor!! I love that color you decided to go with. Looks really nice so far! Keep up the nice work.EXCELLENT!!!
crispy Posted September 13, 2007 Posted September 13, 2007 Kurt, the work is absolutely beautiful! It may be fighting you the whole way but you really seem to have it all under control. Very realistic. What kit(s) are you using? Great work. I look forward to the completed truck! Chris
Jim B Posted September 13, 2007 Posted September 13, 2007 Kurt, Thanks for the info. Might have to give it a try one of these days.
ultraliner13 Posted September 13, 2007 Posted September 13, 2007 A Great project and I will be watching with intrest. Can you tell me please what undercoats you use on plastic as I have had some close calls with paint attacking plastics. I have always used undercoats but sometimes the topcoats has gone right through the undercoat and into the plastic. Cheers John Wilson
Turbo590 Posted September 13, 2007 Author Posted September 13, 2007 (edited) OK, Here is the real "scoop" on this piece..... I started out using the REVELL Peterbilt CAN-DO wrecker, used the cab and chassis, and sold the wrecker on Ebay..orginally going after a 379 model...THEN...I obtained a rare Italeri Pete 378 conventional, which is what I really wanted to shoot for..hood wise..on the weekends I drive a 357...I then decided to marry the front section of (Italeri) frame to the rear REVELL frame..remember 1/24 to 1/25 scale..it turned out excellent...thus the first set of pictures..THEN came the paint "disaster". Using Duplicolor primer as the base..I started shooting the frame with the Alclad II Base Gloss Black..ran out..finished it up with the Tamiya TS-14 gloss black..IT literally started eating the plastic...I was not happy at the point..my stomach just sank... By this time, I had the REVELL wrecker/chassis involved, 1 Pete 378 kit, and 2-Autocar Dump trucks involved. I just used the floors out of the kit..rest was sold on Ebay. Getting very expensive now...WRONG it keeps mounting...the story continues... The chassis was gone!! So I was able to obtain another Italeri 378 from Ebay oversea's..got it, started all over again..salvaged some parts from the orginal disaster..all of my Clint Freeman "resin" parts..(Lift axle)..and rebuilt it all over once again..I made some major improvements in added details. Alot more scratch building, and cutting the new Pete 378 frame and splicing in another 1 1/2" section for the desired length. Reprimered the unit with Duplicolor gray primer again..no problems..then using the universal black (Duplicolor) applied the first coat thin..let dry..and then the second /third coat..it started to BUBBLE... OH NO..here we go again..what the heck is going on...I had prime painting conditions (vented basement) with humidifier... Needless to say..I did not look good at all. I was heartbroken. Now how to get the paint off...reading the forum..I decided to use a closed container with brake fluid. After a few days...paint was gone..primer was exposed...but tons on fine sanding had to be done..I swore up and down... Reprimered it the 3rd time...this was it...the paint either takes..or its going on Ebay....Using the TS-14 once again..controlling the paint environment..it took...FINALLY!! I am only 38 years old...my hands are getting more gittery..my eye-sight isn't what is used to be...and my patience on this one..along with the rocketing costs...knocked me out for awhile. With all of this going on.. this is why I haven't posted in such a long time. Trying to get the details as best as I can..is what makes it. Lots of site visits to dealer lots (Peterbilt/Ti-Brook) and various other resources..all adds up. OF course the "wife" isn't/wasn't too thrilled as well... By the way..Word for the wise..I forgot to mention while soaking in the brake fluid bath..all of my specially acquired "Ebay" Clint Freeman resin parts turned to "######"..yet another major blow. The new lift axle was total scratch built..I'll post some pictures as well, along with the scratch built telescopic hoist.... Sorry to rumble on....Good story, many of you have asked....As Gene Simmons would say..It's good to be me...right..not even close. Thank you to everyone, including Tim...for the great comments...Model on!! Kurt McLucas Edited September 13, 2007 by Turbo590
ultraliner13 Posted September 15, 2007 Posted September 15, 2007 You shore went through hell on this build. I have had major paint battles but I have not as yet melted plastic in the way it happened to you. I used the red alert method and wiped the paint off with strong turps before the paint dried. Managed to just save the body before a melt down In my cases I put as many quick coats including the primer I needed and crossed my fingers. Some of my paint cans said recoat in 2 hours or leave up to 3 days for a recoat. I think I will use my airbrush a lot more and hope to have less panic situations pop up. Cheers John Wilson
kwtrucker Posted September 16, 2007 Posted September 16, 2007 Kurt, Your Pete looks EXCELLENT! Looking forward to seeing it when it's finished.
oilman Posted September 20, 2007 Posted September 20, 2007 (edited) What colors did you use for the CAT yellow? Did you mix or out of the can? I would say that is a perfect match to the new generation CAT colors. Glenn Edited September 20, 2007 by oilman
Turbo590 Posted September 20, 2007 Author Posted September 20, 2007 Oilman, The "CAT" engine color(s), were straight out of a genuine spray can, purchased from a local CAT dealer. For any interested party...I do have almost the entire "CAT" can, along with a 3rd party can, yellow..I would be willing to sell for a reasonable cost..plus S/H.
Recommended Posts
Create an account or sign in to comment
You need to be a member in order to leave a comment
Create an account
Sign up for a new account in our community. It's easy!
Register a new accountSign in
Already have an account? Sign in here.
Sign In Now