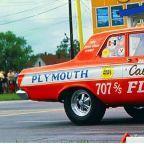
gtx6970 Posted March 12, 2013 Posted March 12, 2013 I usually don't worry about or take many in process photos. But with the camera near by while at the bench this morning I snapped off a picture on this one. This is another one of those I started long ago,,, like maybe just over 10 years...time flys. A Good Stuff resin body on a Johan Challenger funnycar chassis and interior tins. Body and chassis both were painted Testors candy apple red over a gold base coat. I plan to do some basic engine wiring and some fuel system hoses/lines but thats about the extent of it . It's sat quitely in the case far to long waiting to get done.And its time has come.
Custom Hearse Posted March 12, 2013 Posted March 12, 2013 Looks great! I have a few that need to be finished, I just can't seem to find the time with all the other projects I started...
vintagedragfan Posted March 12, 2013 Posted March 12, 2013 finish that thing Bill !!! looks great and you are so close
gtx6970 Posted March 13, 2013 Author Posted March 13, 2013 (edited) I tinkered with it a bit this evening. Drilled the blower scoop for fuel injector lines and made a distribution block for the back of the scoop (that was fun) And made lines and fittings for the fuel tank. Found some pictures on Big Johns website of the original car. And the rollcage is shaped completely different ,,,, but it's to late now to change it. Close enough for hand grenades I always say. http://bigjohnmazmanian.com/ Edited March 13, 2013 by gtx6970
vintagedragfan Posted March 13, 2013 Posted March 13, 2013 feels good huh Bill? little here little there before you know it, it's complete, stay after it man!
dragcarz Posted March 13, 2013 Posted March 13, 2013 That so needs finishing, Your so close and it looks great!!!
John Teresi Posted March 13, 2013 Posted March 13, 2013 Bill......you gotta get this one going.........you don`t see many Big John Cudas..........looks great so far........keep at it ......glad your taking progress pictures too.
gtx6970 Posted March 13, 2013 Author Posted March 13, 2013 (edited) Ok, I'll take some pictures along the way on this one. Managed to get a fuel block made and attached to the back of the scoop , and started running fuel lines for the tank. Not 100% happy with my selection of using crafting beads for the fittings, but I think once it's all together it'll look,,, ok. Now I just need to figure out how to make a barrel valve for the side of the scoop next. Thanks for all the kind words as well. Edited March 13, 2013 by gtx6970
gtx6970 Posted March 15, 2013 Author Posted March 15, 2013 (edited) Ok, I did manage to get a little time at the bench over the past few days. Got the blower scoop injector all plumbed ( not sure I'll do that again ) And have the blower and all the fuel lines in and started running ignition wiring. I remembered why I did more box stock builds while doing this, I just can't see the tiny holes to run this stuff like I used to . Lines and fittings are all from Micheals craft dept. So it's not 100% accurate but good enough for me. Also repainted the wheel centers in a flat silver to more accurately resemble the real car back then. Getting the interior tin to sit down over the chassis is giving me some fit issues, and I want the ft of the body sitting down lower over the ft tires . So I have to work on that next. ( sorry about the crappy pictures, looks like I need to clean my camera lens) Comments good and bad always welcome. Edited March 15, 2013 by gtx6970
Recommended Posts
Create an account or sign in to comment
You need to be a member in order to leave a comment
Create an account
Sign up for a new account in our community. It's easy!
Register a new accountSign in
Already have an account? Sign in here.
Sign In Now