BMX Addicts Posted May 3, 2013 Author Posted May 3, 2013 Yes Sir!!!... I wish I would've known that sooner, the lines could have been drawn complete Thanks a million for the tip
Shelby 427 1965 Posted May 3, 2013 Posted May 3, 2013 Another handy tip (which I use for most if not all details) is a sharpened toothpick, dipped into the very tip of the paint in the lid of Tamiya acrylic paints, you'll struggle to beat it for precision!
BMX Addicts Posted May 3, 2013 Author Posted May 3, 2013 Yes, as a matter of fact I saw a local using the toothpick to detail the wheels... you learn something every day. Thanks
jrherald420 Posted May 3, 2013 Posted May 3, 2013 (edited) Yup sharpies work well. Another marker i use is Prismacolor markers. They are high dollar art markers with a small tip on one end and a flat chisel tip on the other end. They are $$$ but using a 40% off coupon from Michaels or Hobby Lobby makes them affordable and they last along time if you keep the lids on them and they come in a ton of colors that other markers do not. I also use the tooth pick trick when i need to use paint. It works great also. Edited May 3, 2013 by jrherald420
BMX Addicts Posted May 3, 2013 Author Posted May 3, 2013 (edited) Ah yes, I know PrismaColor... They were our favorite gift when we were little, our parents used to give us a thing called the Master Box with pretty much every single color known to man (These were coloring pencils though)... they are extremely cheap in South America (On the check list for the next trip). Will go to Office Max and get some markers today... Those used are my son's and the tip is round in most of them. Edited May 3, 2013 by BMX Addicts
jrherald420 Posted May 3, 2013 Posted May 3, 2013 Glad to help as much as i can......keep in mind i'm not telling you what to do!! lol just kidding.
ZTony8 Posted May 3, 2013 Posted May 3, 2013 The new Testor Fine lacquer primer is just as smooth as the Tamiya version and may be more widely available.I was pleasantly surprised when I tried it.It dried very smooth and needed very little sanding.Looks like Testor got this one right.
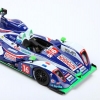
BMX Addicts Posted May 3, 2013 Author Posted May 3, 2013 Thanks Tony, I will check on the Testors brand... I know my local hobby shop is Tamiya exclusive though. Check this out... Looks like taken out of a roller coaster Clear coat is drying, but it looks much better once installed.
BMX Addicts Posted May 4, 2013 Author Posted May 4, 2013 Thanks guys... Challenging stuff for sure Is missing "A LOT", left 4 hoses and the complete steering system in primer tonight.
BMX Addicts Posted May 4, 2013 Author Posted May 4, 2013 (edited) Thank you Chris. A little heavy on glue on the steering column... AND still need to retouch it up a bit. More to come later. Edited May 4, 2013 by BMX Addicts
BMX Addicts Posted May 4, 2013 Author Posted May 4, 2013 All right folks, this is all she writes for the weekend... It has been really hard to get there but I'm loving every second of it
BMX Addicts Posted May 4, 2013 Author Posted May 4, 2013 (edited) PS: Qualifying was rained out... Edited May 4, 2013 by BMX Addicts
BMX Addicts Posted May 6, 2013 Author Posted May 6, 2013 I couldn't find the PrismaColor brand, but ended up purchasing these... The tip seems really strong and is also very fine Little detailing...
BMX Addicts Posted May 7, 2013 Author Posted May 7, 2013 Thanks James... Now that the body is dry and the nose is attached, I tried a quick fit... I can say without a doubt, that with the full cage, the body wont fit all the way down What is really cruel is all the parts were fitted is a way that they are all in good position and I dont have any excess paint or glue anywhere in the chassis...
BMX Addicts Posted May 7, 2013 Author Posted May 7, 2013 Tough morning guys... Literally, had to cut the roll cage in order to make the body come down to level with the chassi, but even then the rear door, even though is close, does not look like a perfect match... The only thing that comes to mind is that maybe there are other small differences between the three DTM kits aside from the livery? Is one of those times where you just cant avoid to start looking at the new stuff waiting to be assembled
BMX Addicts Posted May 7, 2013 Author Posted May 7, 2013 (edited) Oh yeah, It will be finished... but is a hard kick in the head. Some paint, a little carbon fiber and two Advil to deal with this headache.... No worries, my "no so secret" secret project is coming along nicely Edited May 7, 2013 by BMX Addicts
Recommended Posts
Create an account or sign in to comment
You need to be a member in order to leave a comment
Create an account
Sign up for a new account in our community. It's easy!
Register a new accountSign in
Already have an account? Sign in here.
Sign In Now