TFchronos Posted May 21, 2013 Posted May 21, 2013 Way too cool, I'll be watching this one. Amazing work so far.
Plasticfanatic Posted May 21, 2013 Posted May 21, 2013 SUPERB craftmanship and of course modeling subject, this one will indeed be a truly unique model when compleated...again superb work. As a side note...I think that the Vector prototype car was used in the pilot episode of the 1980's TV series Remington Steel, it was shown as the centerpiece of investment party for a "New exotic car company"....what I do remember of that pilot episode was that the thief that stole the jewelry was the president and owner of the prototype car.....because he did not achieve the cash from investors to build the car into production!!!
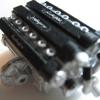
Jeremy Jon Posted May 22, 2013 Author Posted May 22, 2013 Thank you for the kind words Gents & Lady! You're right Fred, it was used in a few different show segments, including the future car - running on H2O - episode The engine is a few generic bits - heads & block & pulleys, but then modified, with all else scratch built, including the transmission & differential Since the W2 was in a constant state of evolution, there are several variations that it "could" be made of, but my preference is the grey metallic/aluminum+blue interior/5 hole mag wheels version, and the red/black interior/8 hole mag wheel version
Dominik Posted May 22, 2013 Posted May 22, 2013 A W E S O ME !!! Jeremy... Yeesh, now THAT'S what I call MODELING!!! Looks like a proffesional prototype! If you do cast this rascal, PLEASE put me down for one! Your doing a GREAT job so far! x2! ...have you planed to cast it? I would take two or more from it. It is a amazing car. The only one in germany i saw was in a museum in Sinsheim - with lincencplate from Great Britain. Just speechless, as i saw it...wow. Very nice. Saw one parked on Daytona Beach many years ago. Keep up the great work. Perhaps, its the same we saw in Florida 17 (seventeen! uiuiui) years ago? My brother and i saw one painted with american flag in a showroom. Can't remember, what place it was. Rumors told, that it was the Vector from Andre Agassi. Keep up the great work! Amazing!
Jeremy Jon Posted May 24, 2013 Author Posted May 24, 2013 Thanks Dominik Next phase is some digital construction, for 3D printed parts to be used as masters, the fine detail and the fact that the human eye can perceive mistakes in circle easily, the wheels in particular fit this technology well Good wheels really do make a model IMO!
Jeremy Jon Posted May 25, 2013 Author Posted May 25, 2013 Decided on a second set of wheels for the W2 build, the 8 hole variation, at the 3D printers being done now!
Jeremy Jon Posted May 26, 2013 Author Posted May 26, 2013 (edited) Continued progress on some of the small items, manifolds & turbos, the flat surface is where the photo etch metal grills will be placed yet Decided to build the turbos, rather than source from a donor kit, using styrene, brass & aluminum stock The early-to-mid variations of the W2 were not intercooled, and used CIS fuel injection A challenge for the fingers & eyes! Edited May 26, 2013 by Jeremy Jon
CrazyGirl Posted May 26, 2013 Posted May 26, 2013 this is crazy nutty talent , Holy Cow ,,, the talent here in this forum never ceases to amaze me
Blown03SVT Posted May 26, 2013 Posted May 26, 2013 Those wheels... the old school 3 pc centerlines... wow! Great work all around on a very ambitious project.
Jeremy Jon Posted May 26, 2013 Author Posted May 26, 2013 Thank you guys, much appreciated, looking forward to getting this one all finished up, starting some of the molds now, to make the duplicate parts & test fit those together in final form Maybe do a twin build of two variations? Thanks Lee! Noticed the Red-Green quotes there "Keep your stick on the ice" Thanks Anne! Yes I should have chosen "Crazy Nutty Modeller" for forum name Thanks Eric! I know those wheels can be found probably from some kit bashing research, but was decided that bespoke wheels were better & made accurate to 1:24 scale - not 1:25 - and finer detail, would befit the build Okay, back to work!
LDO Posted May 26, 2013 Posted May 26, 2013 Sign me up for a kit. Like a previous poster, the only one I've ever seen up close was at the Sinsheim museum. I visited that place several times when I served in Germany.
Jeremy Jon Posted May 28, 2013 Author Posted May 28, 2013 (edited) Thanks LDO! I've still never actually seen one in person, maybe next summer though? There are so few, getting to see one is pretty rare indeed! Work progessing, body pictured in initial & final primer coats now, and interior structure being made ready for final form, other parts primed and in molding process edit: hm, photos made shown in reverse order for some reason? Edited May 28, 2013 by Jeremy Jon
kennb Posted May 28, 2013 Posted May 28, 2013 coming along very nicely,,,,,,,I need to get me a 3D printer
Jeremy Jon Posted May 28, 2013 Author Posted May 28, 2013 coming along very nicely,,,,,,,I need to get me a 3D printer Thanks Kenn! I don't have one either, they are actually quite expensive to maintain, and a head ache, besides which the home based ones under $1000 are not as fine of resolution, so I use Shapeways, and so far quite happy with the results, the trick is making the design model to the best quality level of detail with consideration of primer/paint layers & casting Only the wheels and rotor centers are 3D printed parts for this build, everything else is handmade!
Funkychiken Posted May 29, 2013 Posted May 29, 2013 Excellent and interesting, will be watching!!, love the work & many thanks for sharing!
Jeremy Jon Posted May 31, 2013 Author Posted May 31, 2013 (edited) Thanks Atin! Progress isn't exciting to look at, but primed parts are in mold-making/casting process now, excited to see the second wheels come from the 3D printers - hard to see details with semi-transparent white, but they're there! Working on hinged engine cover and jack-knife doors, so shut lines are all flush fitting, extended rear section slightly (1.5mm) for better accurate appearance & measure Edited August 23, 2013 by Jeremy Jon
LDO Posted May 31, 2013 Posted May 31, 2013 I was completely serious when I said sign me up for a copy, BTW. I think it's an awesome car and a heck of story of what could have been. Imagine an American car with McLaren F1 performance in the early '80s.
Jeremy Jon Posted May 31, 2013 Author Posted May 31, 2013 LOL thanks Lee, I do believe you! you gotta let me finish it first man! I'll be keeping updates on my FB page too Here's a vid from our friend Vector-files, with one being given a run around the neighborhood!
Lownslow Posted June 1, 2013 Posted June 1, 2013 been following this build on AF i love the work i really want this kit.
Jeremy Jon Posted June 1, 2013 Author Posted June 1, 2013 Thanks Frank! Working away on the remaining body & interior now The doors and engine cover to be hinged, to open as the real car does, with scissor-doors! Making them flush fitting, so cast parts should need minimal work as a result, involves several layers of filling and sanding, until the finished result is achieved, but then will be smooth and blemish free!
Jeremy Jon Posted June 2, 2013 Author Posted June 2, 2013 (edited) Thanks Luis! Getting now to the fine finishing details of the body work, some ultra-fine filler in some spots to complete The underbody is done, with the sills built and properly shaped, & primed the deep cut-lines are necessary, so that the cast parts come out with detailing intact The engine cover fitted well, and next will have the hinge assembly fixed in place If you're thinking "where are the door windows?" then you wouldn't be wrong! The real car has flush fitting side windows, no gaps hardly at all, and zero offset in the sill, to that end I've decided to make the doors as a whole single piece, and will cast them in crystal clear! I've now to carve out the windows seams, and detail ocular lens domes That way the windows are simply masked off and painted around, the result will be the easiest way to achieve the flush window appearance proper Not as happy with the second set of wheels, so am making some alterations to the design, and sending back to the 3D printers to be re-done Almost there! Edited June 2, 2013 by Jeremy Jon
Recommended Posts
Create an account or sign in to comment
You need to be a member in order to leave a comment
Create an account
Sign up for a new account in our community. It's easy!
Register a new accountSign in
Already have an account? Sign in here.
Sign In Now