Mooneyzs Posted September 25, 2013 Posted September 25, 2013 Dave... This just keeps getting better. I swear if I didn't know it was a model I would thing this is the real deal. Your work is incredible and very inspiring. Are you sure you don't have a miniature tube notcher.... I have been trying to figure out how to design some tooling fixture that could work with dermal or something to notch tubing. Dave I do the same as you with filing the tubing to cope it so it mount to the next tube. The one problem I have sometimes is that I don't always get it center with filing by hand as to why I wanted to design some sort of tooling I can't wait to see your next update. Keep up the awesome work my friend!
futurattraction Posted September 25, 2013 Posted September 25, 2013 I'm ready for another update, Dave...
Ognib Posted September 25, 2013 Posted September 25, 2013 thanks scott and ray. the gold material is brass. i machined the brackets from 1/8 brass flat bar. they are brass because they will be soldered directly to the chassis. Brass, yes, should'a seen that...I've got aluminum on the brain. Chassis work looks great!
comp1839 Posted September 25, 2013 Author Posted September 25, 2013 bill, thanks!! appreciate you looking in. chris, we'll have to work on a miniature tubing notcher!!! it will come in handy for some of your future projects! ray, i have the same affliction at times. me and the captain can usually sort it out. just for you scott.
futurattraction Posted September 26, 2013 Posted September 26, 2013 Thanks buddy! Now I can make it through the day... lol You do such fantastic work, Dave...
Mack_Mechanic Posted September 28, 2013 Posted September 28, 2013 Outstanding craftsmanship!I can't wait to see this beast finished!
GoatGuy Posted October 1, 2013 Posted October 1, 2013 Like being back in school, learning from a master. And I have a lot to learn. Thank you for the updates. Loved seeing your work at Gilbertsville, meeting you and learning from you.
comp1839 Posted October 4, 2013 Author Posted October 4, 2013 thanks steve. it will be a long ride. likewise dave. it was very nice meeting you. we'll have to do it again.....soon.
S. Svendsen Posted October 9, 2013 Posted October 9, 2013 That's some pretty amazing model building going on right there.
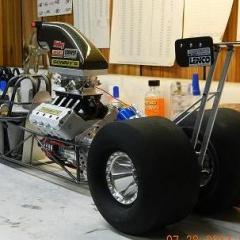
comp1839 Posted October 21, 2013 Author Posted October 21, 2013 sean, james, steven and justin, thank you. i appreciate your kind thoughts. i'm in the process of trying to make a fiberglass seat tub for the camaro. i'm not really a fiberglas expert so i'm taking my time. maybe in a day or two i'll have a finished product. for now i put the chassis on some blocks so i could level the body on the chassis. i put the engine into the chassis at the correct location and then put the nose on the car to check the clearance of the valve covers to the hood. the engine is a pretty close representation of a 5.2 bore space engine. it is way bigger than a factory big block. also making sure the body has the appropriate "bow" in the hood. if you lookclosely you'll see there is about 1/32 or so clearance. at the front of the valve cover. all is good.
vintagedragfan Posted October 21, 2013 Posted October 21, 2013 looks like you dodged a bullet Dave, fits great, I hate surprises like that! lookin killer man!
futurattraction Posted October 22, 2013 Posted October 22, 2013 Looking good Dave. There's clearance - that's a good thing! LOL I'm looking forward to more updates...
Red rocket 10 Posted October 23, 2013 Posted October 23, 2013 Dave you continue to amaze us with your talents , this car is one beautiful work of art my friend ........... Leonard
GoatGuy Posted October 23, 2013 Posted October 23, 2013 Looks great Dave. Looking forward to more updates of this build.
Interceptor Posted October 24, 2013 Posted October 24, 2013 Great progress Dave. I like it a lot. Mark
Mooneyzs Posted October 28, 2013 Posted October 28, 2013 Dave... I have to say that this build is Engineering at its finest.... That is perfect clearance between the front clip and block Keep up the Killer work my friend.
comp1839 Posted October 31, 2013 Author Posted October 31, 2013 thanks a bunch guys!! got a little more chassis work done.
Magic Photos Posted November 1, 2013 Posted November 1, 2013 Thanks Dave for the update what a great build you have going. I learn from all your work.
Mooneyzs Posted November 2, 2013 Posted November 2, 2013 Dave... Outstanding work on that chassis so far. It is looking Killer my friend!!! I can't wait to see the next update. I am taking lots of notes
comp1839 Posted November 2, 2013 Author Posted November 2, 2013 thank you mike. with the quality of your work. i really doubt i'm helping much. when we gonna see another from you? thanks chris. next update is here, hehe. i can't wait to see your funny car finished. it will be epic. i also can't wait to see what you have in store for us!!!!!!!! put the funny car cage on. working on the mid plate mounting to the frame. when that's complete we can continue on with the center of the car.
Prostreet Posted November 2, 2013 Posted November 2, 2013 More stellar chassis work. Looks great Dave.
Recommended Posts
Create an account or sign in to comment
You need to be a member in order to leave a comment
Create an account
Sign up for a new account in our community. It's easy!
Register a new accountSign in
Already have an account? Sign in here.
Sign In Now