comp1839 Posted December 25, 2013 Author Posted December 25, 2013 (edited) thanks chris, mike ,joe, henry and ira. i appreciate your comments!! doing the chute mounts on these cars is a complete night mare. well not really but, it is not really very easy. especially if you have make them actually removable. by removable i mean: to get the body off the chassis. the chute mount must be removable. here is the mounting that stays on the chassis. with the body on. here is the completed removable chute mounting assembly. Edited December 25, 2013 by comp1839
comp1839 Posted December 25, 2013 Author Posted December 25, 2013 here is the assembly attached to the car with the body in place. with the chutes on the mounts.
blackbeard Posted December 26, 2013 Posted December 26, 2013 dave great update that looks fantastic love how the parachutes sit on the back of the car
Magic Photos Posted December 26, 2013 Posted December 26, 2013 Very nice Dave great detail, this build is awesome.
Interceptor Posted December 26, 2013 Posted December 26, 2013 No words to describe your great work Dave. I just love this kind of detail you're putting in your models. Mark
comp1839 Posted December 27, 2013 Author Posted December 27, 2013 (edited) thanks, mike, mark and henry. worked on getting the front end chassis completed. pictures are worth more than words here. Edited December 27, 2013 by comp1839
comp1839 Posted December 27, 2013 Author Posted December 27, 2013 i could type 'til my fingers fall off and not cover what you want to know. if you have a question just ask. it will probably be easier that way.
blackbeard Posted December 27, 2013 Posted December 27, 2013 dave love how the front is coming along and especialy the cups on the upper front struts
Magic Photos Posted December 27, 2013 Posted December 27, 2013 Nice progress on the build, thanks again for sharing. I just keep learning.
comp1839 Posted December 27, 2013 Author Posted December 27, 2013 (edited) thanks mike and henry. spent some of the day out in the machine shop making the frame mounted clevis' for the front control arm and the battery cutoff switch. i had a friend of mine make these superb photo etched pieces. i asked him if he wanted me to tell you guys who he was but, he didn't want me to say anything at the time. if he'd like to chime in and say something he certainly can. Edited December 27, 2013 by comp1839
Red rocket 10 Posted December 28, 2013 Posted December 28, 2013 Dave the car is out of this world buddy , you are taking me to school ! Leonard
waddellsbodyshop Posted December 28, 2013 Posted December 28, 2013 Dave your work is superb. I hope im half as good as this in the future. Your work is an inspiration. Thanks for everything. Keep up the awesome work. Cant wait to see more.
comp1839 Posted December 29, 2013 Author Posted December 29, 2013 thanks guys. spent some time drawing up and machining the front motor plate.
W-409 Posted December 29, 2013 Posted December 29, 2013 Wow Dave even if this is the Big Boyz Section, it's not right to post 1:1 projects in here! Seriously, you're doing a great job here. All of that detailing really pays off. The frame is looking excellent, but my favorite parts are the tires. I've never before seen anyone to put those wear indicator holes on model cars! I might try that, too.
blackbeard Posted December 30, 2013 Posted December 30, 2013 love the look of the motor with the front motor plate on it , your killing this build
comp1839 Posted December 31, 2013 Author Posted December 31, 2013 (edited) had to modify the front motor plate from my original drawing. i figured i was taking a chance and i might have to. it was still very close to the needs of the chassis. while i was at it. i added lightening holes to it. from the side veiw the engine location shows to be about perfect. the real deal. Edited December 31, 2013 by comp1839
blackbeard Posted December 31, 2013 Posted December 31, 2013 dave that front engine plate looks great almost looks like the real motor
Mooneyzs Posted January 1, 2014 Posted January 1, 2014 Dave... Freaking awesome updates. You have sure been busy on this one. I am loving the progress you are making. Your work is just awesome and hope I can build so,e stuff as good as this. Can't wait until your next update.
futurattraction Posted January 1, 2014 Posted January 1, 2014 Gorgeous work, Dave. The cage work, the struts and mounts, the motor plate all look super. The front end mounting brackets look pretty good, too...
midengineaddict Posted January 1, 2014 Posted January 1, 2014 I dont post comments verry often because all the other members tell the same thing that I think, you are the better modeler on the planet.. please keep on working.
Magic Photos Posted January 1, 2014 Posted January 1, 2014 Thanks for the update I am learning so much from you thanks
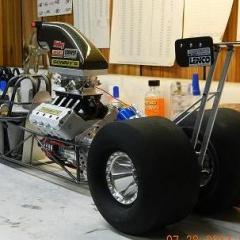
comp1839 Posted January 1, 2014 Author Posted January 1, 2014 thank you guys! i'm glad if anything i do is of any help at all. so, i had this motor sitting in the chassis. i couldn't help myself. i had to put the intake on and the trans in, to see how it looked. the manifold is a skosh high and the nitrous system is a little big but, at this point it is what it is. i can live with the errors. sooooooo, i have this car sitting here and i previously built a sonny's hemi motor for another project.........you can see where this went. maybe we'll have to build another one of these later..............or not! hehe.
Recommended Posts
Create an account or sign in to comment
You need to be a member in order to leave a comment
Create an account
Sign up for a new account in our community. It's easy!
Register a new accountSign in
Already have an account? Sign in here.
Sign In Now