crazyrichard Posted September 21, 2013 Posted September 21, 2013 you are def. one of the best clean builders i've seen .. love it !!!
Rustysnake Posted October 16, 2013 Posted October 16, 2013 (edited) Hi Mate I knew this would be cool, but man, you blew me away! What a brilliant piece of art. Sorry for checking it out so late, shoulda done that right after the party. Seeing this car, I'm really happy I didn't have a 62 to cut up for my couch project... Btw, what lens did did you use to take the pics? Turned out really nice! Cheers & till soon Edited October 16, 2013 by Rustysnake
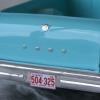
Joker Posted October 17, 2013 Posted October 17, 2013 Killer BMF work....the ridge trim on the T-bird is fantastic !
peekay Posted October 17, 2013 Author Posted October 17, 2013 Sorry for checking it out so late, shoulda done that right after the party.Btw, what lens did did you use to take the pics?Hi Marco - no worries, see you at the next one.I'm using my son's Canon EOS 400D and its 18-55mm kit lens. Actually not that happy with the focus yet and I've been told a lens upgrade would help - but that's not going to happen any time soon.And thanks Al and James, much appreciated.
sjordan2 Posted October 17, 2013 Posted October 17, 2013 Another big winner. I don't know how you do such fine detail like adding the color to the T-Bird logo badges.
peekay Posted October 17, 2013 Author Posted October 17, 2013 Another big winner. I don't know how you do such fine detail like adding the color to the T-Bird logo badges.Apply a larger piece of foil than the badge, burnish down well but dont trim yet - you need the surrounding foil as masking for the last steps. Paint the recessed detail area, making sure you go very slightly over its border. Let it dry. Now remove the excess colour from the raised area with a 6000 mesh polishing cloth. Finish with 8-or 12000. Now you can trim.Go carefully polishing BMF - it creates a black mess which can be hard to remove from some paints.
peekay Posted October 17, 2013 Author Posted October 17, 2013 Killer BMF work....the ridge trim on the T-bird is fantastic !For foiling long straight trim pieces like this I use one of two methods:I carefully lay down a strip of fine tape (eg Letraline) as a guide - this creates a more defined ridge for your blade to follow.But this is now my favourite method:I use a steel ruler to pre-cut the foil (still on the backing sheet) to the exact width I need. This strip needs to be about 2 inches longer than you need. I then lay it down as straight as possible over the trim. You have to hold the strip taught with one hand while pressing it accurately down with the other hand's finger (and somehow keep the model steady with whatever spare fingers you have!). It's NOT easy and requires practice - I quite often don't get it right on the first attempt but the result is a lot better than I can achieve with my shaky hand and an Xacto knife.
Plastheniker Posted October 17, 2013 Posted October 17, 2013 Another perfect build - regrettably not mine ...
Shardik Posted October 17, 2013 Posted October 17, 2013 (edited) Peter, That is definitely "refined", regardless of anyones attitude towards promos. Thanks for sharing your techniques with BMF. They obviousy work quite well. Edited October 17, 2013 by Shardik
Rustysnake Posted October 17, 2013 Posted October 17, 2013 Hi Peter Yeah, really nice to see your work! Amazing. Also great to follow your tips & tricks. Cheers :-) Marco
Maindrian Pace Posted October 18, 2013 Posted October 18, 2013 I use a steel ruler to pre-cut the foil (still on the backing sheet) to the exact width I need. This strip needs to be about 2 inches longer than you need. I then lay it down as straight as possible over the trim. You have to hold the strip taught with one hand while pressing it accurately down with the other hand's finger (and somehow keep the model steady with whatever spare fingers you have!). It's NOT easy and requires practice - I quite often don't get it right on the first attempt but the result is a lot better than I can achieve with my shaky hand and an Xacto knife. This is the exact method that I use, it's tricky but you get the hang of it - and it's much better than trying to run an exacto knife on the paint to remove excess BMF. Fantastic job on the T-Bird. It's so much nicer than the promo, I don't know who could possibly think that it was "ruined" in any way. -MJS
Recommended Posts
Create an account or sign in to comment
You need to be a member in order to leave a comment
Create an account
Sign up for a new account in our community. It's easy!
Register a new accountSign in
Already have an account? Sign in here.
Sign In Now