Jeremy Jon Posted July 21, 2014 Author Share Posted July 21, 2014 what do you use for the carpeting Hi Mike, here is a tutorial I made for the carpeting http://www.modelcarsmag.com/forums/index.php?showtopic=82303 Quote Link to comment Share on other sites More sharing options...
Speedfreak Posted August 24, 2014 Share Posted August 24, 2014 Jeremy, how's this project going? Quote Link to comment Share on other sites More sharing options...
Jeremy Jon Posted September 1, 2014 Author Share Posted September 1, 2014 Slow progress, frustrating, but lacquer needs to be allowed to properly cure/set, before polishing I decided to build the spare kit in "box stock" form, so to make comparison photos of the two side-by-side "box stock" vs. "not" box stock !! Quote Link to comment Share on other sites More sharing options...
Speedfreak Posted September 2, 2014 Share Posted September 2, 2014 One looks more detailed then the other Really great work. Quote Link to comment Share on other sites More sharing options...
Tompidom Posted September 2, 2014 Share Posted September 2, 2014 Cool seeing the difference between box stock and detailed! Quote Link to comment Share on other sites More sharing options...
freakshow12 Posted September 2, 2014 Share Posted September 2, 2014 So, for your box build did you just go straight by instruction paint call outs? Reason I ask is because little things that could have been just detail painted like the dash and some engine stuff you didn't do Quote Link to comment Share on other sites More sharing options...
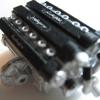
Jeremy Jon Posted September 3, 2014 Author Share Posted September 3, 2014 (edited) Thanks guys! Yes, painted strictly out-of-box, no additional detailing, no scribing, nothing but clean up of parts & paint & assembled, to compare against the modified version Instructions call for basic colours, semi-gloss black as used, silver & aluminum on drivetrain ...couple things I did differently was paint the engine valve covers/super-charger in semi-blk also instead of silver said in instructions, and painted chassis underbody in body colour rather than flat black only Edited September 3, 2014 by Jeremy Jon Quote Link to comment Share on other sites More sharing options...
Jeremy Jon Posted September 8, 2014 Author Share Posted September 8, 2014 The hood painted white belies the extent of modifications, with lengthened nose edge, underside detailing & vent opening modifications to fit the PE (photo etch) grill inserts properly! Quote Link to comment Share on other sites More sharing options...
hgbben Posted September 8, 2014 Share Posted September 8, 2014 Glad to see this near completion Jeremy. I take it that the blue decals were the correct shade or at least close? Quote Link to comment Share on other sites More sharing options...
slusher Posted September 8, 2014 Share Posted September 8, 2014 You have made lots of progress since I checked in last. Looking awesome. Quote Link to comment Share on other sites More sharing options...
Jeremy Jon Posted September 9, 2014 Author Share Posted September 9, 2014 Thanks Carl & Ben, yes decals were exact needed Quote Link to comment Share on other sites More sharing options...
sbvwfanatic Posted September 10, 2014 Share Posted September 10, 2014 So amazing! I'm torn between inspiration to go straight out to my garage and build, or quiting the Hobby entirely because I now feel like an absolute hack.... WOW! Quote Link to comment Share on other sites More sharing options...
Jeremy Jon Posted September 11, 2014 Author Share Posted September 11, 2014 Thanks Scott! Build man build! I'm a hack too, and out of my mind a little (which helps!) Quote Link to comment Share on other sites More sharing options...
Jeremy Jon Posted December 22, 2014 Author Share Posted December 22, 2014 Finally had to paint the stripes on, and final assembly still requiring quite a lot of little under body mods to make sit down right Drilled through resin tires/wheels and into base of diorama, and ran wire looped through, including one around transmission tunnel cross brace (molded part of chassis) which will hold car to base securely Finishing the last of details for final (finally!) assembly Quote Link to comment Share on other sites More sharing options...
Jeremy Jon Posted December 22, 2014 Author Share Posted December 22, 2014 Quote Link to comment Share on other sites More sharing options...
slusher Posted December 22, 2014 Share Posted December 22, 2014 Man those stripes look good Jeremy. Starting to come together... Quote Link to comment Share on other sites More sharing options...
Jeremy Jon Posted December 22, 2014 Author Share Posted December 22, 2014 Man those stripes look good Jeremy. Starting to come together... Thanks Carl! Let me tell you, those *&$^* stripes have been a bane to my existence, nothing seemed to work out well, until this final attempt, definitely wrapping this build up over the Christmas break Quote Link to comment Share on other sites More sharing options...
Speedfreak Posted December 22, 2014 Share Posted December 22, 2014 Man those stripes look good Jeremy. Starting to come together... X2 Really nice work Jeremy. Love it when someone puts this kind of effort into a build! Quote Link to comment Share on other sites More sharing options...
Jeremy Jon Posted December 22, 2014 Author Share Posted December 22, 2014 Thanks Gene, it has been a long project! Quote Link to comment Share on other sites More sharing options...
hgbben Posted December 22, 2014 Share Posted December 22, 2014 Stripes look great Jeremy Quote Link to comment Share on other sites More sharing options...
66belair Posted December 23, 2014 Share Posted December 23, 2014 Outstanding! Quote Link to comment Share on other sites More sharing options...
Recommended Posts
Join the conversation
You can post now and register later. If you have an account, sign in now to post with your account.
Note: Your post will require moderator approval before it will be visible.