MLMDesign Posted January 25, 2014 Posted January 25, 2014 Hi, I'm back with a 67 AMT Charger and a 34 Ford pickup.
JTalmage Posted January 25, 2014 Posted January 25, 2014 Got my photo-etched grille, MSD box, and B&M rachet shifter in the mail today for the Roadkill Charger.
RodneyBad Posted January 28, 2014 Posted January 28, 2014 I aint been asleep at the wheel.. Added a Steering box, Steering Linkage, Track bar and Links to the bare front suspension.
64SS350 Posted January 28, 2014 Posted January 28, 2014 Well this is going to be a rough year, try to get done what I can. Working on chassis, interior, and body work of the Cutlass.
Erik Smith Posted January 29, 2014 Posted January 29, 2014 I am in! AMT's 1966 Buick Riviera. Power via Revell ZR1... Wheels from Fireball Modelworks (tires too, but might switch them out):
Erik Smith Posted January 29, 2014 Posted January 29, 2014 First item - transmission from Revell 2010 Camaro: Replacing molded in wires:
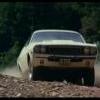
JTalmage Posted January 30, 2014 Posted January 30, 2014 Roadkill Charger "General Mayhem" update! So I've been staying near work this week to watch my sisters place, and I'm closer to my friends house where I do my building, so I stopped by this evening and messed around with the Charger for a few hours. First I made a few body dents and damage to mimic the real thing Then I removed the cozywings and all the trim around the windows/doors except a spot in the back. You can see in that picture I also cut the door handle holes out. Then I waited for my hand to stop cramping and decided to paint the engine black If you notice, the engine has a 727 torqueflite trans behind it. I robbed it from my Mr. Norm's '68 Dart when it fell apart. And the valve covers are from the revell '70 Challenger T/A because they are taller in the middle and look more like the valve covers on the 440 that Finnegan and Freiburger pull from the motorhome. I also did the little dent in the front fender. Don't mind the putty.... my dremel went a little crazy when drilling the holes for where the '68 marker lights *should* be. Next, I decided to tackle the most iconic part of the General Mayhem.... The grille! I gotta find just the right kind of lights to put behind it now! In addition I also found the rear taillights and taillight buckets finally, along with an automatic pedal setup from the same Dart, and electric fan from the old revell 32 ford.
JTalmage Posted January 31, 2014 Posted January 31, 2014 (edited) Did a touch more work to it last night: Removed material from behind the driving lights to open up the holes since the General Mayhem did not have any driving lights at all in the valence Also trying my hand at a little scratch-building for the first time... I've cut the original door panels out w/ my squadron scribe tool that I picked up last week.. which was worth it! I'm trying to recreate doors without door panels on them. And it's kinda tough, my hands are cramping, and everything is hard to cut! But it's going to look like this I hope... So I cut the original part out, and started making pieces from evergreen Going to overlay it to hopefully create some depth. Edited January 31, 2014 by JTalmage
Zarana-X Posted January 31, 2014 Posted January 31, 2014 Great work, Jesse. I'm gonna have to step it up a notch. Rodney, The Camaro looks good. I'd kinda like to get another one myself, mine was damaged, then rebuilt a few times.
JTalmage Posted February 1, 2014 Posted February 1, 2014 I'd say my door panel is done..... 3 more to go. Ugh.
Erik Smith Posted February 1, 2014 Posted February 1, 2014 Engine close...and trying out its new home...
RodneyBad Posted February 2, 2014 Posted February 2, 2014 Loving the RoadKill Build Jesse Good looking motor Erik Nice Looking Dash Karl. Lucky for me Jason, many yrs ago I bought the Monogram Camaro and Parted it out since it was such a bad kit and then ended up getting Parts of a the HighRoller kit off Ebay just for the suspension. I have just enough parts to get it all together.. Since most people are adding a larger Fuel Tank, I don't want to be the first person to run out of Fuel, Soooo More than Doubled my Fuel tank size to run my Lil Blown 350..
knarf Posted February 2, 2014 Posted February 2, 2014 hey rodney, could we get a picture of that clothespin in the last pic?
RodneyBad Posted February 2, 2014 Posted February 2, 2014 hey rodney, could we get a picture of that clothespin in the last pic? Just Regular wood Cloths Pins that have been cut and glued together, and reshaped (for engine blocks,wheels)
knarf Posted February 2, 2014 Posted February 2, 2014 thank you sir! i have some that i've custom carved the tips, i was speaking of the double one-never thought of that:)
JTalmage Posted February 3, 2014 Posted February 3, 2014 Put some paint on it, but not happy with it. Probably gonna strip it and redo it.
DriftingRookie Posted February 3, 2014 Posted February 3, 2014 Revell sent my parts out should be here tomorrow. Going to the hobby store also tomorrow to pick same stuff up
Jantrix Posted February 3, 2014 Posted February 3, 2014 Put some paint on it, but not happy with it. Probably gonna strip it and redo it. If this is going to be a weathered vehicle then bad paint is not an issue. Once you scuff up that blue and pink and add a wash, it will look fine.
knarf Posted February 3, 2014 Posted February 3, 2014 i agree with rob, i've seen that episode of roadkill and i think it'll be fine as weel:)
JTalmage Posted February 3, 2014 Posted February 3, 2014 Well, I accidentally painted over dissimilar paints, and there is a lot of cracking/crazing under the hood and I'm not pleased with it. the pink is actually a red, and it was supposed to be darker. The chassis, firewall, and core support are all bad... definitely need stripped. Silly me.. should have known but tried to chance it.
DriftingRookie Posted February 3, 2014 Posted February 3, 2014 I'm going to be adding a little1964.5 Mustang to my builds the impala want be making it. My light fell and landed on the body
64SS350 Posted February 5, 2014 Posted February 5, 2014 Some work on the motor so far, decided to cut the interior for lack of detail, made some arm rests tonight.
cruncher Posted February 6, 2014 Posted February 6, 2014 I posted before that I am trying to build two for this year's CBR, so here are some in progress for project #1. It is obviously a 1972 Chevy pick up (my favorite vehicle) BUT with a slight up-grade. It now has a Cadillac Escalade chassis. The chassis is from a project i started a couple years ago; therefore some of the assembly and painting had been started. During a recent bout of moderate weather i rushed a 2 tone paint job. Future plans are a large bed mounted fuel cell, roll bar, and ??? So far as project #2 the 57 Chevy, i am having extreme "builders guilt" about stripping all the chrome to make a night runner, it may take several hands on top of mine to push the chrome into the tub of purple power. I am still new to this forum so please forgive any short comings i have in these replys. it is rather hard for me to stay up with so many posts on this group but some of the pics i have seen are awesome. You are welcome to email me direct one25th@cruncher.us
Recommended Posts
Create an account or sign in to comment
You need to be a member in order to leave a comment
Create an account
Sign up for a new account in our community. It's easy!
Register a new accountSign in
Already have an account? Sign in here.
Sign In Now