tubbs Posted February 25, 2014 Posted February 25, 2014 I feel bad suggesting the yellow, I an not the best painter, in fact, the painting stage has caused my project pile to grow 10 fold.... but I would say to let it dry completely, wet sand lightly and repaint. I would do this a few times, it will cover.
Tony-442 Posted February 25, 2014 Posted February 25, 2014 Note to self you have to be smarter than what your working on. I forgot to put headers on before wiring plugs. We've all been there brother.. No Worries! Have fun with it. I would just bend the wires around the bottom side of the headers, and learn from it for the next build. Don't get yourself down, you're doing an amazing job. Great Work!! You have to be able to laugh at yourself too!! I do it all the time! As for colors like Yellows and lighter colors. I do many light coats, letting them dry between coats. Usually three, sometimes 4 coats. I don't sand between coats, unless I have a run, then I'll sand that out. Just make sure the surface is clean! I wet sand the flat surfaces when it's dry, and buff it with a polishing compound. Be really careful not to sand off any badges or fine details. I use soft cotton cloth to buff and wipe it clean I bought a baby blanket at Walmart and cut it up into small pieces, works great!
Skypower Posted February 25, 2014 Author Posted February 25, 2014 Thanks for the input guys I gave it another coat this morning before I left for the office, we will see how things look when I get home tonight. Tubbs no issues I chose that color because I just wanted something different, I didn't think covering light gray primer would be this hard who knows maybe it will still work out. John thanks for the laugh that cracked me up for some reason maybe because I only slept a 3 hours last night. lol
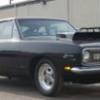
Skypower Posted February 26, 2014 Author Posted February 26, 2014 Pulled her out of the cooker when I got home and I guess I can live with it I will wet sand and polish and hope for the best. Now I have to hunt some carbs down and finish up some of the detailing then hopefully I can call this one done, of course with me that could take a few more weeks all though I hope not. I'm going with a flat black hood just need a little more work on it before painting. Here she is kinda of mocked up.
1930fordpickup Posted February 26, 2014 Posted February 26, 2014 Looks good so far Bob. If you want to do a coil over shock just wrap wire around the threads of a small bolt. It was in a magazine tip one month, not mine.
Skypower Posted February 28, 2014 Author Posted February 28, 2014 (edited) Getting some more of the detailing done. How's it look, just making things up as I go. If you see something in my details that I can improve on or things that might work better please speak up I'm trying to learn all this stuff and really helps when you all give advice or criticism either way I learn. Thanks Bob P.S. how do I edit the title to my thread. Edited February 28, 2014 by Skypower
ewaskew Posted February 28, 2014 Posted February 28, 2014 Looking good Bob. When your writing your post click preview and use full editor to change your title,that's the way I do it. God Bless
Speedfreak Posted February 28, 2014 Posted February 28, 2014 The chassis and battery detail look good Bob! Those slicks are some fat babies, are they from the kit?
slusher Posted February 28, 2014 Posted February 28, 2014 Looks great so far Bob, looks great in yellow also..
Skypower Posted February 28, 2014 Author Posted February 28, 2014 Looking good Bob. When your writing your post click preview and use full editor to change your title,that's the way I do it. God Bless Thanks Earl I will try that. The chassis and battery detail look good Bob! Those slicks are some fat babies, are they from the kit? Thanks Gene, they are the tires from the kit, they seem to fit nicely on this body although I did have to shorten the rear end to make them clear the body when I lowered the car. Thanks Carl hopefully it will look ok once buffed.
1 bad55 stan Posted March 1, 2014 Posted March 1, 2014 some nice work going on there Bob,i like what your doing with this ....
Skypower Posted March 5, 2014 Author Posted March 5, 2014 Keep saying I'm buttoning this one up and seem to keep adding a few more details. I made a MSD box and coil since the coil that came with the kit seemed out of scale added more detail to the motor throttle cable and a return spring and dip stick and still working on fuel lines. Made a fuel cell since I added fuel lines under the car I figured what the heck even though you won't see it when assembled. That's about it for now. Oh yea painted dash. Thanks for looking.
Skypower Posted March 6, 2014 Author Posted March 6, 2014 Couple more bits finished up tonight. It's getting there.
slusher Posted March 6, 2014 Posted March 6, 2014 You have lots of great detail on this build Bob. Its looking great..
buxxx69 Posted March 6, 2014 Posted March 6, 2014 Great great great build thus far mister ! Looking forward to seeing more.
Skypower Posted March 7, 2014 Author Posted March 7, 2014 Assembly started still some touch painting on chassis to do but making some progress. Body on just to get a good look.
Skypower Posted March 8, 2014 Author Posted March 8, 2014 Attempting to learn BMF. I hope I don't screw things up to bad at this point. Engine compartment pretty much done.
Speedfreak Posted March 8, 2014 Posted March 8, 2014 (edited) Hot D all mighty Bob! That thing is lookin' fine! You're taming the beast! Just take your time on the BMF, (nice and easy) and, don't drink a bunch of coffee beforehand. Get in the 'X-ACTO' groove if you know what I mean. Edited March 8, 2014 by Speedfreak
slusher Posted March 8, 2014 Posted March 8, 2014 Nice start on the foil Bob, it soon will be in the under glass section....keep up the good work..
FASTBACK340 Posted March 8, 2014 Posted March 8, 2014 Wow! What a great job your doing! The plug wire looms came out nice, as did the chassis plumbing. What did you use for the hold-down clips on the harness/lines? The throttle linkage and accessory wiring makes it all come together instead of isolated detailing. The hold-down for the battery is perfect BTW…. Bob, you got it going. Truly impressive building for a "novice". Keep it up and your going to be one hell of a builder. You definitely have the skills to do it.
Skypower Posted March 8, 2014 Author Posted March 8, 2014 (edited) Thanks for the positve comments guys it means a lot to know if im going in the right direction with my build. I am learning alot of cool stuff here on this site from you guys. John i got some chrome a/c tape from harbour freight and cut small slivers, then wraped around the wire on to it self leaving a little tab then glued the back side with med ca glue, then used a tooth pick to push it down and in to shape till the glue held. It seemed to replicate clamps pretty good. Edited March 11, 2014 by Skypower
Skypower Posted March 11, 2014 Author Posted March 11, 2014 BMF done. Question though should I clear over the BMF or do I leave it alone. I think it came out ok for my first time. What do you guys think.
Recommended Posts
Create an account or sign in to comment
You need to be a member in order to leave a comment
Create an account
Sign up for a new account in our community. It's easy!
Register a new accountSign in
Already have an account? Sign in here.
Sign In Now