le_marbrier Posted April 27, 2015 Author Share Posted April 27, 2015 (edited) Yes -- thanks ! I'm new to the whole "drybrushing" thing. Can you explain more about how you applied the Humbrol 70 and 85 after painting them with Humbrol 56? Thanks ! For my drybrushing I take a n°6 or 8 wide brush. First I apply the n°70, I dip barely the brush in the paint and wipe off the excess on a paper towel. The brush must be almost..dry... Then I apply it here and there over the part. I do the same with the n°85 (but much lightly than the 70 color) Well it's not that easy to explain with words, moreover when it's not your native language I hope my "explanations" '^^ will help you a little. Edited April 28, 2015 by le_marbrier Quote Link to comment Share on other sites More sharing options...
le_marbrier Posted April 27, 2015 Author Share Posted April 27, 2015 (edited) Close to the end Edited April 27, 2015 by le_marbrier Quote Link to comment Share on other sites More sharing options...
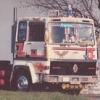
kilrathy10 Posted April 28, 2015 Share Posted April 28, 2015 That is a cool looking rig....You are getting there, for sure....Decals came out pretty good.... Quote Link to comment Share on other sites More sharing options...
gatorincebu Posted April 30, 2015 Share Posted April 30, 2015 I agree with JT. Looking real good here! Be Well Gator Quote Link to comment Share on other sites More sharing options...
anarximis Posted May 14, 2015 Share Posted May 14, 2015 how was it to build this kit where the instructions easy to follow Quote Link to comment Share on other sites More sharing options...
le_marbrier Posted May 15, 2015 Author Share Posted May 15, 2015 how was it to build this kit where the instructions easy to follow No main problem in the building process, the plan is clear, excepted that I have to remove some parts I added to the engine, to place correctly Revell parts, to let the cab go correctly on the frame. Second one was with the opening-door system which was not well fitted. I have to make some surgery cut to let the doors go in their frames. And of course the opening system broke at the first try, too fragile ! I still can open them but very carefully. Here I started the trailer and it's not the same thing....evenso it's a revell one. There are mistakes on the part's number (hopefully you see them quickly) the plan is not clear on the way to place the parts and there are even moulding mistakes on the parts themselves ! Unbelievable ! Quote Link to comment Share on other sites More sharing options...
anarximis Posted June 10, 2015 Share Posted June 10, 2015 wow Quote Link to comment Share on other sites More sharing options...
Tesla Posted June 10, 2015 Share Posted June 10, 2015 You've done a terrific job with this build! Quote Link to comment Share on other sites More sharing options...
le_marbrier Posted June 11, 2015 Author Share Posted June 11, 2015 truck finished, trailer started Quote Link to comment Share on other sites More sharing options...
gatorincebu Posted June 12, 2015 Share Posted June 12, 2015 Franck, You've done one really fine job building the truck! It looks real good. I will be watching to see what and how you do the trailer. Be Well Gator Quote Link to comment Share on other sites More sharing options...
SpreadAxle Posted November 18, 2015 Share Posted November 18, 2015 It looks great. Quote Link to comment Share on other sites More sharing options...
gino Posted November 19, 2015 Share Posted November 19, 2015 nice work ! Quote Link to comment Share on other sites More sharing options...
Recommended Posts
Join the conversation
You can post now and register later. If you have an account, sign in now to post with your account.
Note: Your post will require moderator approval before it will be visible.