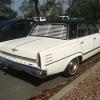
vc273 Posted October 21, 2014 Posted October 21, 2014 Hi completed this one when it was first released but over the years the decals started peeling and looked a bit worse for wear. Had another kit that I didnt need the decals so ended up stripping and soaking the body in water to remove the decals. Polished the body and ended up painting the blackouts instead of using the decals for a cleaner look. Sanded back,polished,bmf and got the rest of the decals on then a couple of clear coats. Light sanding back then polished again and the body is close to being finished. Stripped the interior and am about to repaint. Left the motor how I built it all those years ago as it was the first detailed engine I built. Changed the front rims for ones I found in my parts box and replaced the rear slicks as I thought the original ones looked a bit small. Everything is just in mock up at the moment but hope to have it finished by the weekend. Cheers and thanks for looking
High octane Posted October 21, 2014 Posted October 21, 2014 Looks good to me, and I just love dem Mopars!
booboo60 Posted October 22, 2014 Posted October 22, 2014 Very bright clean build so far! Grill would look great with some black weathering in it! Give ut some depth! U did a super job on the paint!
vc273 Posted October 22, 2014 Author Posted October 22, 2014 Hi thanks for all your comments have bought some auto interior vinyl paint for it to try to get more of an authentic look. Just a matter of interest when I was sanding the paint I had accidentally got some dish-washing liquid on the wet and dry and to my surprise the section came out so much better than using just water I finished the whole body using it. Was it just luck or has anyone else used this method cutting back their paint work. Cheers and thanks again.
62rebel Posted October 23, 2014 Posted October 23, 2014 i always add some Dawn to my sanding dip water. keeps the paper clean longer and helps disperse residue.
Recommended Posts
Create an account or sign in to comment
You need to be a member in order to leave a comment
Create an account
Sign up for a new account in our community. It's easy!
Register a new accountSign in
Already have an account? Sign in here.
Sign In Now