Dragline Posted July 3, 2014 Share Posted July 3, 2014 (edited) In between a multitude of commision builds i have somehow found some time for a few of my own. I have a Mad Max II build which just needs a few glamour shots to be considered finished. But between all these Aviation, Armor and Maschinen Kreiger builds i have found time for my personal passion Drag Raciing. Here is a sorta WIP already well along for the latest modified reissue of the 1967 Malco Gasser Mustang. I used Acryilic paints almost exclusively through my airbrush. I used Tamiya and Vallejo Acrylic paints throughout this build. The only mods were a scratchbuilt blower drive since the stock one was pathetic and a few other mods not worth mentioning. The Acrylic clearcoat was not polished since the originals were not perfect. I did use Duplicolor color coats that I had om hand for the light and dark blue colors. i also used MM buffing metalllics where I felt they were needed. The finished model will be shown soon here in the Drag Racing section. Edited July 3, 2014 by Dragline Quote Link to comment Share on other sites More sharing options...
PappyD340 Posted July 3, 2014 Share Posted July 3, 2014 Looks great Bob!! Quote Link to comment Share on other sites More sharing options...
slusher Posted July 3, 2014 Share Posted July 3, 2014 Super sharp already... Quote Link to comment Share on other sites More sharing options...
1 bad55 stan Posted July 3, 2014 Share Posted July 3, 2014 Thats cool,looks like your doing a fine job! Quote Link to comment Share on other sites More sharing options...
mnwildpunk Posted July 3, 2014 Share Posted July 3, 2014 Looks nice Quote Link to comment Share on other sites More sharing options...
bobthehobbyguy Posted July 3, 2014 Share Posted July 3, 2014 Nice start. Quote Link to comment Share on other sites More sharing options...
Dragline Posted July 3, 2014 Author Share Posted July 3, 2014 Thanks for the kudos fellas. I must say that the kit instructions for this kit are typical 70's MPC. Lots of ambiguous parts placement call-outs and questionable mating surfaces. It's almost like the builder must be his own machine shop and test fitting everything is an absolute must. I think I removed every locating pin on the kit before I glued a single part together. I also removed about 40% of the chrome as well. The seats are proving tricky to paint since they have dark blue stripes on a few of the tuck and roll parts. It gave me fits tonight but since I'm using acrylics, if i don't like the result some reduced ammonia removes the paint for another try. I thought far enough ahead to use white laquer for the seat paint so it is unaffected by my goof-ups till I get it perfect. It's still a great kit that is going to look unique in my display case. Quote Link to comment Share on other sites More sharing options...
am73grand Posted July 3, 2014 Share Posted July 3, 2014 Looks awesome so far!!!! Quote Link to comment Share on other sites More sharing options...
dragcarz Posted July 3, 2014 Share Posted July 3, 2014 Looks great Quote Link to comment Share on other sites More sharing options...
Truck parts Posted July 4, 2014 Share Posted July 4, 2014 It's off to good start. Now I need to get this kit. Quote Link to comment Share on other sites More sharing options...
Terminator-Fox Posted July 4, 2014 Share Posted July 4, 2014 Currently building this kit as well. I like the mag look you put on the wheels. I hope mine turns out as nice! Quote Link to comment Share on other sites More sharing options...
Speedfreak Posted July 4, 2014 Share Posted July 4, 2014 Very nice Bob! Best one I've seen so far. That blue you put on the body and your use of colors/finishes overall is superb. Quote Link to comment Share on other sites More sharing options...
MikeBoyle Posted July 5, 2014 Share Posted July 5, 2014 Excellent work. Quote Link to comment Share on other sites More sharing options...
Dragline Posted July 5, 2014 Author Share Posted July 5, 2014 Wow, first time anyone has called my model anything superb. High praise indeed and I thank you sir. I am digging the color as well. It's Duplicolor Perfect Match BGM0539 Lt Mett Blue and BCC0422 Intense blue pearl for those who are digging them. I think the Lt Blue is a dead nuts on flake wise for the real car if a shade darker overall. The wheel flares were airbrushed with Tamiya metallic blue thinned a bit. I think I'm going to change the blower belt since the idler should direct the belt to the inside not outside like I have it. These Duplicolor paints do like to blush so make certain it's pretty dry when you use them. But after experimenting I found that even large blush spots completely dissappear with clearcoat on them. I finished the headers and am about to blue them with some acrylic and the seats are done. What a pain it was painting those dark blue stripes on those little seats. Pics perhaps by Sunday. I should have it finished by the beginning of the week. Bob Quote Link to comment Share on other sites More sharing options...
Speedfreak Posted July 6, 2014 Share Posted July 6, 2014 (edited) Bob, I bought this kit today at my LHS, Thanks! And thanks for the tips on building it. Gene Edited July 6, 2014 by Speedfreak Quote Link to comment Share on other sites More sharing options...
Jade043 Posted July 6, 2014 Share Posted July 6, 2014 Very cool! Quote Link to comment Share on other sites More sharing options...
John Teresi Posted July 7, 2014 Share Posted July 7, 2014 Bob……..such a Great looking model……..AWESOME!!!!!! Quote Link to comment Share on other sites More sharing options...
LunaticRick Posted July 7, 2014 Share Posted July 7, 2014 Beautiful work Bob, I agree the job you've done here is simply outstanding!!! Quote Link to comment Share on other sites More sharing options...
Truck parts Posted July 10, 2014 Share Posted July 10, 2014 Great job!!!!!!!!!!!!! Quote Link to comment Share on other sites More sharing options...
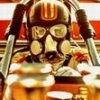
Dragline Posted July 10, 2014 Author Share Posted July 10, 2014 A little update here. I decided to rework the header since drilling them was proving frustrating. I am making them out of aluminum and after a bit of cleaning up and Alclad they should be much better. I am almost done with the drivers side which was tricky since the steering shaft goes between the center two. Here is the pass side mock up and the blower belt correctly routed. Bob Quote Link to comment Share on other sites More sharing options...
rustybill1960 Posted July 11, 2014 Share Posted July 11, 2014 Awesome! Thank You for sharing looking forward to this build up Later Russ Quote Link to comment Share on other sites More sharing options...
Dragline Posted April 20, 2015 Author Share Posted April 20, 2015 Is finished. Took long enough but I've cut off commission build and am only building for my dad and myself. The rest in "Under Glass, Quote Link to comment Share on other sites More sharing options...
MAGIC MUFFLER Posted April 21, 2015 Share Posted April 21, 2015 Congrats!!!!! It turned out really nice and thanx for sharing this one. A quick note: My friend actually sold the real car. I remember sitting in it and was kind of blown away by the interior work. I think I took some pics sitting in the drivers seat. I also worked for Ohio George on his '33 Willys and had George sign some things for me. I started this kit about 20 yrs ago and then shelved it. Almost done and your pics are inspiring me to jump on it and finish it this year. I have many drag cars started and put on the back burner because I got so involved in building my Blown Fuel Altered the last 10 yrs. Time to get on the kits again! Cheers Quote Link to comment Share on other sites More sharing options...
Dragline Posted April 21, 2015 Author Share Posted April 21, 2015 Inspiring? Then my work is done here. Thanks Bob Quote Link to comment Share on other sites More sharing options...
Recommended Posts
Join the conversation
You can post now and register later. If you have an account, sign in now to post with your account.
Note: Your post will require moderator approval before it will be visible.