Semi Trailer Mechanic Posted April 24, 2010 Share Posted April 24, 2010 Lookin' Good!!! I like the way these old cars were set up between the 70's and the late 80's. I too had some PRO-TRACs on a 1972 442 Olds I had in high school. Try to find a 442 Olds w/ a flawless body for under $1,200.00 these days!!! Quote Link to comment Share on other sites More sharing options...
Jeff Sauber Posted April 24, 2010 Author Share Posted April 24, 2010 (edited) Lookin' Good!!! I like the way these old cars were set up between the 70's and the late 80's. I too had some PRO-TRACs on a 1972 442 Olds I had in high school. Try to find a 442 Olds w/ a flawless body for under $1,200.00 these days!!! Thanks...Yeah, I always thought that one day I'd just grab another camaro or GTO and start again with a 1:1 project. Unfortunately, even one in rough condition these days are fairly expensive..I don't even see all that many out on the road anymore. Back in the 80's these things were a dime a dozen. Now they are becoming few and far between. Edited April 24, 2010 by J. Sauber Quote Link to comment Share on other sites More sharing options...
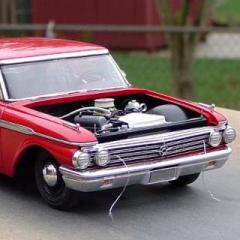
caine440 Posted April 24, 2010 Share Posted April 24, 2010 It is looking great! Your work on the grille is killer! Well done! Quote Link to comment Share on other sites More sharing options...
Jeff Sauber Posted April 25, 2010 Author Share Posted April 25, 2010 Another small update today.....Been getting a little more done with the chassis and some real nice photoetch from the model car garage... Next up will be the driveshaft saftey loop... Quote Link to comment Share on other sites More sharing options...
Scalper Posted April 25, 2010 Share Posted April 25, 2010 Awww Man that looks so good so far Nice job on the grill. Love the chevy emblem on it. Keep up the good work. Quote Link to comment Share on other sites More sharing options...
Ben Posted April 25, 2010 Share Posted April 25, 2010 Awww Man that looks so good so far Nice job on the grill. Love the chevy emblem on it. Keep up the good work. Coooool! I like that blue Chevy emblem on the grill! It's just like the one on my 1:1 that i'm restoring/upgrading the entire front end on right now. Quote Link to comment Share on other sites More sharing options...
Semi Trailer Mechanic Posted April 25, 2010 Share Posted April 25, 2010 Thanks...Yeah, I always thought that one day I'd just grab another camaro or GTO and start again with a 1:1 project. Unfortunately, even one in rough condition these days are fairly expensive..I don't even see all that many out on the road anymore. Back in the 80's these things were a dime a dozen. Now they are becoming few and far between. I agree!! I seldom see these cars except for when the GoodGuys show comes to town or if there's a cruise - in somewhere. In 89 I bought a rust free "STRONG RUNNING" 70 Chevelle for 600.00 I actually bought parts for that car at a local Chevy dealer after a fender bender. The parts catalog looked like an antique. I remember laughing about it along w/ the parts guy as he acted like he blew dust off of it. BUT HEY GM still had the parts available. I broke down and sold that car a little over a year and a half ago to a fella that's been trying to get me to sell that since 1993. Keep up the good work!!! Quote Link to comment Share on other sites More sharing options...
Jeff Sauber Posted April 25, 2010 Author Share Posted April 25, 2010 I've gotten a bit further along with the underside...I did some detail painting and more adjusting. I should have the chassis pan finished up by tomorrow, and then I'll move on to the engine bay. I rotated the pics around to give the image the feel of looking at the car as if it was up on a lift.....Thought I'd try something different rather than the typical lying flat on the table routine...More to come Quote Link to comment Share on other sites More sharing options...
Raul_Perez Posted April 25, 2010 Share Posted April 25, 2010 All of the little hardware details look GREAT, Jeff!! Later, Quote Link to comment Share on other sites More sharing options...
Jeff Sauber Posted April 25, 2010 Author Share Posted April 25, 2010 All of the little hardware details look GREAT, Jeff!! Later, Thanks Raul, I'm using some photoetch stuff from the model car garage and Pro Tech. I hope to get to the engine bay today and will try and plumb & wire a few things. The MCG photoetch kit for this car is real nice. I'm looking forward to using it on the interior and body. It will really make the model pop. Quote Link to comment Share on other sites More sharing options...
AMT Pacemakers Posted April 25, 2010 Share Posted April 25, 2010 Killer... you going to put some turn downs on the exhaust? CCSS Quote Link to comment Share on other sites More sharing options...
Jeff Sauber Posted April 25, 2010 Author Share Posted April 25, 2010 (edited) Killer... you going to put some turn downs on the exhaust? CCSS I had thought about it, but back on my 1:1, I just had the mufflers set up like this...I got pulled over a few times....sometimes the cops told me I had to run the exhaust all the way to the back of the car, but I guess it depended on the officer's mood those particular days..LOL. A couple of turndowns might look good on the model though, I may go ahead and add some on just to give it a more completed look.... Edited April 25, 2010 by J. Sauber Quote Link to comment Share on other sites More sharing options...
Hillbilly Deluxe Posted April 25, 2010 Share Posted April 25, 2010 Fantastic job Jeff!!! Where did you get the "bowtie" emblem really nice touch? Quote Link to comment Share on other sites More sharing options...
Jeff Sauber Posted April 25, 2010 Author Share Posted April 25, 2010 Fantastic job Jeff!!! Where did you get the "bowtie" emblem really nice touch? The bowtie is from the Model Car Garage photoetched detail kit...It's about 15 bucks for the set, but it's worth it. It comes with really nice items for the body and interior... Quote Link to comment Share on other sites More sharing options...
caine440 Posted April 25, 2010 Share Posted April 25, 2010 You should give classes on how to work with the PE stuff! Looks great! I tried it and failed miserable at it! Quote Link to comment Share on other sites More sharing options...
Jeff Sauber Posted April 26, 2010 Author Share Posted April 26, 2010 (edited) I worked top side a bit more tonight, and added in some plumbing...Theres a lots more to do, but so far so good. next I'll be working on the core support/radiator unit. Edited April 26, 2010 by J. Sauber Quote Link to comment Share on other sites More sharing options...
Scalper Posted April 26, 2010 Share Posted April 26, 2010 Holy Engine Batman. That is great Work. Quote Link to comment Share on other sites More sharing options...
Pro Tech Posted April 26, 2010 Share Posted April 26, 2010 Jeff, great job!! nice touch with the fuel line scuff protectors at the valve cover, just wondering what did you use for ties? Charlie Pro Tech Quote Link to comment Share on other sites More sharing options...
shucky Posted April 26, 2010 Share Posted April 26, 2010 Jeff, this build looks great so far. Engine detailing is superb! I'm diggin the stance also, looks mean. I saved your engine photos for future reference lol ... Great job man! Quote Link to comment Share on other sites More sharing options...
plasticfrog Posted April 26, 2010 Share Posted April 26, 2010 You do a awesome job on detail Quote Link to comment Share on other sites More sharing options...
Jeff Sauber Posted April 26, 2010 Author Share Posted April 26, 2010 Jeff, great job!! nice touch with the fuel line scuff protectors at the valve cover, just wondering what did you use for ties? Charlie Pro Tech Thanks, Charlie.....The scuff protectors are just some black rubber tubing sliced open on one side and slipped over the braided hose, and the ties are just really thin strips of aluminum tape. I found out the hard way with my 1:1 that fuel lines rubbing against metal parts isn't really a good idea....LOL. So I cut some sections of heater hose and wrapped the undersides of the A/N lines and secured them with silver zip ties. I did the same thing on my 1:1 '68 mercury Cyclone... Quote Link to comment Share on other sites More sharing options...
Jeff Sauber Posted April 26, 2010 Author Share Posted April 26, 2010 awesome work Jeff! bringing back some memories for me too. i had my fuel lines run the same way and over to the passenger side fenderwell. no braided line for me though it was just regular rubber line i thought i'd fail tech at the track, but it passed. i thought the NHRA rule was no more than 12" of rubber line. i ran 15x3.5 Centerlines on the front of my car for awhile with plain 15x7 Chevy rally's on the back and some seriously worn Pro Trac L60's. Dave I had the rubber lines and cheap hose clamps as well for a while, but you're right, the track tech guys hated those set ups..As my car eventually became faster, I had to switch over to real plumbing in order to get the OK to make a few passes up at the [now retired] 75/80 dragaway in Monrovia MD. Ah, those were the good ole days...The smell of Cam 2 race fuel, and burning rubber. Quote Link to comment Share on other sites More sharing options...
Alyn Posted April 26, 2010 Share Posted April 26, 2010 (edited) Love it, Jeff. I can't get enough of your detail work. The coil and carb look great. Good to see you're at the bench. BTW, thanks for the gallery pics. I had already forgotten how nice the detail work was on Christine. Glad to see the reminder pics up top. Edited April 26, 2010 by Alyn Quote Link to comment Share on other sites More sharing options...
Jeff Sauber Posted April 26, 2010 Author Share Posted April 26, 2010 (edited) For tonight's update, I created the moroso "cool can" and plumbed the rest of the fuel system. [sorry the pics are a little fuzzy, I wasn't using a tripod or good lighting.] Tomorrow, I'll get started on the radiator/elec fan/ and remaining cooling system... Edited April 26, 2010 by J. Sauber Quote Link to comment Share on other sites More sharing options...
Raul_Perez Posted April 27, 2010 Share Posted April 27, 2010 Superb detail, as usual!! This will be another awesome build!! Later, Quote Link to comment Share on other sites More sharing options...
Recommended Posts
Join the conversation
You can post now and register later. If you have an account, sign in now to post with your account.
Note: Your post will require moderator approval before it will be visible.