jedimastergary Posted April 27, 2010 Share Posted April 27, 2010 Looks like it is coming along great nice detail watching to see this one done I have a 69 Camaro that I am thinking of building a street racer out of now I think I would not do as good as you might just change motor and wheels never liked the 302 in a camaro when you could have bigger like a 427 Quote Link to comment Share on other sites More sharing options...
Jeff Sauber Posted May 6, 2010 Author Share Posted May 6, 2010 Got a little more done tonight on the radiator/core support assembly...I combined both photoetched items as well as a bit of scratchbuilt parts and ran some of the basic wiring....more to come. Quote Link to comment Share on other sites More sharing options...
cruz Posted May 6, 2010 Share Posted May 6, 2010 This is awesome Jeff, thanks for sharing!!! Quote Link to comment Share on other sites More sharing options...
Tumbler75 Posted May 6, 2010 Share Posted May 6, 2010 This is going to look fantastic when done! The extra attention to details looks killer! I really like it. Keep them updates comin'! Quote Link to comment Share on other sites More sharing options...
crazyjim Posted May 6, 2010 Share Posted May 6, 2010 I can't believe the detail on your engine. Looks awesome! Quote Link to comment Share on other sites More sharing options...
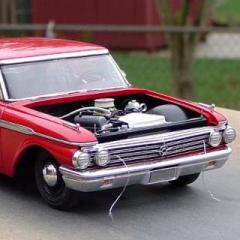
pharr7226 Posted May 6, 2010 Share Posted May 6, 2010 Very nice detail work. The cool can and radiator really caught my attention. Keep up the great work. Quote Link to comment Share on other sites More sharing options...
Romell R Posted May 6, 2010 Share Posted May 6, 2010 1st let me say I hope you get better soon, 2ndly I am impressed with your level of building expertise. I love a clean build and one that you can tell the builder has put his heart into. keep up the excellent work and i will be following along. Have a great day ! Romell Quote Link to comment Share on other sites More sharing options...
Jeff Sauber Posted May 7, 2010 Author Share Posted May 7, 2010 Thanks for the comments guys.... With the engine and chassis mostly completed, I'll be turning my attention to the interior. the majority of it will be built and modified from the kit supplied parts, but I'll have to add in a 6 point cage, and a few other scratchbuilt details. The MCG phtotetched items will really make things pop.. Quote Link to comment Share on other sites More sharing options...
Raul_Perez Posted May 7, 2010 Share Posted May 7, 2010 I really like the way you make a complete model out of each subassembly...awesome attention to detail!! Keep it up...you're almost there!! Later, Quote Link to comment Share on other sites More sharing options...
Wayne Buck Posted May 7, 2010 Share Posted May 7, 2010 OUTSTANDING job so far!!! Your builds are totally mind blowing! Can't wait to see this one finished! Quote Link to comment Share on other sites More sharing options...
beefheart22 Posted May 7, 2010 Share Posted May 7, 2010 Holy moly! The amount of detail is incredible. Loving the grill and the engine is nothing short of remarkable! Quote Link to comment Share on other sites More sharing options...
Jeff Sauber Posted May 10, 2010 Author Share Posted May 10, 2010 I was able to get a little bench time in this weekend and detailed the dash...I used some scratchbuilt stuff as well as some PE items from MCG...next up will be the inner door panels... Quote Link to comment Share on other sites More sharing options...
Romell R Posted May 10, 2010 Share Posted May 10, 2010 Im lovin your work keep the pics commin!!! Quote Link to comment Share on other sites More sharing options...
Jeff Sauber Posted May 10, 2010 Author Share Posted May 10, 2010 (edited) what, no hacked up dash for a modern head unit? i drilled a hole through my very nice dash pad too for a tachometer. very nice work on that dash! Dave Thanks Dave, actually, the stock interior was the one thing I never really butchered up on my 1:1.. I used the factory tach and speedo...then when I went with the big block swap, I added a few extra gauges, a 6 point pre-fabbed cage [ordered from the old "PAW" catalog], and one those Sun tachs strapped to the steering column. For the model I'm just going with a fairly stock layout except for a drivers side harness and a 4 or 6 point cage.......[depending on if I decide to add in the door bars]...We customized the cage and added those "swing out" door bars on my 1:1, but I never really used them much since I drove the thing on a daily basis....I just left them off unless it was track day. Edited May 10, 2010 by J. Sauber Quote Link to comment Share on other sites More sharing options...
Jeff Sauber Posted May 10, 2010 Author Share Posted May 10, 2010 Im lovin your work keep the pics commin!!! Thanks, I'm having alot of fun with this kit. The tooling is decent and it really has the look and feel of the 1:1 car. The chassis and body fit is real tight, so mock ups have to be performed with alot of care. I'll try and get the interior side panels done today and then the seats, if there's time......Jeff Quote Link to comment Share on other sites More sharing options...
Raul_Perez Posted May 10, 2010 Share Posted May 10, 2010 The dash pics look great, Jeff. What did you use for the woodgrain? Later, Quote Link to comment Share on other sites More sharing options...
Jeff Sauber Posted May 10, 2010 Author Share Posted May 10, 2010 The dash pics look great, Jeff. What did you use for the woodgrain? Later, The fake woodgrain is a piece of shelf paper/drawer liner...It's a similar tone and shade as my 1:1 had.....Looks just as cheesy too....LOL. My car had the fake wood trim inserts at the wiper/headlight switch and above the glove box, instead of the grab handle option. Quote Link to comment Share on other sites More sharing options...
Scalper Posted May 10, 2010 Share Posted May 10, 2010 Wow the dash is looking great, Great work. yes the chassis to body is a very tight fit. Same issue with mine that I have a wip for link is in my sig. Keep up the great model buidling. Quote Link to comment Share on other sites More sharing options...
Jeff Sauber Posted May 11, 2010 Author Share Posted May 11, 2010 Got the door panels done....Next up, the seats and belts. Quote Link to comment Share on other sites More sharing options...
Nick Winter Posted May 11, 2010 Share Posted May 11, 2010 Jeff those are un-freakin-beleavible Quote Link to comment Share on other sites More sharing options...
Pro Tech Posted May 11, 2010 Share Posted May 11, 2010 Jeff, super job on the dash and door panels, beautiful trim work bud! Charlie Pro Tech Quote Link to comment Share on other sites More sharing options...
Art Laski Posted May 12, 2010 Share Posted May 12, 2010 Very nice work. I love the open grill. What bit did you use in the Dremel? Also, did the ignition coil come with the kit? I need to add one to a Corvette 427 on the bench. Art Quote Link to comment Share on other sites More sharing options...
Jeff Sauber Posted May 12, 2010 Author Share Posted May 12, 2010 (edited) Very nice work. I love the open grill. What bit did you use in the Dremel? Also, did the ignition coil come with the kit? I need to add one to a Corvette 427 on the bench. Art Art, these are the two bits I used..I nearly wrecked the grill a couple of times because of the rate the plastic was being removed...Make extra sure you go very slowly and check your work often. It's very easy to burn through everything if you're not carefull. One of the reasons it may have been so tough for me was I used a single speed tool..You're likely better off using a multi speed version and setting it to the slowest speed for better control... I scratchbuilt the coil from 2 different sizes of evergreen rod and aluminum sheet [for the hold down bracket]. The coil that comes with the kit isn't bad though. You can drill it out and wire it if you'd like. Mine unfortunately got misplaced, so I had to go the scratchbuilding route instead. Edited May 12, 2010 by J. Sauber Quote Link to comment Share on other sites More sharing options...
TimKustom Posted May 12, 2010 Share Posted May 12, 2010 Great detail going on here Jeff. I've built several of these Camaros and hope a trick I learned along the way can be useful to you. It looks like you haven't got into the bodywork yet. The rear pan fits terribly on this kit. I've glued that on, filled the seams, then rescribed them. Next, cut the lower front valence off at the body lines. It's pretty easy to make a "backer" inside the fenders so aids in the fit and gives a nice place to glue it during final assembly. This also solves an issue with the fit of the radiator support. As the kit is designed, Its real tricky to get the body on without snapping the support loose. It's a very tight fit. Without the front valence, it slides in no problem. Looking forward to more progress. Quote Link to comment Share on other sites More sharing options...
Raul_Perez Posted May 12, 2010 Share Posted May 12, 2010 WOW!! Photo etch works really well for that steering wheel. I remember those from '69...they were really thin. This whole build is coming along very nicely!! I can hardly wait to see the finished model!! Later, Quote Link to comment Share on other sites More sharing options...
Recommended Posts
Join the conversation
You can post now and register later. If you have an account, sign in now to post with your account.
Note: Your post will require moderator approval before it will be visible.