diymirage Posted January 2, 2009 Share Posted January 2, 2009 (edited) hey guys i finally found a sweet little dio kit its a garage set i snatched of ebay for about 35 bucks shipped im hoping to have it here by the end of next week so if anyone has any advice im listening heres a picture of the box Edited April 10, 2009 by diymirage Quote Link to comment Share on other sites More sharing options...
Eshaver Posted January 3, 2009 Share Posted January 3, 2009 The box is not really a true representation of any shop where I worked . It's way too small for one thing and I can certainly help if you want me to . I don't know exactly where you wish to take this assemblage . tell us where you might want to go with it and maybe I'll have a suggestion . Ed Shaver Quote Link to comment Share on other sites More sharing options...
randx0 Posted January 3, 2009 Share Posted January 3, 2009 Try not to over do the scene by trying to put everything in the box into your display plan it out and try to tell a story for example a teenaged girl and her father working on changing the oil a simple job that doesn't require a lot of tools and is easy to convey to the veiwer.sometimes simpler is better in a diorama. Quote Link to comment Share on other sites More sharing options...
randx0 Posted January 3, 2009 Share Posted January 3, 2009 also those garages are available without the tools if you need more space. Quote Link to comment Share on other sites More sharing options...
Scott H. Posted January 3, 2009 Share Posted January 3, 2009 I bought the kit way back in '88 or '89 when I first saw it. Ed is right on the money with the size of the base. If you wish for it to be big enough to look like a decent garage, you're going to need 3 more base kits. The tools in the kit are nice and can be built well, but like Rand said if you put everything on a single base a car will not fit in there too. The K.I.S.S. principle definitely applies here. What I used to use mine for before an ex girlfriend destroyed it, among several other of my models, was as a back drop for taking pictures of my models. It worked GREAT for that!!! The biggest suggestion I have is to put a clear coating of some sort to seal the CARDBOARD walls on the kit! White glue is what I used on mine after the walls started bowing due to the humidity this state ALWAYS has. Over all, I think it's going to be a good first start for you. Not too difficult to assemble, but it has enough details to keep you interested. Hope this helps, -Scott H. Quote Link to comment Share on other sites More sharing options...
Exotics_Builder Posted January 3, 2009 Share Posted January 3, 2009 The only time I’ve seen these, or the base Fujimi Garage sets used in the single setup is for a one car display base. Otherwise, you’ll need multiple sets to make a more realistic garage. The set is modular, but a more reasonable approach may be looking at a 2 or 3 bay diorama set from Scale Modeling by Chris. Quote Link to comment Share on other sites More sharing options...
diymirage Posted January 3, 2009 Author Share Posted January 3, 2009 (edited) thanks for all the advise guys what i mainly wanted this for is 1 a backdrop for my pictures (i mean, look at this one, with a nice backdrop this would look very realistic but the cannisters kind of give it away) 2 as a first step into building dioramas. it seemed like an easy enough kit to get started with, nothing to major so it would be nice practice. all the "exces" tools could be positioned by my other cars i have sitting on shelves, just to give them a little more life. scott, thanks for the heads up on the walls, to be honoust i didnt realise these were cardboard not sure if i like that or not. im kinda exited with the possibilities of that, as far as photocopying and scanning and modifying goes. Edited January 3, 2009 by diymirage Quote Link to comment Share on other sites More sharing options...
Eshaver Posted January 4, 2009 Share Posted January 4, 2009 AH HA, you want a photo back drop there Eelco, no problem! You engineers alway have to go to such great detail to tell us design folks what ya want . Look I posted a tutorial over at Bluesmans new site that utilizes Foam core . I wont rehash stuff here but the stuff is white , runs about 3,00 a sheet and will "Reflect the light back over the model you are photographing nicely. To glure the boards , use any "White" glue or epoxy. Now if you're going to have exposed edges , I strongly sugest you "Seal" the edges first with either White glue or epoxy. Most primers will attack the foam. You can paint the faces with most any kind of paint . My service stations have used Velvet finish for a Concrete look and Stone for a Stucco look. To reinforce the glued joints use straight pins through the joints . If you need help, please E-mail me . Ed Shaver Quote Link to comment Share on other sites More sharing options...
Mike Whatshisname Posted January 7, 2009 Share Posted January 7, 2009 Eelco, Not sure what kit Capt. Bondo is referring to but this kit has hard plastic styrene walls, much sturdier than cardboard. As the fellows have mentioned, one of these "modules" would be too small for displaying a model with a "ton" of details in the backround. I have done a couple of these together (see pics below) and ended up turning what was going to be a backdrop for taking photos into a full fledged "Hobby Garage" with a ton of different projects going on. I covered the plain plastic walls with cinder block sheets from plastructs and with stained balsa. I scratchbuilt most of the tools and furniture but used much of the kit tools first. You can get an idea about how big these 2 kits together would be by the small model T rod in the left front corner of the dio (covered with a tarp and a ton of boxes). Model Car Magazine ran a 3 part article in what I think was the August, Oct, and DEc issues of 2007 on building this type of dio. Maybe that can help you with your dio building. If you live in the states, I may have an extra base and walls from this kit that I can donate to help widen your dio. Lmk if i can help in any way. Quote Link to comment Share on other sites More sharing options...
diymirage Posted January 8, 2009 Author Share Posted January 8, 2009 that looks awesome mike that is pretty much waht i am gettting at i figured this kit is a good start, partially because it has soo much tools and stuff to go with it im kinda excited to hear it has styrene walls wish it would get here yet, silly snailmail Quote Link to comment Share on other sites More sharing options...
Scott H. Posted January 8, 2009 Share Posted January 8, 2009 (edited) Not sure what kit Capt. Bondo is referring to but this kit has hard plastic styrene walls, much sturdier than cardboard. If the walls in your pictures are the ones supplied in the kit you bought, it looks like they have updated the kit. The walls my kit were cardboard and only had a printed stucco looking texture on them, not bricks like is in your pictures. I honestly hope that they did update the kit since I bought mine and started including styrene walls instead of the cardboard ones I received. It would make a much better display if they did! I like the way your diorama turned out! It's just busy enough to look like a real garage without being over done. -Scott H. Edited January 8, 2009 by Scott H. AKA Cpt. Bondo Quote Link to comment Share on other sites More sharing options...
george 53 Posted January 8, 2009 Share Posted January 8, 2009 Eeet looks jus like my cousin Rickey's Auto Body Chop! Open 24 hrs , no cobber charsh anytine! Makes me homesick! I likeses eet! Quote Link to comment Share on other sites More sharing options...
Eshaver Posted January 8, 2009 Share Posted January 8, 2009 George, if your relatives body shop is open 24hrs, then that means that boredom has really set in inside the Detroit area! No wonder the state is losing population ! Ed Shaver Quote Link to comment Share on other sites More sharing options...
Eshaver Posted January 8, 2009 Share Posted January 8, 2009 George, if your relatives body shop is open 24hrs, then that means that boredom has really set in inside the Detroit area! No wonder the state is losing population ! Ed Shaver Quote Link to comment Share on other sites More sharing options...
Eshaver Posted January 8, 2009 Share Posted January 8, 2009 George, if your relatives body shop is open 24hrs, then that means that boredom has really set in inside the Detroit area! No wonder the state is losing population ! Ed Shaver Quote Link to comment Share on other sites More sharing options...
Eshaver Posted January 8, 2009 Share Posted January 8, 2009 George, if your relatives body shop is open 24hrs, then that means that boredom has really set in inside the Detroit area! No wonder the state is losing population ! Ed Shaver Quote Link to comment Share on other sites More sharing options...
Eshaver Posted January 8, 2009 Share Posted January 8, 2009 George, if your relatives body shop is open 24hrs, then that means that boredom has really set in inside the Detroit area! No wonder the state is losing population ! Ed Shaver Quote Link to comment Share on other sites More sharing options...
diymirage Posted January 13, 2009 Author Share Posted January 13, 2009 im so excited i just recieved news from the inlaws the kit has arived in the mail will be a few days before i can actually build it Quote Link to comment Share on other sites More sharing options...
Rick Schmidt Posted January 13, 2009 Share Posted January 13, 2009 I bought the tools that came with that set and have been using them to stock my own shop which serves as my backdrop for pictures Obviously everything in there didn't come with the set but the pics give ya a decent idea Build the 2 post lift right and it's adjustable and will hold a car up Here's the rest of the pics I don't have everything in there but will eventually http://s34.photobucket.com/albums/d143/mid...dknight%20shop/ Quote Link to comment Share on other sites More sharing options...
diymirage Posted January 13, 2009 Author Share Posted January 13, 2009 awesome part of the reason i choose this kit is because of all the tols included cant wait to get started on it that wall you have looks nice, is it styrene ? Quote Link to comment Share on other sites More sharing options...
Mike Whatshisname Posted January 13, 2009 Share Posted January 13, 2009 Nice set-up you have there Rick! Great job with that kit and the tools... Quote Link to comment Share on other sites More sharing options...
Rick Schmidt Posted January 14, 2009 Share Posted January 14, 2009 Walls are printed bricks on paper stuck on wood ... The doors were found on some website that sells doors I copied em and resized to fit my needs and put them where I needed em Quote Link to comment Share on other sites More sharing options...
diymirage Posted January 15, 2009 Author Share Posted January 15, 2009 finally piched her up today im very excited about the tools and stuff but a little bit disapointed in the size sooooooo i am going to completly scavenge this kit and just build my own base for it (floor and 2 walls) using the tools, door and window from the kit this might take a while because i get the keys to my house today so im gonna be swamped the next few weeks Quote Link to comment Share on other sites More sharing options...
Mike Whatshisname Posted January 15, 2009 Share Posted January 15, 2009 HOUSE! HOUSE! You don't need no steenkin' house! Get going on that diorama!!! LOL! Seriously, Good Luck with the new house Eelco and keep us updated on dio progress. Quote Link to comment Share on other sites More sharing options...
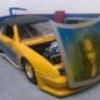
diymirage Posted April 10, 2009 Author Share Posted April 10, 2009 well guys, here is an update i built the base a while ago but i didnt tape it of properly (painted the bottom of the wall blue , you'll see) so it had terrible overspray i tried fixing it and ended up having to wait untill i could find new material for the base today i finally found some at my job and went right to town the new base measures 17X24 and the walls are 24 inches high everything is 1 inch thick foam when i got the foam it had a sticker on there and i peeled this of leaving a paper residue behind i was hoping this would give the walls and floor a nice "concrete" looking texture and i am not disapointed with the way it came out here is a quick mock up i still need to paint and install the door and dare i say it ...scratchbuild an overhead door (it wont be functional but it will look like it is) the walls are just taped together and none of the tools/equipetment is painted yet but i just had to share Quote Link to comment Share on other sites More sharing options...
Recommended Posts
Join the conversation
You can post now and register later. If you have an account, sign in now to post with your account.
Note: Your post will require moderator approval before it will be visible.